Create a Notification in StREAM@Leeds - SES Guide
Important: Only Faculty Student Success Officers can create Notifications for their respective school or faculty. School SES staff who support digital engagement monitoring then help manage these Notifications.
If you would like to know about how Notifications are managed in your School, please contact the relevant SES colleagues for more information.
Please remember that Notifications should only be created as agreed in school level guidance on the use of Notifications. Before creating your first Notification, we recommend you read through all the steps to get a sense of the information you'll need to enter to create a Notification.
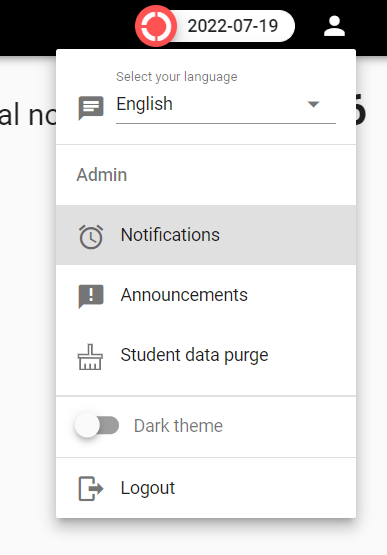
2. Click on the person icon in the top right of the screen to open the user selection menu and select Notifications from the drop-down menu. If you do not see this option, you do not have the permissions to create a Notification. If you think you should be able to do this, please raise a support request via the IT Service Desk
This will open the Notifications page where you will find a list of all the Notifications that have already been created in StREAM@Leeds. You'll be able to see the total number of Notifications that have been created along with a search function in the top left of the page.
Each Notification that is listed includes:
- The name of the Notification.
- An icon depicting whether the Notification is a standard alert (a clock icon) or a positive Notification (green thumbs up icon).
- Status slider which allows users to quickly make a Notification active/inactive.
- Copy button to allow users to quickly create a duplicate using the criteria of the selected Notification.

3. Click the Create New button which is in the top right of the screen. You will be taken to a new Notification creation page. Down the left-hand side of the page you'll find a workflow outlining each of the sections that needs to be completed in order to set up the Notification.
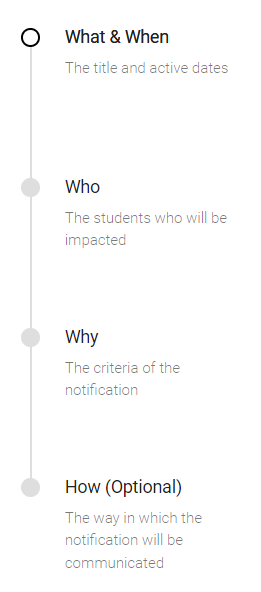
The What & When section
4. Start by entering the following details:
-
- Description - enter the name of the Notification. Naming conventions should be consist and allow end users to easily identify the reason the Notification was triggered.
- From - select the first date from which the Notification can trigger.
- To - select the final date the Notification can trigger (you can also set the Notification to trigger indefinitely).
- Notification Frequency – select how often a Notification could trigger (e.g. if a the Notification Frequency is set to every 6 days, a student cannot trigger the same Notification for 6 days after the initial one, even if they meet the necessary criteria).
- Status - use the on/off slider to toggle to turn the Notification on. You should ensure your Notification status is on even if you are using from and to dates, failure to do this will mean your Notification will not trigger.
5. Click Next to save and move onto the next section
The Who section
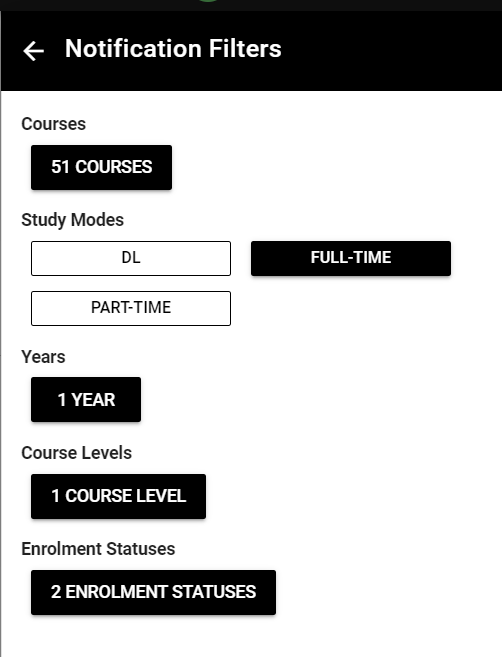
6. You'll now define which students will be impacted by the Notification. Under the Who is impacted by this notification, click Filter to open the Notification Filters side menu.

7. Choose from the options available:
- Courses - select from faculties, schools and/or programmes
- Study modes - (e.g. full-time, part-time, distance learning (DL))
- Years
- Course levels - (e.g. UG, TP, MD, DE)
- Enrolment status - (e.g. RE/RO for registered students)
If you do not select a filter for an option, all of the students that fall within that option will be included. For example, if you do not make a selection in the Study modes section, all the study modes will be included. Make your selections and click Next to move on to the next section.
The Why section
8. You'll now set the criteria for the Notification trigger. Each Notification can have one or multiple criteria (known as 'Data Sets'). Let's look at each one.
Data Set: Resource
Process: Set a Notification to trigger when a specific amount or lack of interactions have been made by a student over a chosen period of time. Here you will need to enter the following details:
- Type – select which Resource Activities you want the Notification to consider
- Threshold – select the logic of the criteria (e.g. less than, greater than, equal to…)
- Sum of day – enter the total amount of interactions (or clicks) you want the Notification to consider in relation to the threshold
- Duration – enter the number of days a student needs to meet the above criteria before triggering a Notification.
Example: By setting up a Notification in the way displayed in the screenshot below, students would trigger a Notification if they have 7 consecutive days where they have 2 or less interactions with a Virtual Classroom system (i.e. MS Teams, Zoom and Collab Ultra).

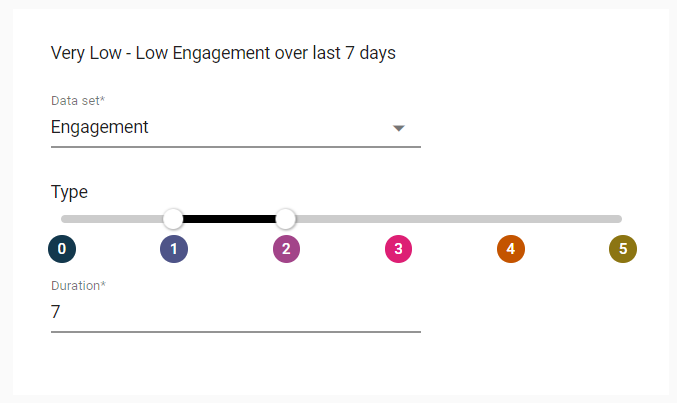
Data Set: Engagement
Process: Set a Notification to trigger when a student has remained within specific Engagement Ratings for a chosen period of time. Here you will need to enter the following details:
- Type – use the slider to select one or a range of Engagement Ratings a student will need to remain within
- Duration – enter the number of days a student needs to meet the above criteria before triggering a Notification
Example: By setting up a Notification in the way displayed in the screenshot below, students would trigger a Notification if they have 7 consecutive days where they have remained in either the Very Low (1) or Low (2) Engagement Rating categories.
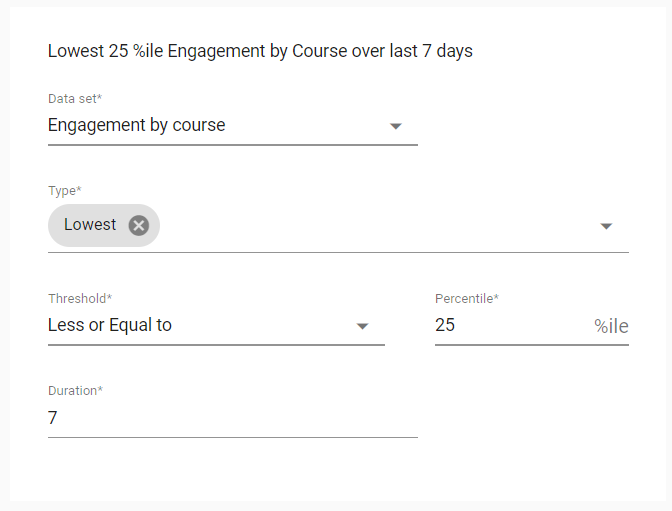
Data Set: Engagement by course
Process: Set a Notification to trigger when a student’s Engagement Ratings have remained below a selected percentile of their cohort for a chosen period of time. Here you will need to enter the following details:
- Type – select which type of quintile you want the Notification to consider (please note that StREAM@Leeds only allows you to select ‘Lowest’ currently)
- Threshold – select the logic of the criteria (please note that StREAM@Leeds only allows you to select ‘Less or Equal to’ currently)
- Percentile – enter the percentile of the cohort you want the Notification to consider (e.g. the bottom 10%)
- Duration – enter the number of days a student needs to meet the above criteria before triggering a Notification
Example: By setting up a Notification in the way displayed in the screenshot below, students would trigger a Notification if they have 7 consecutive days where their Engagement Ratings have remained in the bottom 25% of their cohort.
Data Set: Attendance
You'll see Attendance as a visible option when setting up a Data Set, please be aware that this data is not available in StREAM@Leeds and should not be used.
You can add more than one criteria to a Notification by clicking the + Data Set button. You will then be required to enter information as shown above, as well as select how the criteria relate to each other using AND/OR logic.
9. Make sure to click the Save button whenever you are making changes to the Notification criteria. It’s important to make sure to click the ‘Save’ button every time you make a change to a Notifications criteria, as it will not save automatically.
When you have finished defining your criteria, click Next to move onto the next section. The next section is the 'How' section, this is optional, you may or may not want to complete this step however we would recommend you Check your Notification criteria before finishing (see below).
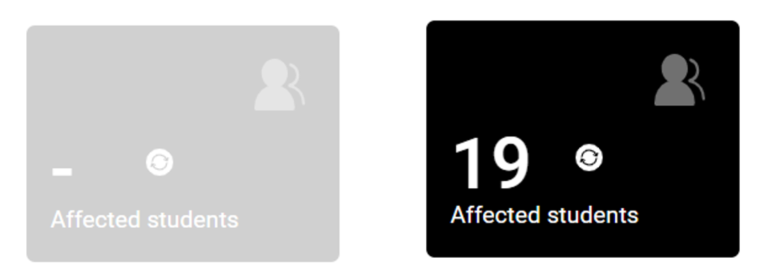
Check your Notification criteria
Once you have selected the Notification criteria, you can quickly see how many students would trigger the Notification if it was to run at that time.
10. Down the left hand side of the Notification creation page, you will find a grey box titled 'Affected students'. Click the round refresh icon within this box (two arrows in a circle) to calculate the number of students that currently meet the criteria you have selected.
The box will change in colour, to black, and show the number of Affected students. If the Affected Students box returns a value of zero, make sure to double check that your criteria and date ranges are correct.
The How section (optional)
This section gives you the option to set up automated emails when the Notification is triggered.
11. Under the, How would you like to deliver the notification heading, select +Delivery method and choose Email from the drop down menu options. This will reveal the email settings to use for the email, you'll now need to enter these.

12. Email Frequency - click on the days you would like emails to be sent out on. Notifications will still trigger on unselected days, however StREAM@Leeds will not send out an email until the next selected day
13. Template Name - enter a name for reference in case you want to set up multiple emails for one Notification. The template name will not appear on the emails that are sent out.
14. To - select who the email should go to. You can select one or multiple recipients, including the student, tutor, or add a specific address checking the Free type box below (remember to click enter to finalise any email addresses you enter this way).
15. Subject - this will be the subject heading that is used in the emails.
16. Email Content - enter the text you want to use in the email, in the box provided. You will have a limited number of font/size options to edit the email’s content. It is also possible to include placeholders here which will auto-populate with specific information about the student who has triggered the notification (e.g. their name). See the Placeholder guidance below on how to use Placeholders within email templates.
17. Use the Email preview window to check everything looks right and click the Save button to finalise your email template.
Using Placeholders in email templates
Placeholders are strings of text that can be used to auto-populate information specific to the student who has triggered the Notification, including their name, tutor or course details. These can be used within the Subject and Email Content area of your email template.
To do this, click Placeholders to reveal a drop down menu which lists the fields you can add. Click on the desired field you want to include. This will then copy the text string onto your computers clipboard, which you can then paste either within the Email Content section, or Subject field. The Email preview window will then display a generic example of how the Placeholder would appear in the template email.

Adding additional email templates
You can add additional email templates for other recipients by again clicking the + Delivery Method button and following steps 11. to 16.
Removing an email template
To remove an email template, simply click the cross icon in the top right of the template.
Tips on creating Notifications
- If a Notification is not triggering, make sure that both the ‘Status’ toggle is switched on, and the From and To dates selected are relevant.
- If you want to make your Notification trigger weekly, make sure to set it’s frequency to 6 and not 7. This will therefore allow a student who triggers a Notification for example on a Monday to trigger a second Notification the following Monday.
- You can make a Notification a Positive Notification by clicking the thumbs up icon found when completing the Why section. Selecting this option will mean the resulting Notifications display a green thumbs up icon rather than a clock icon, connoting a positive flag.
- It’s important to make sure to click the ‘Save’ button every time you make a change to a Notifications criteria, as it will not save automatically. If you want to check whether the criteria has saved correctly, simply click the ‘Back to Notifications’ option at the top of the view, then reopen the Notification to check it is correct.
- Remember, you can also use placeholders in the ‘Subject’ field of an email template to create distinctive email titles that are easier to search for.