Create bookable meeting slots using Microsoft Bookings with Me
Video Guide
The written guide can be found below.
Written Guide
You may want to consider using Microsoft Bookings with Me to arrange meetings with your tutees. By using Microsoft Bookings with Me to set-up your APT meetings you will be able to share a link to available meeting times with your tutees, so that they can choose a time/day that suits them, (up to 90 days in advance) - within the diary constraints you have predefined. Your calendar does not get blocked out until a tutee books a meeting time.
Once set up, Microsoft Bookings with Me offers seamless integration with your Outlook calendar. Your tutees will also be able to select, amend or cancel bookings easily.
Creating bookable meeting slots
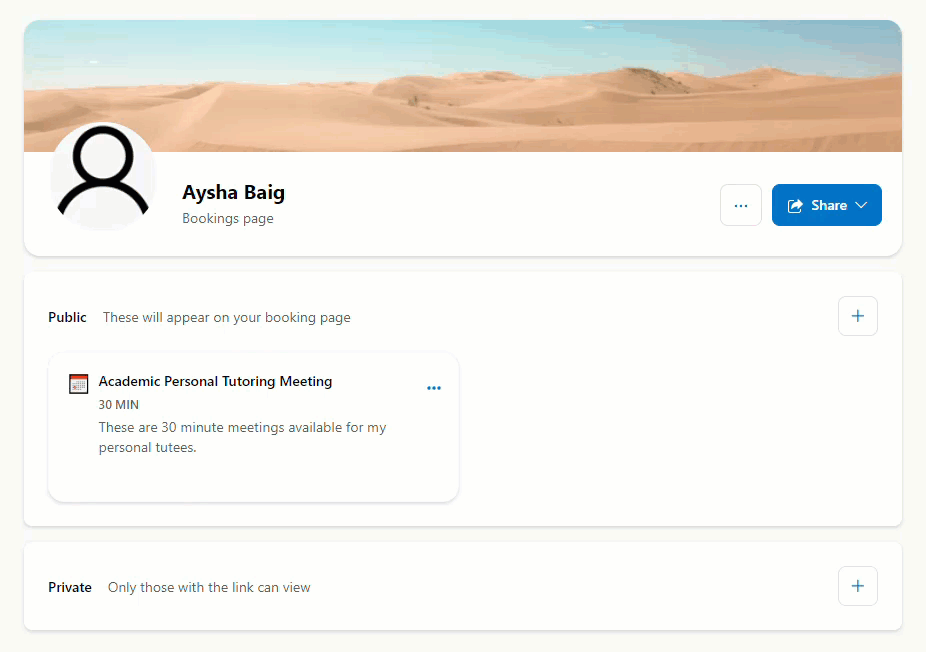
Go to https://outlook.office.com/bookwithme/me. You will see a preview of your Microsoft Bookings with Me page – this is split into two sections: Public and Private.
- Any meetings created in your Public section can be seen, (and booked) by anyone who has a link to your Bookings with Me page.
- Meetings created in the Private section are only visible to people you share the meeting link for the individual meeting with.

1. We will create a meeting type in the Private section. Click the + icon in the Private section

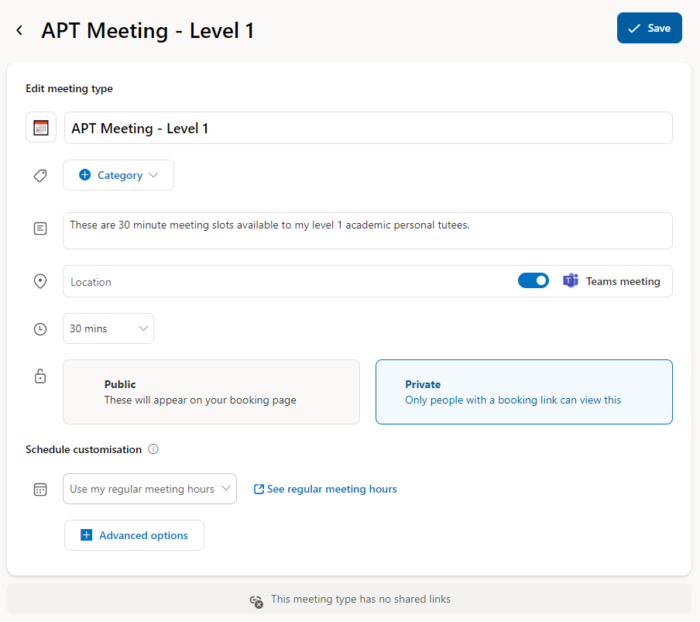
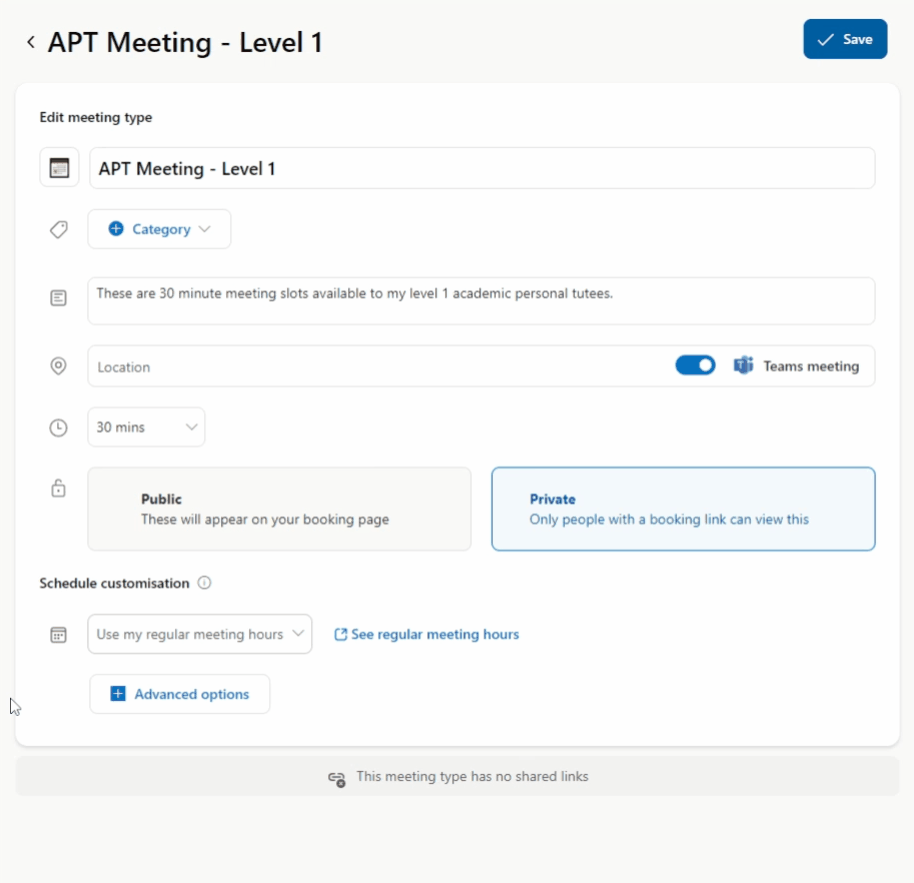
2. This will open the Edit meeting type page. Enter a:
- Title for your meeting type – e.g., APT Meeting – Level 1.
- Description – e.g. These are 30-minute online meeting slots available to my level 1 academic personal tutees.
- Location – the default is an online Teams meeting, if you want to offer in-person meetings, enter a location, and click the Teams meeting toggle to disable it.
- If you are typing a location in the location field, you'll need to confirm you want to use the location by selecting the blue 'Use this location' text that appears as you type. You must select the blue text for the location to be saved in the the location field. Don't forget to toggle the Teams meeting off.

- Duration – the default is 30 minutes; you can change this as required.
3. Schedule customisation – You will need to check/define your meeting hours – these are the hours in which a tutee could potentially book time with you (as long as you do not have any scheduling conflicts).
There are two options in the drop-down menu:
- Use my regular meeting hours
- Use customised availability hours
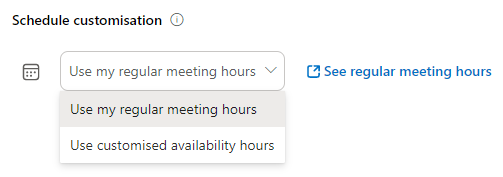
Let's look at the difference between the two. We'll start with customised availability hours as this is what we'd recommend using:
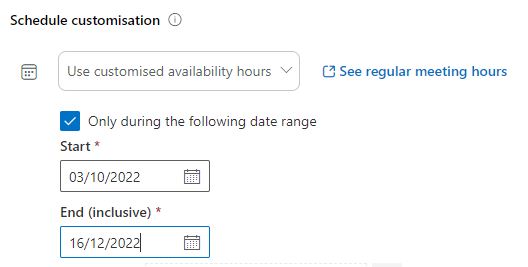
Use customised availability hours
- If you want to offer APT meeting slots during specific days and times, for example Mondays 10am to 12 noon and Thursdays 2pm to 4pm, select the Use customised availability hours option and enter the days and times you want to offer.
Select the Only during the following date range check box if you want to specify a date range during which meeting slots are available. Enter your Start and End dates, for example every week from the start of the semester, up to the last day of semester 1.
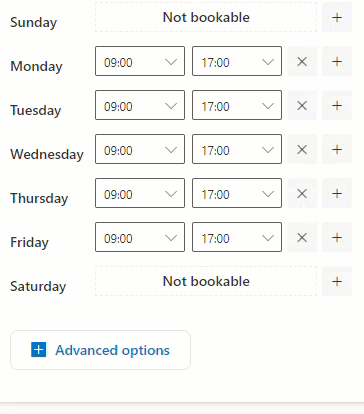
Then define your availability for each of the days. For example, Mondays 9am to 12 noon and Thursdays 10am to 12 noon and 1pm to 3pm (each week). If you want any of the days not to be bookable, click the Cross button for the day you want to make unavailable, to make it 'Not Bookable'.
Let's now look at the other option you could use:
Use my regular meeting hours
- If you want to use your regular meeting hours, select the See regular meeting hours link, this will open your Outlook Settings in a new browser tab. On the View tab, check your work week reflects your availability, and that your start time and end time reflects your working hours.
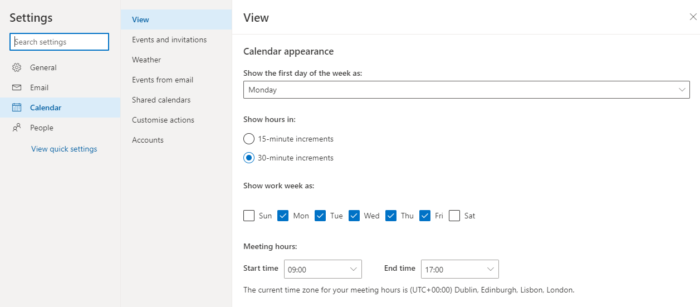
For example, if you work part-time remove the days you do not work so that tutees do not book a meeting with you on that day. If you finish work at 4pm (or prefer not to have meetings in the last hour of the day), set your end time accordingly. Once you’ve checked your meeting hours, close the Settings window and go back to the Bookings with Me browser tab.
5. After you've chosen, checked and defined your Schedule Customisation options, click Save to create the meeting type. At this stage, you can share a link to your Bookings with Me meetings to allow tutees to book, however, we strongly recommend you read the tips below and consider some of the advanced options.
Tips
Public Holidays / University Close Days
Microsoft Bookings with Me will not account for public holidays or University closure days unless you have these entered in your Outlook calendar.
Moving meeting types between Private and Public
Whilst you have the option of moving meeting types between the Private and Public sections of your Bookings with Me page - once you’ve shared the link with others, we would not recommend doing this, as this breaks the link. Anyone who has made a booking of that particular meeting type will receive an error message if they subsequently try to cancel or reschedule their meeting via the Manage meetings link.
If you do move a meeting type after sharing the link, tutees will have to contact you directly for you to cancel/reschedule their meeting. You will also need to delete their meeting from your Outlook calendar manually.
Blocking out days/times
At short notice, it can sometimes be quicker to block out periods you do not want to offer meeting times as 'Busy' in your Outlook calendar rather than tweaking Schedule customisation options in Microsoft Bookings with Me.
Advanced Options
We recommend you look at the Advanced Options and consider if any of them need adjusting:
1. Click on + Advanced options to set your advanced options.
Add a buffer time before the meeting
If you prefer to have some time just before the meeting to read your notes, you may find adding a buffer time helpful. This time is not added to your tutee's calendar.
Add a buffer time after the meeting
For example, you may have two 30-minute-long meetings consecutively, if you prefer a break in between, use this setting to define a buffer time, for example 10 minutes. In practice, this would mean, if one student books a 10am slot, subsequent students will see your next availability at 10:40am.
Limit start time to
You can use this setting to define the start times available for meetings.
For example:
- You have a 1 hour free time between 9am and 10am.
- You are offering 30 minute meetings.
- With 30 minute start time intervals, tutees will see available slots at 9am and 9:30.
- With 10 minute start time intervals, tutees will see available slots at 9am, 9:10, 9:20 and 09:30.
By default, this is set at 30 minute start time intervals. You can leave this on the default setting and revisit this setting if you're finding you want to offer more granular start times or want to ensure you have less pockets of time in between meetings, free.
Minimum lead time
You can define how late notice your tutees can book a meeting with you (1 hr before is the minimum).
By default this is set to 1 hour - you may want to increase this to 1 day to give you sufficient notice of a meeting.
Maximum lead time
You can define how far ahead your tutees can book a meeting with you (90 days ahead is the maximum).
By default this is set to 90 days ahead - you can adjust this according to your preferences.
Click Save once you have chosen your Advanced options - your bookings are now ready to share.
Share the link to your meeting slots
Once you have created a meeting type, you can share a link with your tutees who can then chose a time/day and suits them.
1. From your Microsoft Bookings page (https://outlook.office.com/bookwithme/me), click the three dots (ellipsis) on the APT meeting booking you have set up and want tutees to be able to book.
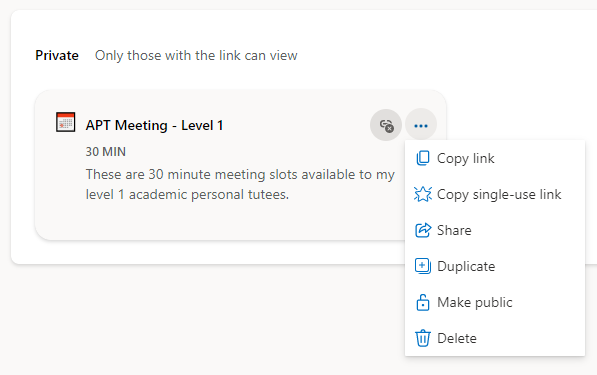
2. Select Copy link. You can then share this link with your tutees so that they can book a time with you. You can also choose the Copy single-use link if you only want to ensure your tutees only book one meeting time.
If you chose to create your meeting type in the Public section of your Bookings with Me page, you can share your Bookings page and allow tutee's to choose the relevant meeting type from your Bookings page.
3. Once you have copied the relevant link, you can share it via:
- Teams
Tip - When you copy a link to a meeting that is created in the Private section, Microsoft Bookings with Me generates a link that includes:
- your name
- the title of the meeting
- it also includes the date the link expires
This link expiry date is based on the University's policy on Microsoft links. All Microsoft links that are shared are set to expire 90 days from the day the link is copied/generated.
To avoid confusing your tutees, when you paste the link into an email/chat message, remove the wording about the link expiry as your tutees may think they have until then to book with you (which may or may not be the case depending on how you set up your date range):

What happens when your tutee clicks the link you share with them
When your tutee clicks the link you share with them, they will then be able to choose a meeting slot.
If they are logged into Microsoft 365 using their University credentials when they choose a meeting slot:
- Microsoft Bookings with Me indicates if they are available at the chosen time (by referencing their Outlook calendar).
- Their name and email address is auto-populated on the booking form (they cannot change this).
- Once they've selected the slot they want, they will receive an email invite to their University Outlook inbox, at this point the meeting slot will be added to their calendar, and yours - it will appear as 'Student Name Meeting Title', e.g. Laura Tims APT Meeting Level 1.
- Your tutees' invite prompts them to accept the invite. Don't worry though, if they don't it will still be booked and show in your and their Outlook calendar.
It is possible for your tutees to book as a Guest (rather than by logging into their University Microsoft 365 account), if they do this:
- They will need to enter their name and email address manually into the booking form.
- Once they've selected the slot they want, they will receive an email invite to the email address they used in the booking form. At this point the meeting slot will be added to their calendar, and yours - it will appear as 'Name they entered in the booking form, Meeting Title', e.g. Laura Thornton APT Meeting Level 1. This isn't ideal if they don't use their real names - when you share bookings link with them, we would recommend encouraging them to login to the Microsoft 365 account when booking so that their name and email address is pre-populated into the bookings form.