
Self-assessment of Work in FeedbackFruits - Staff Guide
The self-assessment of work tool allows students to review a submission based on predefined criteria, providing scores and feedback.
If you are unsure of which FeedbackFruits tool to use, please see guide: What are the FeedbackFruits tools.
Creating a Self-assessment of work in FeedbackFruits
Navigate to the Minerva Module you would like to create a FeedbackFruits Self-assessment of work in and select the purple plus button to add content to your module.

From the drop-down menu select Content Market then select FeedbackFruits.
You will then be taken to the FeedbackFruits dashboard. From here you can select to use a template from your library, copy a past activity, or create something from scratch. When creating a new assignment select start from scratch.
You will now see the 7 feedback tools available within FeedbackFruits. Once you have selected Self-assessment of work, the settings page for your assignment will open.
Instructions
Insert a title in the top left corner of the screen. You will also need to add content in the instructions box available.
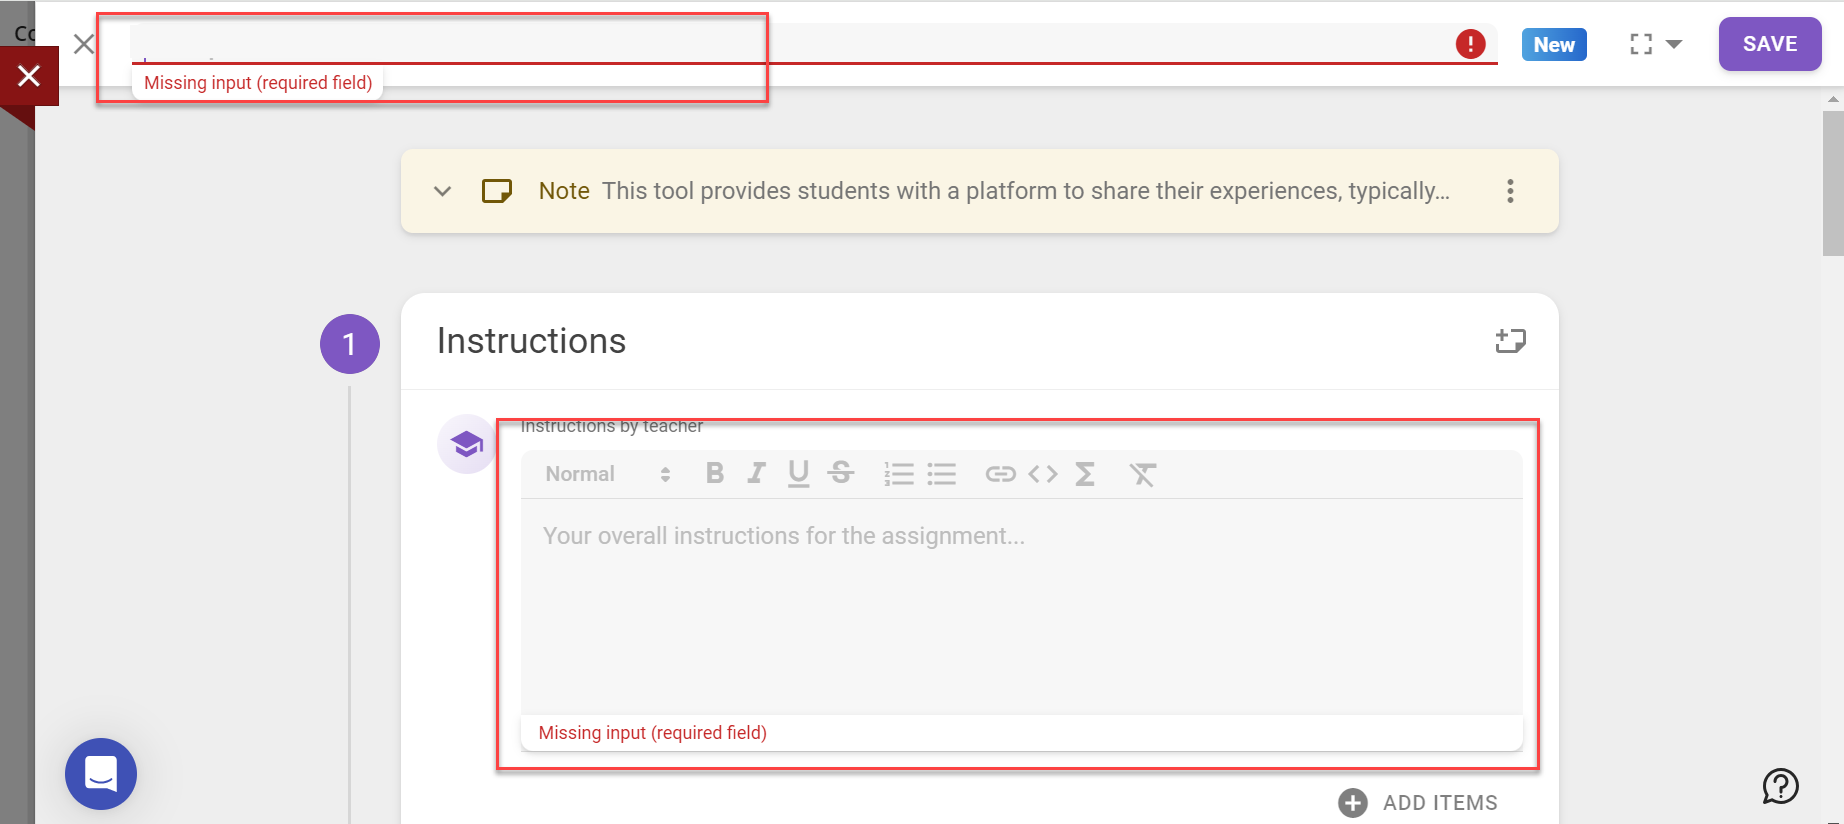
Note that you need to save your work on FeedbackFruits as you go using the save button in the top right corner of the screen. However, your work will only save once something is entered into the instructions box; this box cannot remain empty.
Once you click save on a FeedbackFruits assignment you will be taken back to your content screen within Minerva and the item will automatically be visible to students. We recommend changing the status to hidden from students until you have configured all the settings.
To continue editing the settings on the assignment, click on the item that you have created and select edit in the top right corner.

Once you have added a name and instructions, you can also add extra items in the instruction box if you wish. This could be a recorded audio or video of the instructions, or a file that you want to provide your students with.
The last item in the Instructions section allows you to set whether students hand in their work individually or as a group. To access the options, click on the purple change button next to student collaboration and select from the options available.
Submissions
The required number of files can be set by clicking on the arrow to access a drop-down menu. You can choose to select a range, a minimum or an exact number of files that the students should submit.
Note that the number of files that can be uploaded is a minimum of 1 and a maximum of 9.
Scheduling deadlines
You can choose whether to set a deadline date for the submission. To add a deadline, use the drop-down arrow and select after a certain date to access the date and time settings.
If you choose to set a date and time, additional toggles will be visible, allowing you to control whether students can hand in late and if students who did not hand in at all can participate in reviewing.
You can also allow extensions to individual students by clicking on the person icon to the left of the date field and completing the fields in the pop-up box that appears.
File requirements
The tool allows for several file types to be submitted. All file types will be ticked by default and can be unticked if not required. We advise that other file types be unticked to avoid students uploading zip files. FeedbackFruits can accept zip files, however when users reach the stage of giving reviews, the files will not open inside the tool and have to be downloaded and opened separately.
Note that more than one file type can be selected here if required.
Guiding students
In addition to the settings detailed above, there is an option to include written instructions for handing in work.
Given Reviews
This section allows you to configure settings on how students will give feedback on their own work, what criteria should be used, set deadlines and provide any additional guidance your students may need.
To set feedback criteria, click on the purple configure button to open the settings menu. Click on create new criteria to open the options for building your first criterion and follow the instructions (note, you can have as many criteria as required).
Click on the type of criteria you want to add (rubric, scale, or comment only). Additional options are available depending on which criteria type is chosen. For more information on setting up criteria, please see the How to set up feedback criteria guide.
Scheduling deadlines
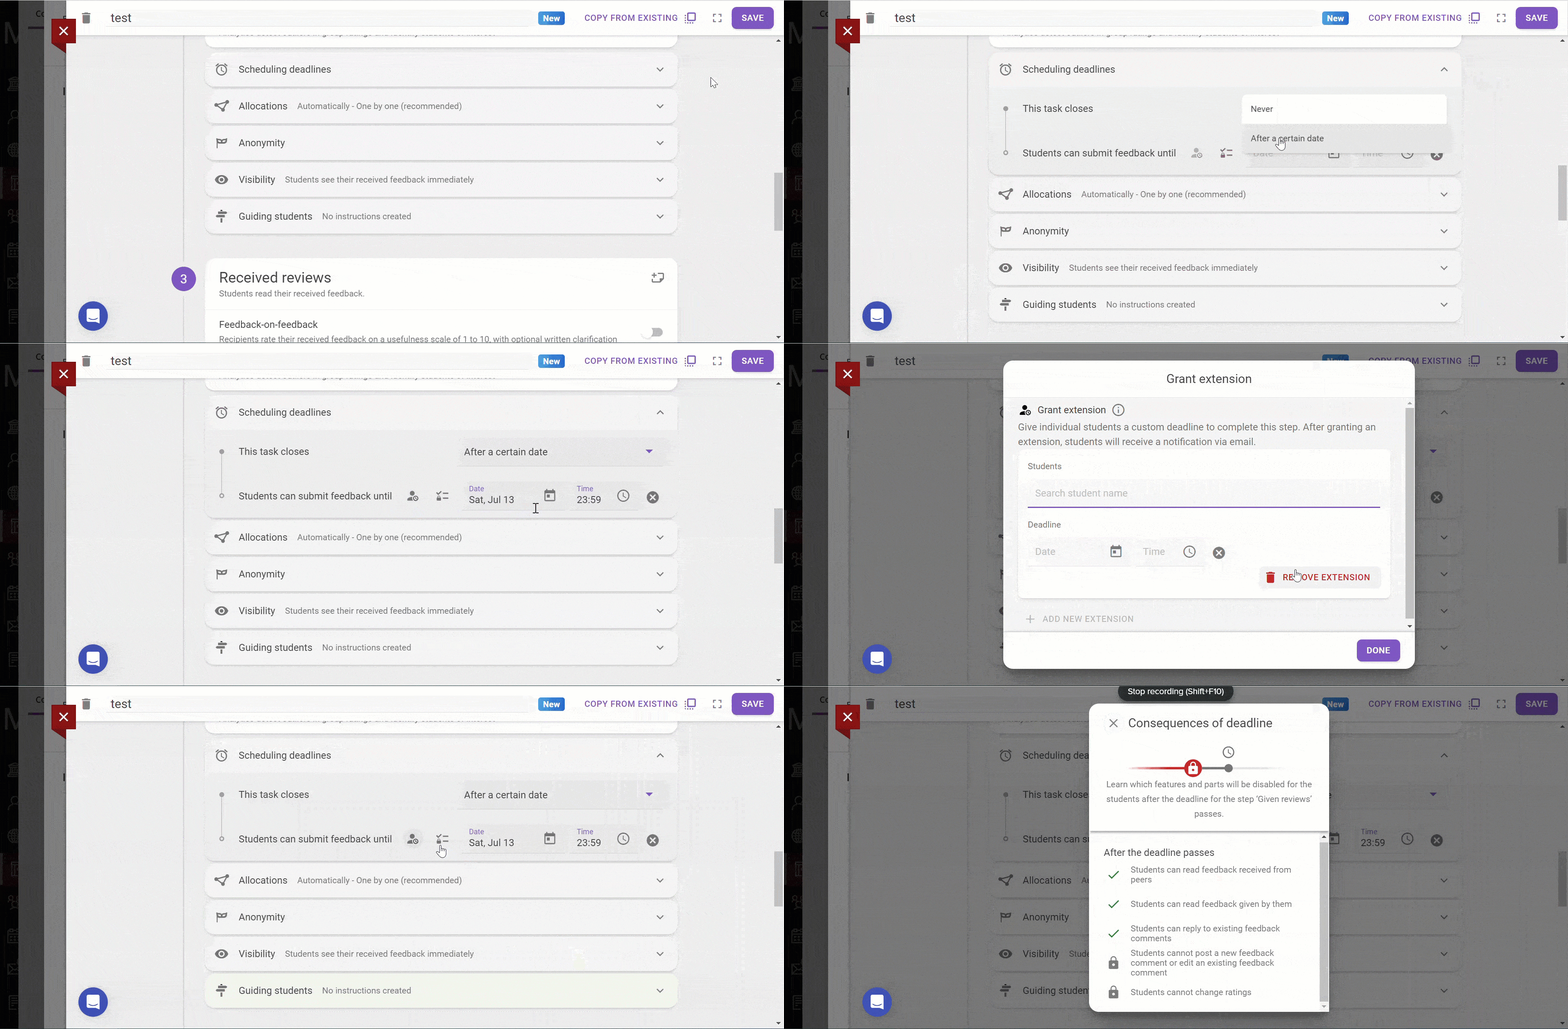
To set a deadline date for the submission work use the drop-down arrow and select after a certain date to access the date and time settings.
You can also allow extensions to individual students by clicking on the person icon to the left of the date field and completing the fields in the pop-up box that appears.
The second icon on the date picker row provides a pop up explaining the consequences of adding a deadline for feedback, allowing you to sense-check if it is appropriate to include one.
Guiding students
Click on the drop-down arrow to open the options to include guidance for student reviewers.
To include writing tips, click on the toggle button to switch on/off. Note that a selection of tips are shown at random and not all tips will be seen by all students.
Once the feedback writing tips toggle has been activated, a window will pop up with 11 tips field rows pre-populated. To delete a tip, click on the grey x on that row. Note that this will clear the text but it will not delete the row.
To add your own tips, click on the add another tip button in the lower left corner of the screen to add a row. Alternatively, if you have deleted one of the pre-populated tips you can re-use that row by typing into the text box.
To include a checklist for the reviewer, click on the toggle to switch on/off. A pop up will appear where you can add items to a checklist. To add more than one item, use the add another item button in the lower left corner of the screen or hit enter to create the next item. Once you have added all your items, click the done button to exit the screen.
You can also toggle on the automated feedback coach, however we suggest leaving this setting toggled off due to it being in a Beta release. If you do choose to enable the automated feedback coach you can see more information about it on the FeedbackFruits website.
At the bottom of the Guiding Students section, there is a text box where you can add further instructions if required.
Received Reviews
To set a deadline date for students to have read their received feedback use the drop-down arrow and select after a certain date to access the date and time settings.
You can also allow extensions to individual students by clicking on the person icon to the left of the date field and completing the fields in the pop-up box that appears.
Grading
Grading is split into three components: has submitted the required number of files; has completed self-assessment on criteria set, and has read all received feedback. Grading is presented as a percentage, and you can choose the weightings for each component. Note that the average ratings option is only available if more than one section is created within the feedback criteria section.
To update the weightings, click on the purple configure button in the lower right corner. A pop-up will appear where you can edit the weightings in the submissions column and select the components to be included by using the toggles.
Under grading options, select whether you want the mark to show as a percentage or a pass/fail by using the drop-down menu and selecting your preferred choice. If you choose pass/fail, an added step will be visible for you to choose the pass mark (as a percentage).
Additional functions
The final section on the page allows you to add further learning steps of Participation Grading and/or Reflections for the students to complete. To include these activities, click on the purple plus button to access the options available. Any additional learning steps you choose will appear on the page and you can update the settings to suit your needs.
You have now created a self-assessment of work in FeedbackFruits. Save the content and return to Minerva. Remember to make the link visible to students when appropriate.