Making ThingLink Content Accessible
Whilst ThingLink are committed to improving the accessibility of their software as part of continued development, some features are not currently fully accessible.
What needs to be improved
- There is now an accessibility player option for 3D models used as base layers, but there isn’t a way of navigating the tags with keyboard shortcuts.
- Whilst you can add alt text to a video used as the background for a scene, you cannot add alt text to a video embedded within a Text and media tag. However, you can add a caption file.
Ways to ensure your ThingLink content is accessible
To ensure your ThingLink resources are as accessible to the widest number of students and staff as possible, we recommend utilising the following ThingLink features.
- Base layer: Add Alternative Text to base layers.
- Images: add Alternative Text
- Videos: add Close Captions to your ThingLink video base content
- Share a link to content that opens directly in the ThingLink Accessibility Player
- Embed web accessible ThingLink content into your Minerva module (Staff Guidance)
- Immersive Reader available for all text descriptions by default
- Tag sequence and keyboard controls
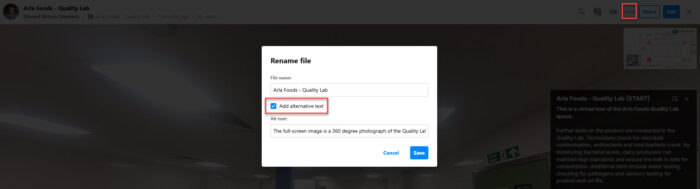
Add Alternative Text to your scene
You can add alternative text (alt text) to your scene by opening it, selecting Rename from the three dots at the top (first option), and then tick the box for Add alternative text. Enter your text and then select Save. This will work when using images, videos or 3D models as your background.
Add Alt Text to media in a tag
You can add alternative text to images and 3D models embedded within a Text and media tag.
First, whilst editing your scene, select Add tag and choose Text and media.
Then, in the Media files area, select the upload icon to upload your content.

Once uploaded, select the ellipsis icon (...) at the top left of your new media file to open the Settings.
This is where you can add your descriptive Alt Text, as well as an optional Caption which is then shown at the top of your media within the tag (this may be useful if you are displaying more than one form of media in a single tag, to create a slideshow).

See, Adding alternative (alt) text on ThingLinks support site or Creating Accessible Content for further guidance.
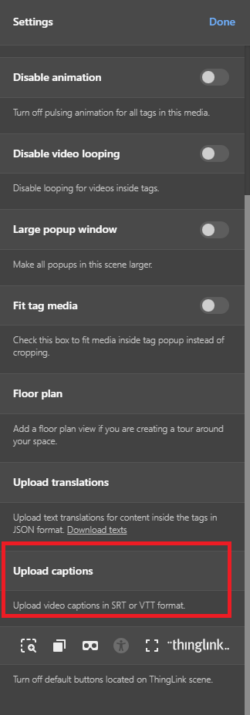
Add Closed Captions to background videos and those embedded in text and media tags.
You can add closed caption files to videos used as the background for a scene, and those embedded within a Text and media tag. ThingLink currently supports the SubRip (.srt) and WebVTT (.vtt) subtitle and caption file types.
Viewers will then have the option to turn closed captions on or off using the cc button in the bottom-right corner of the video
![]()
See, how to add and display closed captions on base videos on ThingLink's support site for guidance on how to add close captions to your video content.
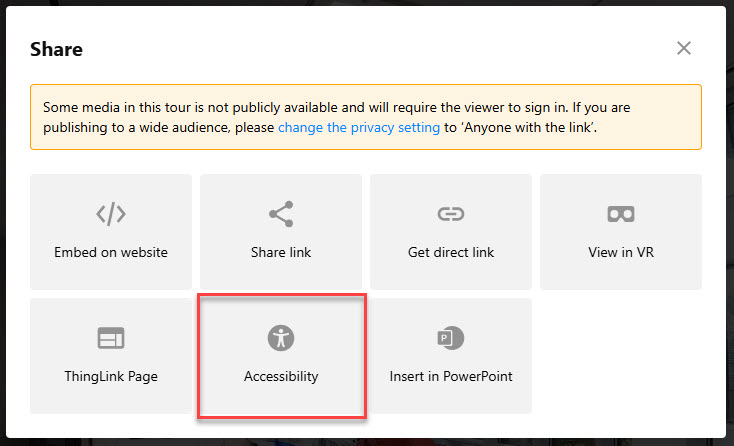
Share a link to content that opens directly within the ThingLink Accessibility Player
ThingLink’s Accessibility Player is designed to better meet WCAG web accessibility standards: providing multiple avenues for students to engage with content in ways that are tailored to suit their individual needs.
As well as providing its own screen reader tool, the Accessibility Player also offers choices for how to display text and images, as well as general display options such as contrast settings and cursor size.
If you wish to share a link for students to view your ThingLink project in an Accessibility Player, you can go to Share and select the Accessibility option. This will provide you with a unique web link which you can then share with your students so that they can directly access the Accessibility Player version of your ThingLink project.
See, ThingLink’s web page dedicated to explaining the Accessibility Player.
Embed web accessible ThingLink content into your Minerva module (Staff Guidance)
You can embed your ThingLink project into a Minerva module:
- Click the Share button at the top of the window
- Select the Embed on website option
- Make sure Include web accessibility link is ticked
You can then copy and paste the provided HTML code into a Minerva learning document using the Add HTML option.
Video demonstration
Immersive Reader available by default for text descriptions
Once a text description is added to a Text and media tag, the icon for Microsoft’s Immersive Reader - an integrated reading tool and automatic language translator – will be shown automatically to the right of that tag. This provides additional textual, audio and visual options for descriptions, such as translation to other languages, highlighting parts of speech, and reading text aloud.
![]()
See, ThingLink’s dedicated web page on ThingLink’s integration of Microsoft Immersive Reader for more information.
Tag sequence and keyboard controls
By default, the tags are shown in the order they were added to the scene, with the oldest tags shown first. This order can be changed to suit keyboard navigation by selecting Edit, then Settings and then Tag sequence. You can then use drag and drop (the three lines to the right of each tag) to change the order (the first tag is at the top).
Keyboard Navigation:
- Tab jump to different tags and buttons in your scene, including items within tags.
- Enter interacts with tags and buttons, e.g., to open a tag.
- Esc closes a tag. Alternatively, you can select the cross button using Tab key and select Enter.
- Space stops and starts something, e.g., a video.
When using the tab key, the currently selected tag is slightly enlarged, making it easier to identify. Additionally, the view within 360° photos and videos moves and centres on the currently selected tag.
Page last checked: December 2025
Related Guides
Further support using this tool
Quick Link
- To login to ThingLink, go to the ThingLink Azure login page.