How to create a Page using PebblePad - Student Guide
Pages are single-page designs, great for purposes such as presenting professional development activities and overviews, or for project reports, or as an alternative to a résumé. You may choose to present and showcase aspects of yourself, or evidence of achievement, to an audience and keep these pages as single assets or incorporate them into larger portfolios, curating them into a meaningful narrative.
Having all of your pages as single assets available (and searchable) within your Asset Store means the ability to reuse your them in a number of different designs for different purposes.
1. Creating your page
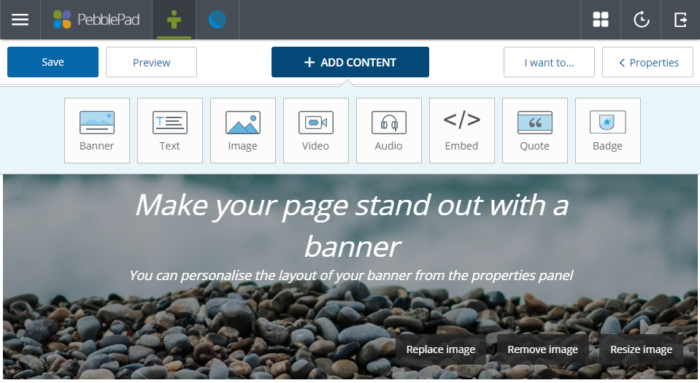
To create a new page, first click the Burger menu and select Get Creative and Create a page from the menu. This will open the page builder, allowing you to start creating your new page by adding content. The page already contains a default PebblePad banner image which you can replace with another from the PebblePad store or your own asset store. Click Replace image to access these.
Once you have added your first content block, you will be prompted to save your page and it will go into your Asset Store.
Tip: You can tell you are in page builder mode if you can see the Preview button.
2. Adding content to your page
The content blocks are called elements in PebblePad and are displayed in a menu which appears when you click the Add content button.
 Clicking an element type adds it to the page and it will appear below the last one you worked on. They can also be reordered with the arrows at the side of the block frames. You can also drag the elements onto your page.
The active block can be deleted by clicking the X in the top left-hand corner and clicking Confirm. Click into a content block to make it the active one.
You can drag any of the elements side by side in a page with the exception of the banner element to give the appearance of two columns.
PebblePad provides a comprehensive guide to all the content element types in a downloadable PDF from the Learning Centre.
3. Using the Properties Panel
Whichever content block you are using, it has its own set of properties accessed by clicking the Properties Panel in the top right-hand corner and then selecting Block. You must have the relevant active block selected for the properties panel to show its criteria.
You can also access properties in the panel for the whole page as well as the individual block.
Unique to pages and portfolios is the ability to change the background colour of the portfolio, the page and the content blocks. You can also change the page reading width which allows the background colour to be visible. It is also possible to add an image to the page or portfolio background which is visible around the narrower page width and when moving from page to page in the portfolio. These options are found in the properties panel.
4. Saving your page
You will be prompted to save your page before you can first preview it. This will save it into your Asset Store.
5. Renaming and deleting a page
You can rename or delete your page from the Asset Store by clicking on the icon to the left of its title. Go to the i on the right-hand side, click Edit and rename the page. If you wish to delete the page, go to the I want to … button at the bottom right-hand corner and click Delete.