
How to download a recording from Collaborate and save it to Mediasite - Staff Guide

Please Note: Blackboard Collaborate is no longer available as a video-conferencing tool. Content recorded in Collaborate can still be accessed up until 31st July 2026. You can read more about this in our news post about the changes to Collaborate.


This guide will explain how to download recordings from Collaborate and save them in Mediasite.

We would recommend using a PC or laptop to download recordings.

Download a recording from Collaborate

Go to the relevant module in Minerva.

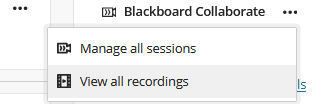
Under Details & Actions (the menu on the right), you should see a link to Blackboard Collaborate if it is available. Select the three dot menu. From the menu displayed, select View all recordings.


The recordings page will now open.  Use the Filter by option at the top right to extend the date range, so you can see all your recordings

Filter by option with the Recordings in a Range option highlighted.

To download your recording, find the recording you want to download from the list. Click the three-dot menu to the right of the list and from the drop-down menu that appears, select Download. This will download an mp4 file to the local download folder on the laptop/PC. It is not possible to multi-select recordings to download.

Circle icon menu with option to Download highlighted.

Please note: If you are going to upload the MP4 into Mediasite then you will not need to download the caption file separately as Mediasite will create a captioning file automatically on upload.

Choosing where to store your recording

You will need to choose where to store your recording once you have downloaded it

  • If the recording needs to be visible to students enrolled on your module/organisation, you will need to upload the recording to mediasite
  • If the recording does not need to be visible to students enrolled on your module but you want to retain a copy for potential sharing or use in the future use, you can upload content to Mediasite and store in your personal mediasite space

Note: Any recordings shared to mediasite will be retained and will be migrated to any replacement lecture capture system at the University 

Upload your recording to Mediasite

If you want to upload your recording(s) into Mediasite and add them to a Minerva Organisation, please refer to the Minerva Guide: Add Video from Mediasite

If you are adding your recordings to a Minerva module, please refer the guidance below.

Uploading recordings into MediaSite and adding them to a Minerva module area.

Once you have downloaded your recordings as MP4 file(s), start by logging into Minerva.

On the MyLeeds page, under Tools and Other University Systems, select Mediasite. Mediasite will then open/launch in a new browser tab.

Minerva menu

From the options on the left, select Browse Shared Folders. A list of shared folders will be displayed. There should a module folder for each of the Minerva modules you have a Minerva staff role for (e.g. Instructor, Assistant).

Mediasite menu with browse shared folders option highlighted.

Selecting the star icon next to a module folder allows you to favourite it. It will then appear under the Favourite Shared Folders area, making it easier to find in future. Note: Merged module folders are created on request. If you do not see a folder for a merged module, you can request IT to create one by completing a Mediasite Shared Folder Request form.

Shared folder example

Select the module folder you want to store your recording in. If there are already videos in the folder, a list of these will appear.

In this example, we are uploading the recording to a shared module folder as this will allow the content to be managed by the University's retention and deletion policy. A future upgrade of Mediasite will improve sharing permissions. Therefore we recommend, using the relevant module folder where possible.

Now select  + Add Presentation from just under where your name is listed in the top right of the screen.

Add presentation option highlighted

The Add Presentation options will then be displayed. From the three options available, select Choose File. You will then be prompted to find and open the recording you downloaded earlier. Navigate to the Downloads folder on your computer and select the recording you want to add and click Open to confirm.

Choose file option

A pop-up window will be displayed on screen. Give your recording (Presentation) a Title and brief Description. The Destination field should already be pre-populated with the shared folder name you selected earlier. Ensure the destination is selected, then click Create Presentation. Your recording will then be processed, depending on the length of your recording it may take a few moments. You will not be able to move onto the next steps until the video has finished processing.

presentation details

You will receive an auto-generated email advising you that the recording is available in Mediasite and ready to be reviewed, edited and approved for publication.

Your recording is now saved to Mediasite. You have the option to edit the video if you wish by selecting Edit Video. This can be useful if you need to top and tail your video (i.e. cutting the beginning setup and end out of the recording). Captions will also be auto-generated and you'll receive an auto-generated email when they have been completed.

Making the recording available to view

We'll now move on to make the recording viewable. Under the WHO CAN VIEW? section, slide the option bar to My Organization. A pop up will slide up advising: Success. The presentation is now viewable...

Video visible in Mediasite

At this point if you were to click Share Presentation, you could generate a link and share this with someone with a University of Leeds account and when they clicked it, they would be able to watch it. You could also now embed this recording in Minerva.

However, we want our recording to appear when students click the Mediasite (Lecture Capture) link from our Minerva module content area, as this is where they will also find scheduled lecture capture recordings (made via the lecture capture system on-campus), so we have another step.

Mediasite link within a Minerva module

We need to assign the video to the module. Select Edit Details (to the right of the video), then on the Information tab (towards the bottom of the screen), scroll down to Modules. Select + Add Modules.

edit details being selected

This will open an Add Module pop up where you will now select the module you want to add. Modules are ordered oldest first and the list will show all the modules you have staff enrolments for. To see your newest modules, click on Page 1 and select the last page in the list that is displayed.

Alternatively, click the magnifying glass icon to open a search window. If you are enrolled on a large number of modules, it may take a few moments for the search to return the module you are searching for. Unfortunately, there is no progress indicator, please be patient.

magnifying glass icon highlighted on Add Module option

Once you have found the correct module, for the appropriate academic year, select it from the list, you will then be taken back to the Edit Details screen.

module being selected from dropdown menu list.

The module you selected, should now appear under the Modules section of the Information tab, select Save to finish adding the module.

Module shown in information section.

Now when you, or your students click the Mediasite (Lecture Capture) link within the associated Minerva module, the video you attached by following the steps above should appear alongside all the other videos uploaded using this method and the lecture capture recordings.

Note: The Mediasite (Lecture Capture) link will need to be Visible to students, for them to be able to see it.

Mediasite link being selected from Minerva module.


< Return to Collaborate Staff home page