
Create and manage groups in Minerva - Staff Guide
Staff can organise students into Groups within a module or organisation. The workflow is that you first create one or more Group Sets, and then create individual Groups within those Sets.
The important thing to remember is that within a given Group Set, each student can only be added to a single Group. If you want the same students to be placed into different Groups for different purposes, you will need to create more than one Group Set.
Groups can be used for the following purposes:
- Group Blackboard Assessments - Group Sets can be associated with a Blackboard Assignment, Test, or Discussion via the assessment settings. Students will then contribute to the Assignment / Test / Discussion as groups, according to their membership of the Groups in that particular Set.
Releasing module content - Module content can be released to individual Groups, using Conditional Availability. Note that when using Conditional Availability, Groups from different Sets can be selected. For more information, see our guidance on using Conditional Availability. - Delegated Grading - Blackboard Assignments have a Delegated Grading feature. Grading can be delegated to different staff members via Group membership.
- Filtering Turnitin Assignment Inboxes - An individual Group (from any Set) can be selected in a Turnitin Assignment Inbox, to filter the Inbox to display only the submissions from the students in that particular Group. This can be useful in cases where marking has been allocated to different staff members. For more information, see the guidance on using Groups to filter a Turnitin Assignment inbox.
- Group Space - Staff and students can select the Group name and see any content assigned to this Group. Currently, this will only be Group Blackboard Assignments, i.e., where students work on an assignment together and submit one on behalf of the Group, Discussions or Tests.
Important information about Group Set visibility
However, for content release, delegated grading or filtering a Turnitin inbox, Group Sets can be used even when they remain hidden.
In this guide:
- Creating a Group Set
- Switching between modes (Manual/Automatic/Self-enrol)
- Removing students from Groups
- Making a Group Set visible to students
- Import from CSV
Creating a Group Set
To create a Group Set, select Groups from the module's main Navigation bar. Then click on + New group set.

You will see 4 different options in the dropdown menu:
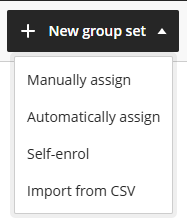
- Manually assign
- Automatically assign
- Self-enrol
- Import from CSV
These options are explained in the sections below.
Manual assignment
After selecting Manually assign, a Group Set page will open. Here you can edit the name of the new Set (which will automatically default to a name containing today's date), and you can also add a description if desired.

Now you need to add groups to your Group Set. You can either add them one by one (create single groups) or create multiple at once (create multiple groups).
Creating single Groups
Note that the Add group button is split into two sections, with text on the left and an arrow on the right. These two sections can be clicked on separately.

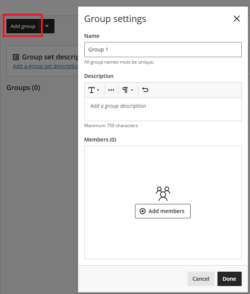
If you want to create groups one at a time, start by clicking on the left-hand (text) section of Add group to create a single Group. This will open a settings panel where you can give the new group a name and (optionally) a description. If desired, you can click on Add members to add students to the Group at this point. However, this is not a necessary step. You can add students at a later point, once you've created all the Groups you need. Click on Done to create the Group.
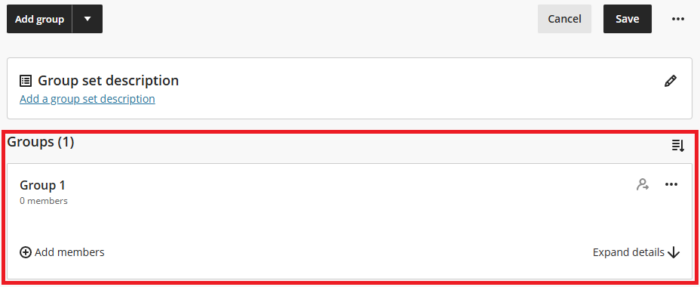
You will now see the newly created Group listed on the page. Note that the text showing Groups (x) at the top of the list will automatically update to show the total number of Groups currently existing in this Set.
Creating multiple Groups
Instead of creating Groups one at a time, you can click on the right-hand (arrow) section of Add groups and then select Create multiple groups.
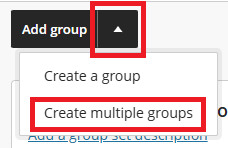
In the pop-up box that appears, select the number of Groups you want to create, then click on Continue.
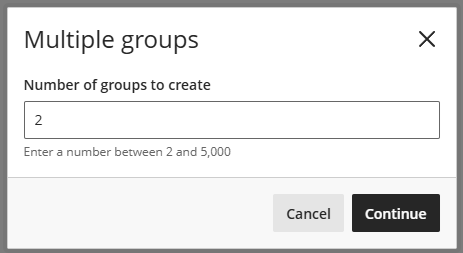
To change the name of the Groups/add descriptions, click on the three dot icon for each Group and then Group Settings.

Make changes as needed and then click Done.
Adding students to Groups
You can add students to Groups either by clicking on Add members under the relevant Group, or by using the Unassigned students panel on the left (which offers several different methods of moving students into Groups). All of these possibilities are explained below.
Add members
If you click on Add members under a specific Group, you will see a pop-up box where you can search for and select students by ticking the boxes to the left of their names. Once you've selected the required students, click on Assign members at the bottom right to add them to the Group.

Unassigned students panel
If you hover over one of the students listed in the Unassigned students panel, you will see the following elements (from left to right):

- a drag-and-drop handle (lavender-coloured strip with 6 dots);
- a tickbox;
- the student's avatar and name;
- a plus (+) icon.
You can use the handle to drag and drop a single student into a Group.
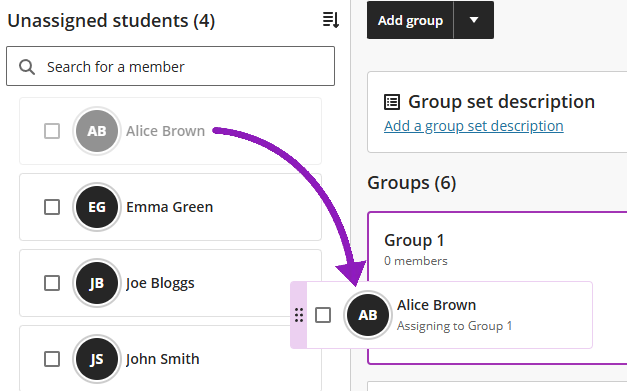
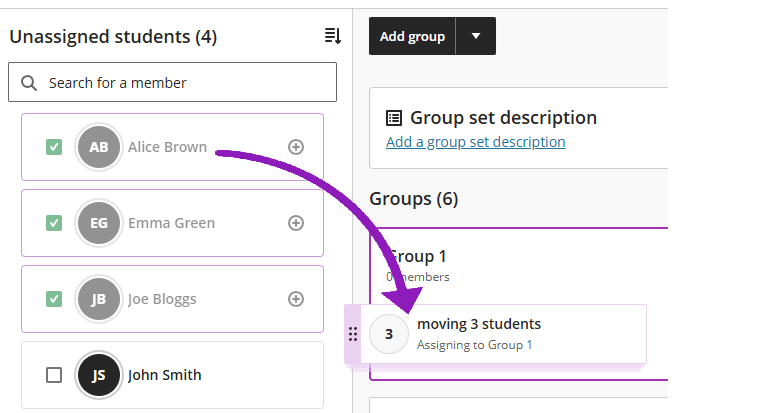
If you tick the boxes next to multiple students, then you can use the handle (next to any of the students you've selected) to drag and drop all of the selected students into a single Group at once.
The plus (+) icon can be used in a similar way. You can click the icon next to a single student and select the Group you want to add them to.
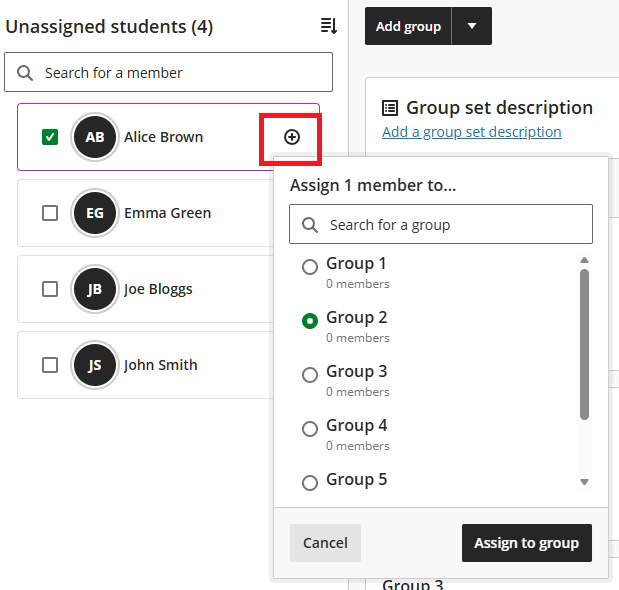
Alternatively, you can tick the boxes next to multiple students and use the plus (+) icon (next to any of the students you've selected) to add all of the selected students to a single Group at once.

A final alternative method is to tick the boxes next to one or more students, and then click on Assign here under a specific Group.
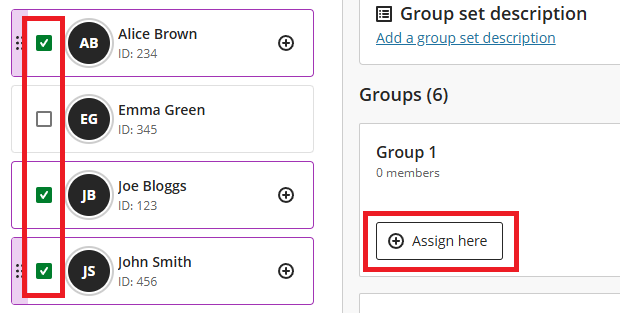
(Note that the Assign here option is only visible when at least one student is ticked. When none are ticked, Add members appears under each Group instead.)
Go back to the top of this page
Automatic Assignment
When creating a new Group Set, you can select the option to Automatically assign - rather than manually assign - students to Groups. In the pop-up box that appears, enter the number of members you would like to be assigned to each Group and then click on Enrol members.
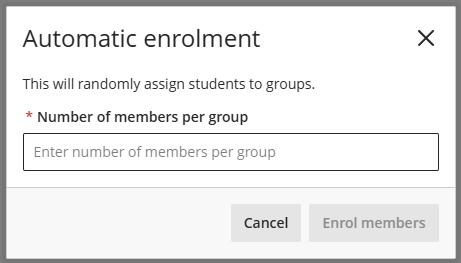
This will create the required number of Groups (given the Group size you specified) and randomly assign students to those Groups.
Go back to the top of this page
Self-enrol Groups
Another option, when creating a new Group Set, is to select Self-enrol. This will open up the Group set settings side-panel, where you can configure the options for self-enrolment.

Here you can modify the following settings:
- Start Date / End Date - These can be used to define a period during which students are able to self-enrol.
- Auto-enrol members after the end date - If an End Date has been specified and this setting is enabled, then any remaining unassigned students will be randomly assigned to Groups once the self-enrolment period is over.
- Allow members to change groups during enrolment.
- Hide enrolled members - If enabled, this will prevent students from seeing who has joined each Group.
- Restrict group sizes - If enabled, this prevents further students from self-enrolling in a Group once the cap you've specified is reached.
Once you have configured the settings as desired, click on Done.
Important
Go back to the top of this page
Switching between modes (Manual/Automatic/Self-enrol)
No matter which option you selected when you started to create a Group Set, you can easily switch to a different mode if desired.
- If you did not start by selecting Automatically assign, you can switch into this mode by clicking on Automatic enrolment at the bottom-left of the Group Set page.
- If you did not start by selecting Self-enrol, you can switch into this mode by clicking on the cog icon at the top-right of the Group Set page.
Go back to the top of this page
Removing students from Groups
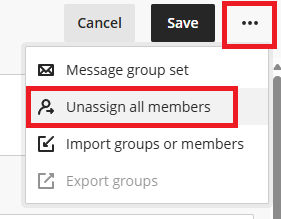
If you want to quickly and easily remove all students from all Groups within a Group Set, click on the 3-dots icon at the top-right of the page, and select Unassign all members. (You will see a message asking you to confirm this action.)
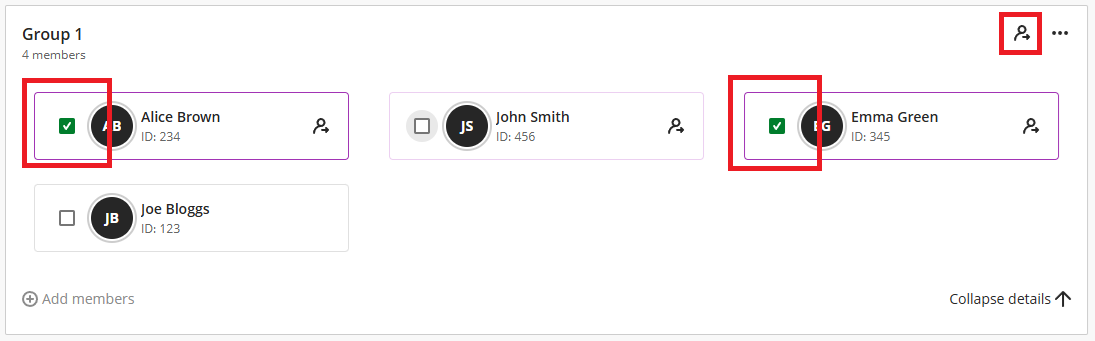
To selectively remove one or more students from a single Group, click on Expand details at the bottom-right of the panel for that Group. This will show you the members of the group in more detail. Here you can tick the boxes next to the students you wish to remove, and click on the remove icon (in the shape of a person + arrow) at the top right.
Important
Go back to the top of this page
Making a Group Set visible to students
There are 2 places where you can find the Group Set visibility setting, which can be used to toggle between the two states: Hidden from students and Visibile to students. First, it appears on the main Groups page, directly under the name of the Group Set.

Second, it appears at the top right of the page when you are creating or editing a Group Set.

Note that in order to use a Group Set for a group assignment, you must make it visible to students. However, if you are creating a Group Set to use for (i) delegated grading, (ii) filtering a Turnitin Assignment inbox, or (iii) releasing module content via Conditional Availability settings, then you do not need to make it visible to students.
Go back to the top of this page
Import from CSV
See our guide explaining how to import group sets and members in Minerva using CSV upload.
Go back to the top of this page