Using Conditional Availability to release content in Minerva - Staff Guide
Important: Once you've created or updated a Conditional Availability rule we strongly advise that you check it is working as expected using the Student Preview function.
The Conditional Availability function allows you to set pre-conditions (or rules) students must meet before they can access content. These rules can include:
- date
- group membership
- grade
If you choose more than one condition for your content, students must satisfy all conditions before the content is available. When content is restricted by date or grade, you have the option to let students see the content item even though they cannot yet access it.
You may want to use Conditional Availability rules if you want students to access content only after you've discussed it in class, and you don't want students to work ahead. Or if you want to release an assessment during the assessment period, or make content available only to specific groups of students.
Student access to assessment grades and feedback
This only applies to Conditional Availability rules, if you select 'Hidden from students' at the top level for the item the item and grade is still completely hidden from students.
In this guide
Set Conditional Availability based on specific dates
1. Go to the relevant content within your module: a folder, learning module or individual content item (e.g. a Document). Be careful not to set conflicting conditions within a learning module. Consider the order of items in the learning module before you set other availability conditions based on date and performance.
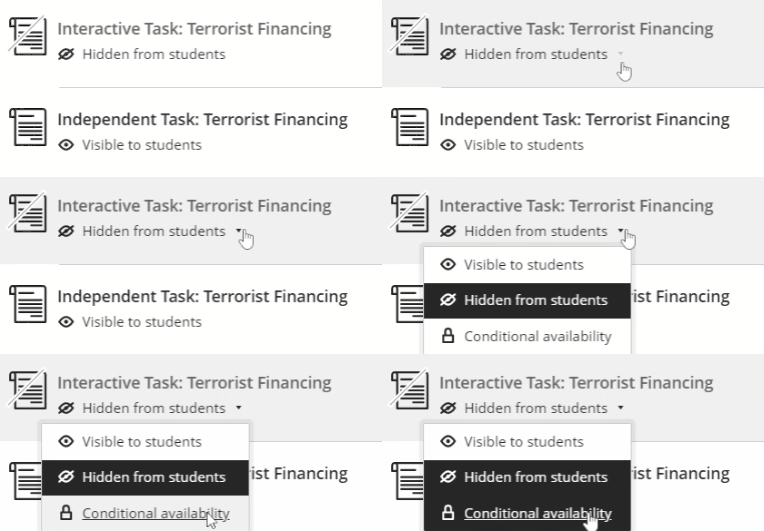
2. You now need to access the visibility settings:
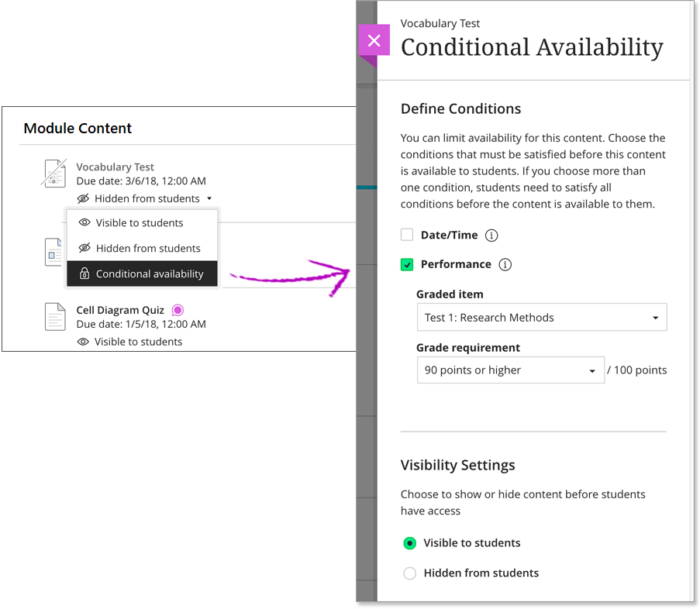
- Click the small downward arrow next to 'Hidden from Students' or 'Visible to students' to reveal the visibility settings, and choose Conditional availability
3. In the Conditional Availability settings panel that will be displayed, check the Date/Time checkbox.
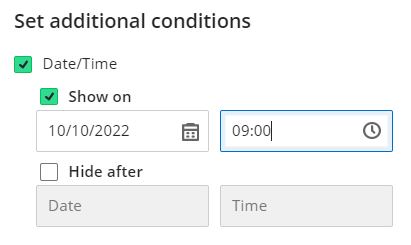
4. Check the Show on checkbox, and enter the date and time you want to release your content, by entering this information in the date selector and the time selector fields. You will also have the option to hide the content after a defined date and time (this is optional). If you want to do this, check the Hide after checkbox, and choose the date and time you want to hide your content.
5. Next choose whether you want students to be able to see the content before/after they can access it.
- Visible to students - All module members can see the item, but they can't open it until all release conditions are met
- Hidden from students - Hidden items don't appear until conditions are met
6. Click Save to confirm your settings.
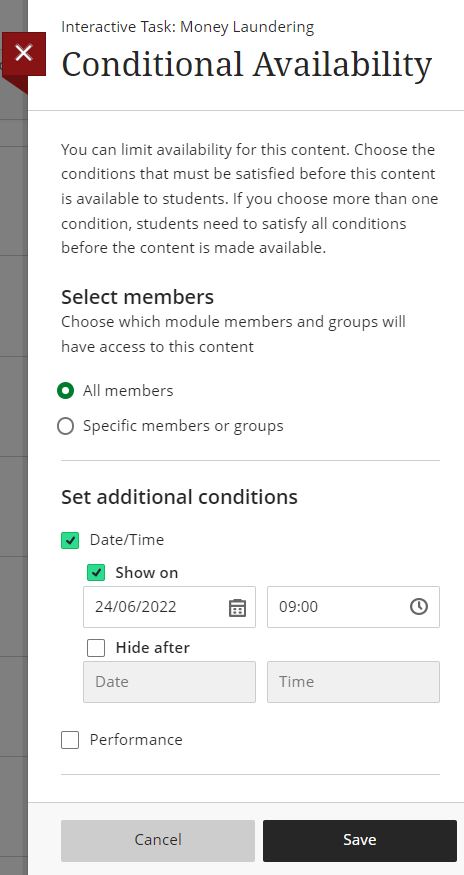
To close without saving your changes, click Cancel and then select Close from the pop-up window that appears.
Set Conditional Availability based on grades (performance)
You can release an item or folder when a student achieves a certain score on an item or Gradebook column in your module. For example, you want students to progress to the next item only after they score a 60 or above (out of 100) to demonstrate their understanding. You can also use percentage based scores.
1. Go to the relevant content within your module: a folder, learning module, or individual content item (e.g. a Document). Be careful not to set conflicting conditions within a learning module. Consider the order of items in the learning module before you set other availability conditions based on date and performance.
2. You now need to access the visibility settings:
- Click the small downward arrow next to 'Hidden from Students' or 'Visible to students' to reveal the visibility settings, and choose Conditional availability

3. In the Conditional Availability settings panel that will be displayed, check the Performance checkbox.
4. Choose the Graded item you want to incorporate into the rule from the list of Graded items that you have created in your module, e.g. you have created a Blackboard Test called Research Methods Test. choose this from the Graded item drop down box.
5. From the Mark requirement drop down box, choose the Points you want to use in your rule (e.g. 60 out of 100) or select Custom range and select Percent to define a minimum and maximum percentage score. Remember to enter maximum points/percentage as otherwise, it will remain as 0.
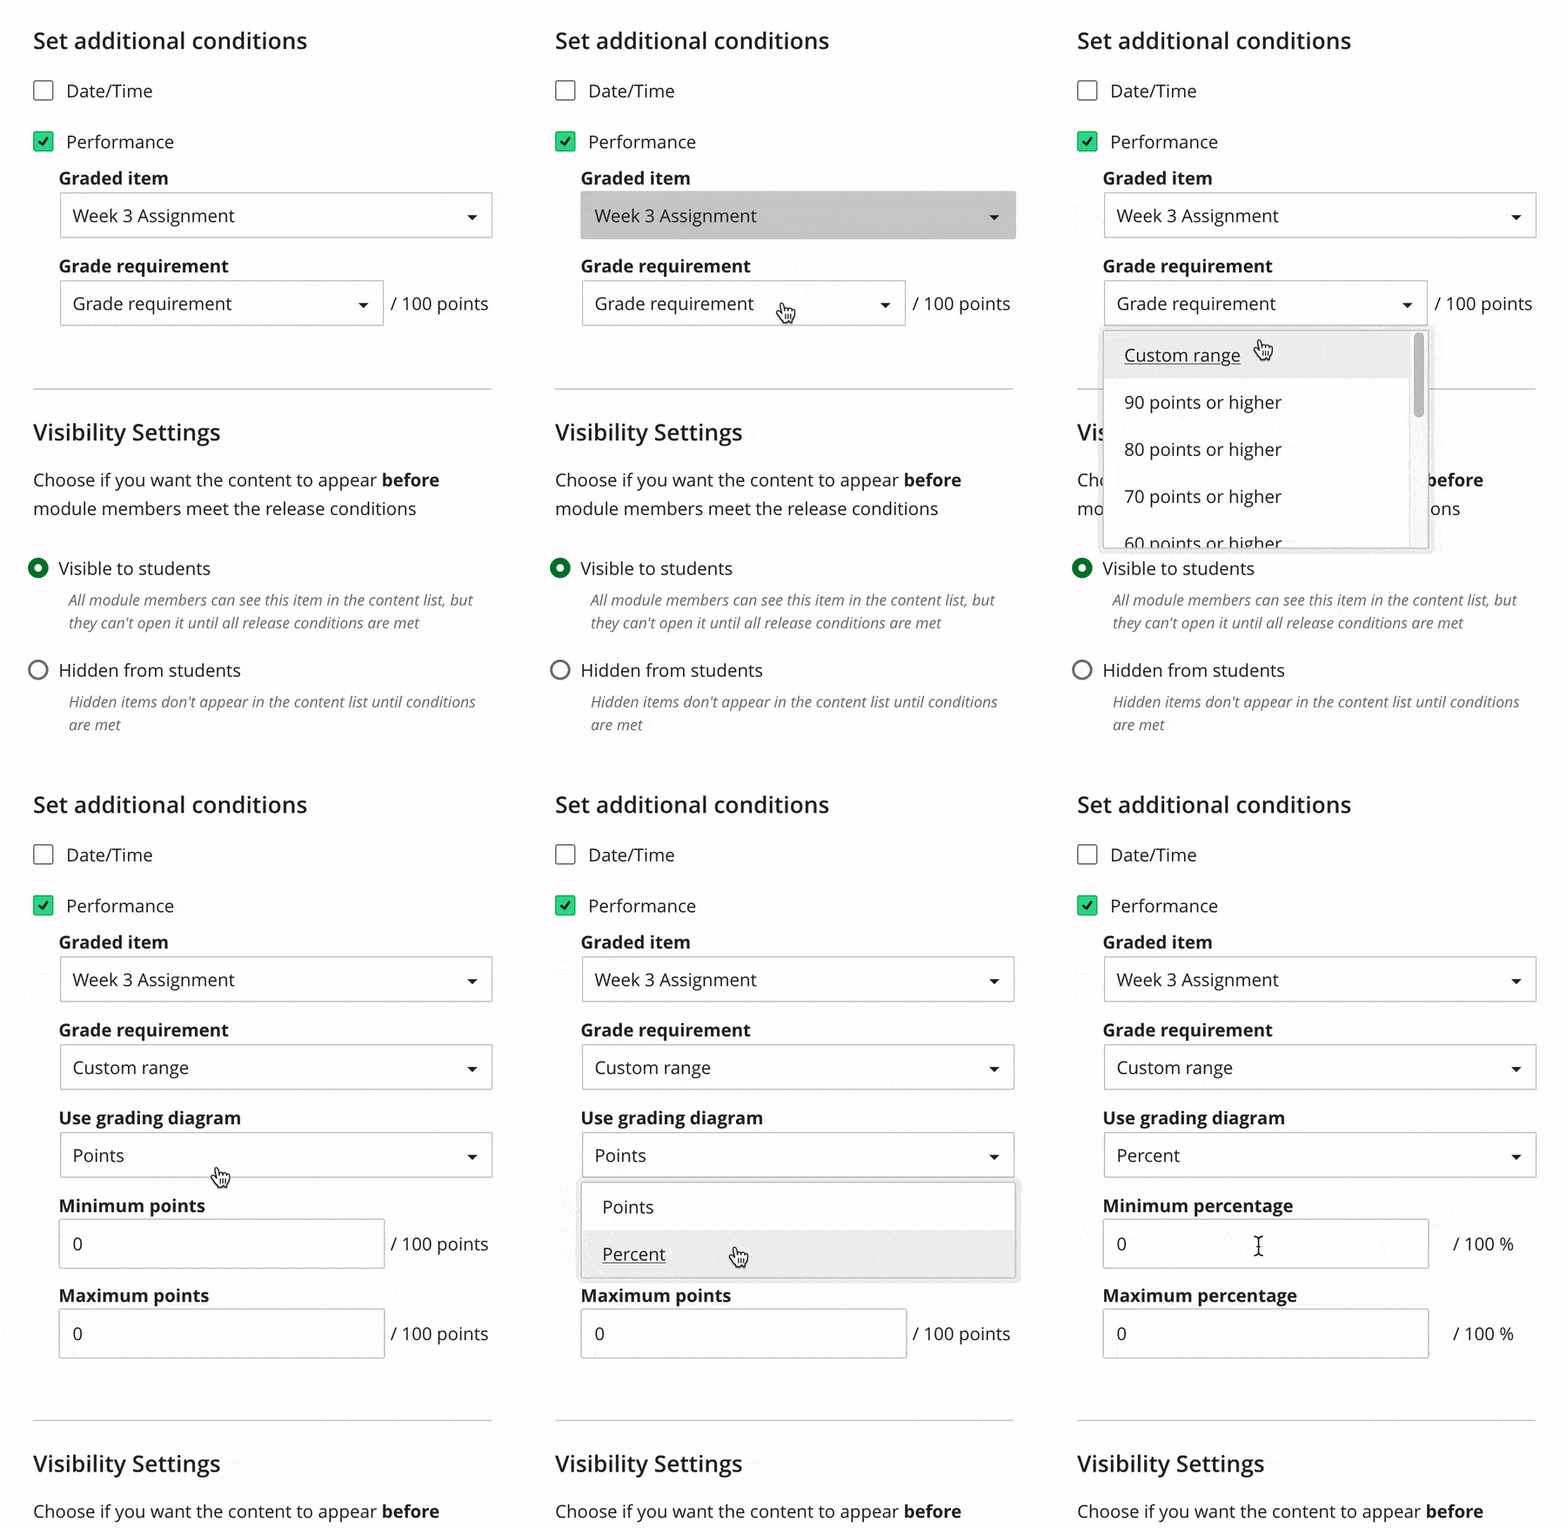
5. Next choose whether you want students to be able to see the content before/after they can access it.
- Visible to students - All module members can see the item, but they can't open it until all release conditions are met
- Hidden from students - Hidden items don't appear until conditions are met
6. Click Save to confirm your settings. Students will then be able to access the content after they have achieved the grade you defined in the rule.
To close without saving your changes, click Cancel and then select Close from the pop-up window that appears.
Set Conditional Availability based on user or groups
Tutors may have content they only want individual users/groups to access. To avoid confusion amongst the whole module cohort and to prevent others from accessing the content, a rule based on members could be used. You may also find this rule useful for making content available for students who need to resit assessments as this will prevent them receiving notifications about assessments which do not apply to them.
1. Go to the relevant content within your module: a folder, learning module or individual content item (e.g. a Document). Be careful not to set conflicting conditions within a learning module. Consider the order of items in the learning module before you set other availability conditions based on date and performance.
2. You now need to access the visibility settings:
- Click the small downward arrow next to 'Hidden from Students' or 'Visible to students' to reveal the visibility settings, and choose Conditional availability

3. In the Conditional Availability settings panel that will be displayed, check the Specific members or groups checkbox.
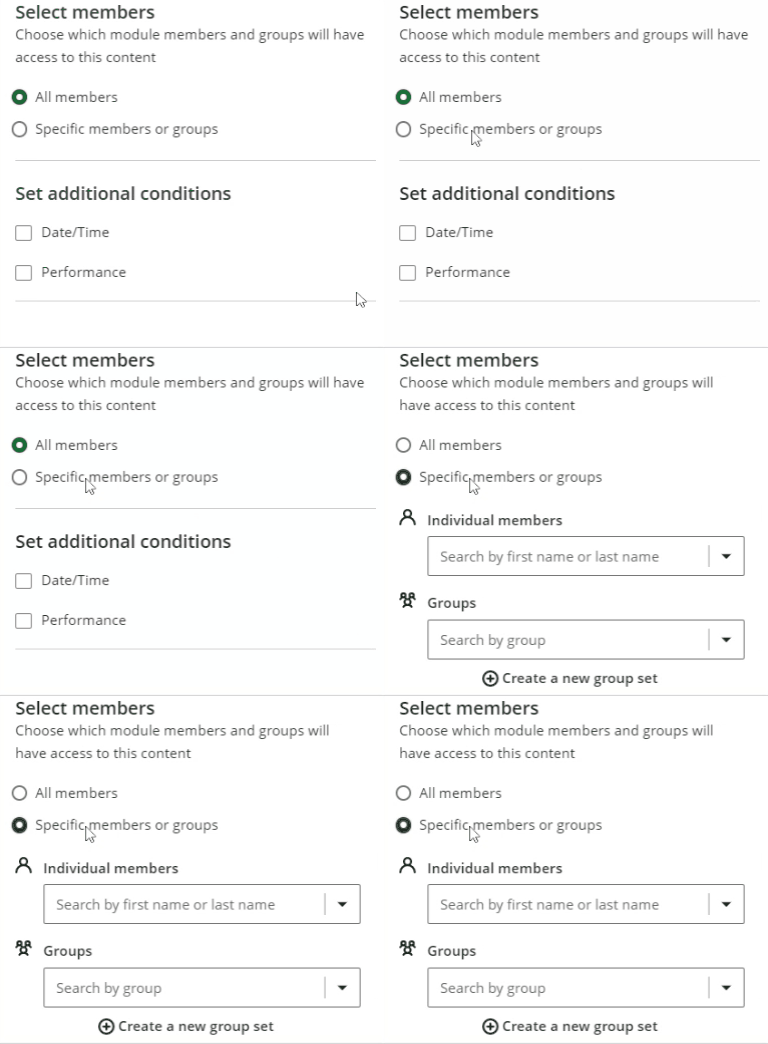
4. You will then be given the option to enter the names of individual members or search for the groups you want to use in the rule. You can use a combination of groups and individual members in the rule.
You can also add date conditions into your rule, see step 3 in the Set Conditional Availability on specific dates guide above.
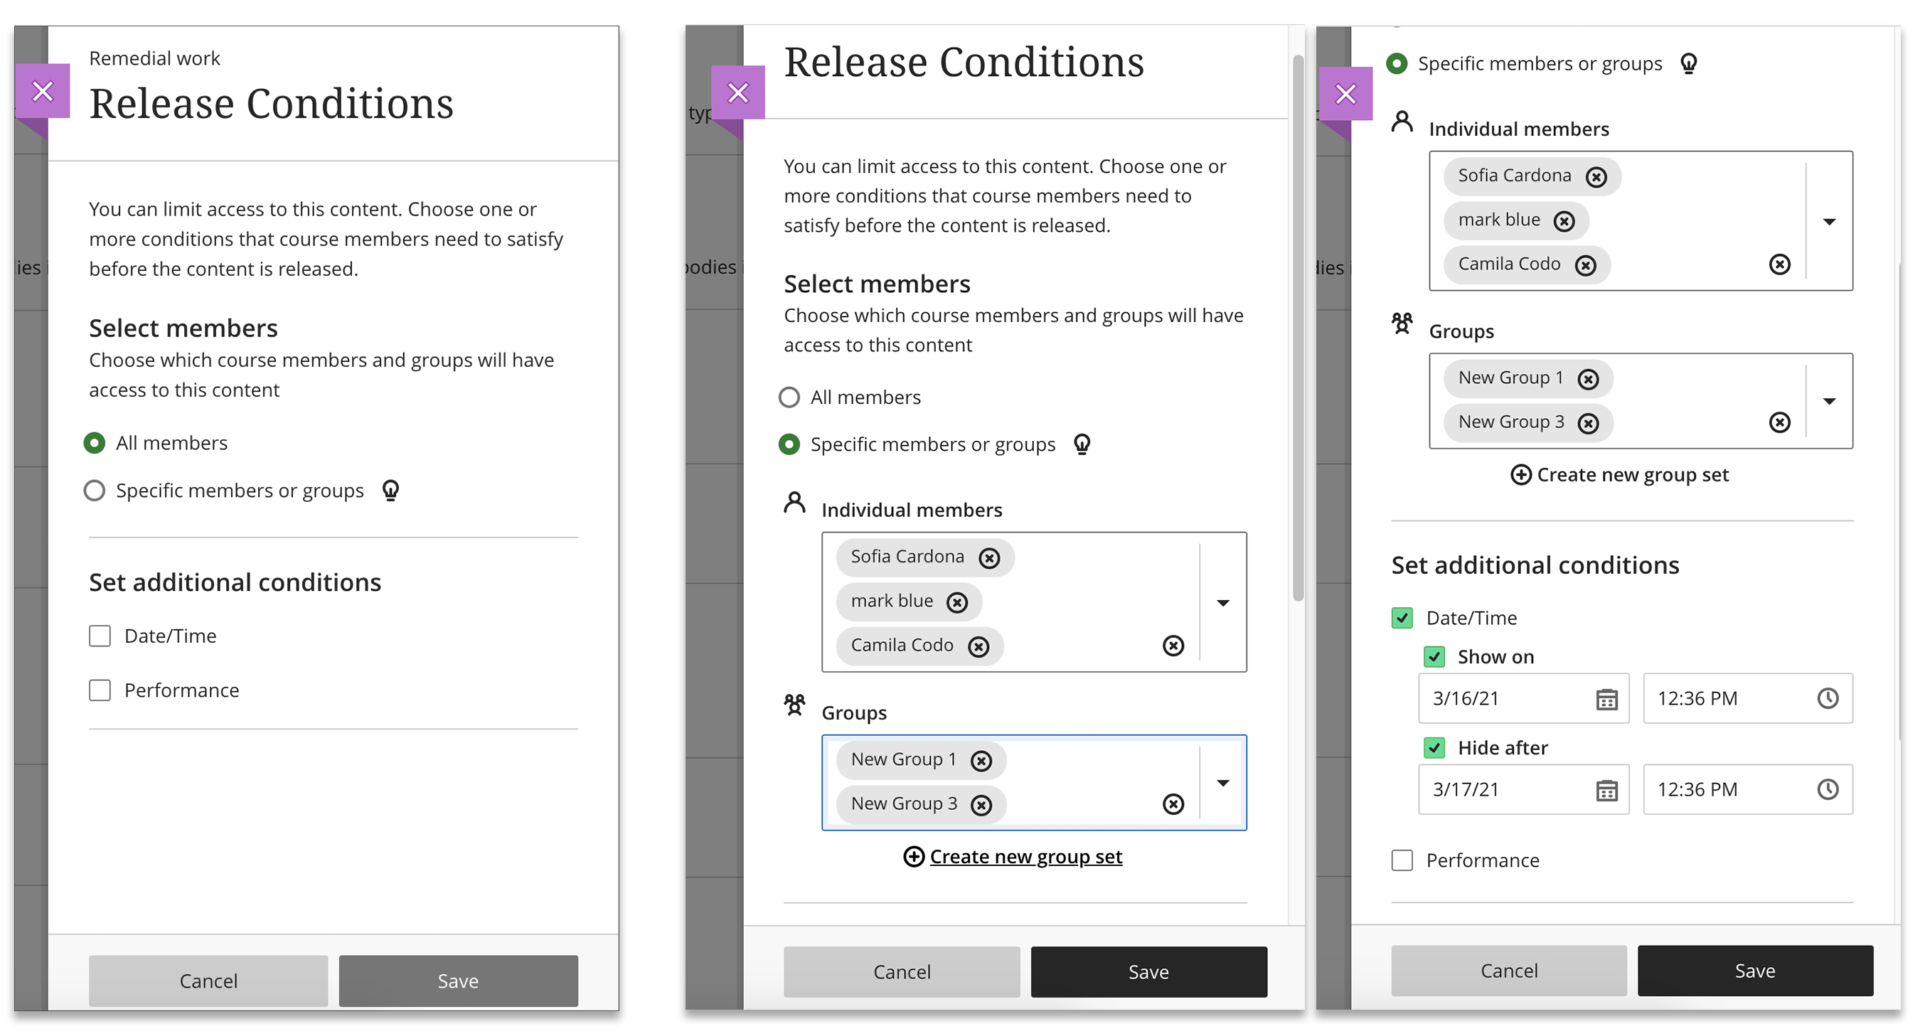
5. When releasing content to users/groups, other students will not see that the content exists. If you release content to users/groups in combination with a date or grades restriction, users will only see the content if all conditions are met.
6. Click Save to confirm your settings.
To close without saving your changes, click Cancel and then select Close from the pop-up window that appears.
Releasing content in a sequence
If you want students to access content in a particular sequence, you can use Conditional Availability and base the rules on specific dates, however, you may find learning modules are more suitable.
Learning modules let students navigate from one content item to the next, without distractions or extra clicks. You can force students to access content in a learning module in a sequential manner to make sure students know which content to access and in what order.
See, Learning Modules, to learn more about the forced sequence settings and how to use them.
Fix broken rules / Troubleshooting
Conditional availability rules break if you delete the content the rule is based on. An alert appears in the Module Content area that students are unable to access content due to broken rules. Open the Conditional Availability panel to set up a new rule.
If you base a rule on a content item that is Hidden to students, they won't have the opportunity to satisfy the conditional availability rule. However, the item with conditional availability may still appear in the Module Content area based on the visibility settings. In this case, students see a message that they can't access the content and to contact their instructor.
Watch – Applying Conditional Availability
Learn how to apply conditional availability rules (3 minutes).
