Take a Blackboard Test - Student Guide
Your tutor may ask you to take a test in Minerva using the Blackboard Test tool. Your Blackboard Test can contain questions, examples include multiple choice, fill in the blanks, yes/no, formula, mathematical and essay questions, you could also be asked to upload documents to support your answers.
| Before submitting assessed work online, we recommend you also read, Tips on submitting assessed work online |
Step 1. Find and view the Test details
Find the Blackboard Test and review the details before starting
Find and open the Test
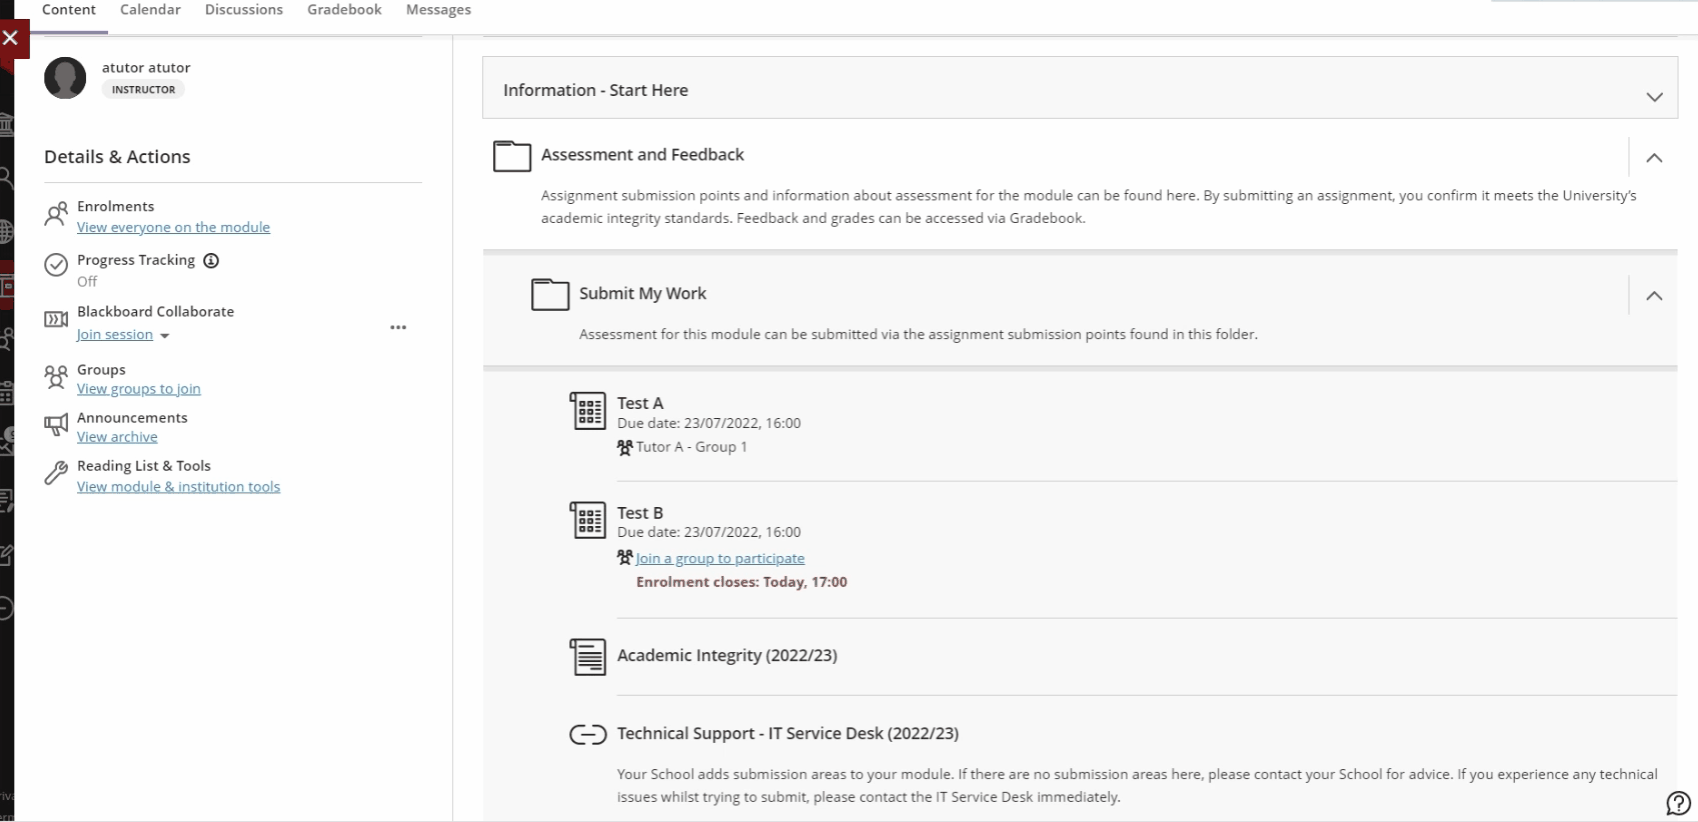
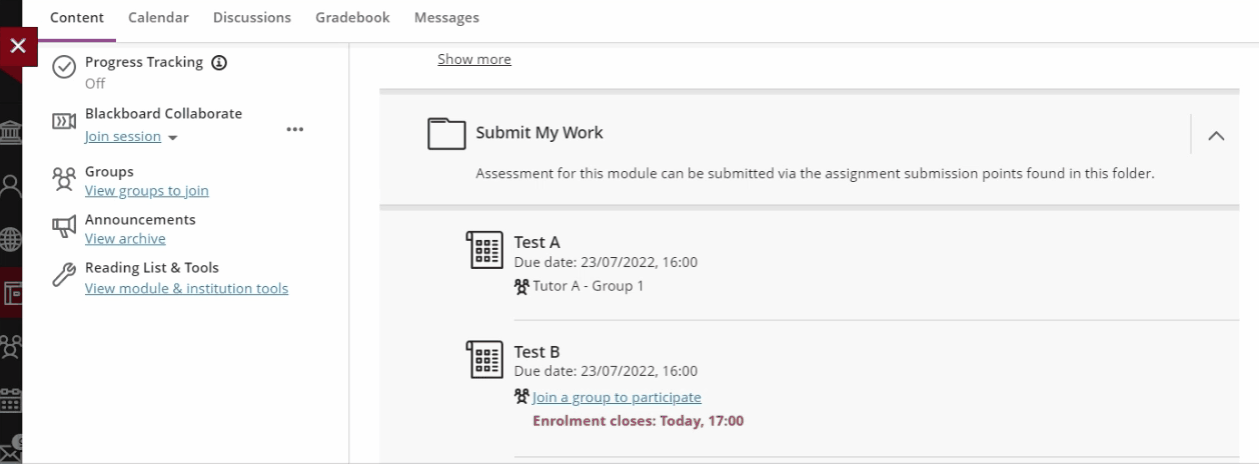
1. In Minerva, open the relevant module.
2. You should find your Test in the Module Content area of the module in the Submit My Work folder within the Assessment and Feedback folder.
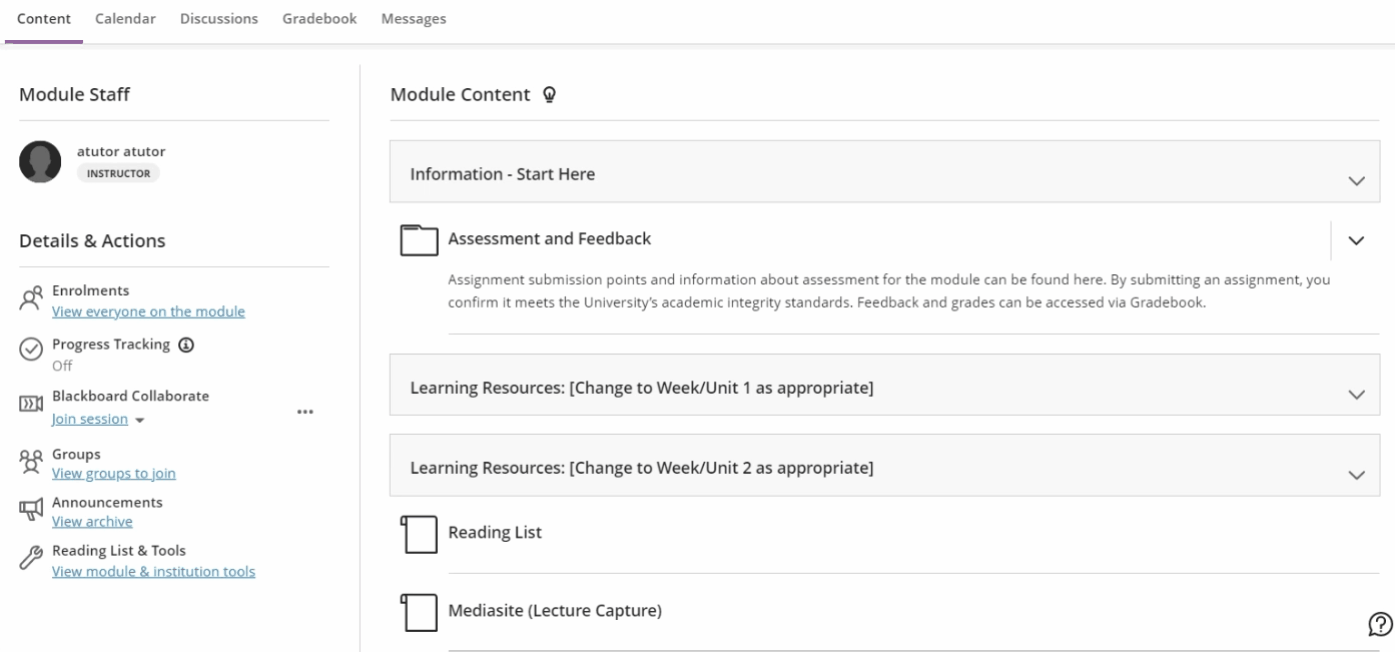
Your tutor may also organise Tests in other folders and learning modules within the Module Content area. Make sure you check the Submit your work folder for what information is available to assist you with completing your Test – your School may upload an assignment brief or information about School procedures.
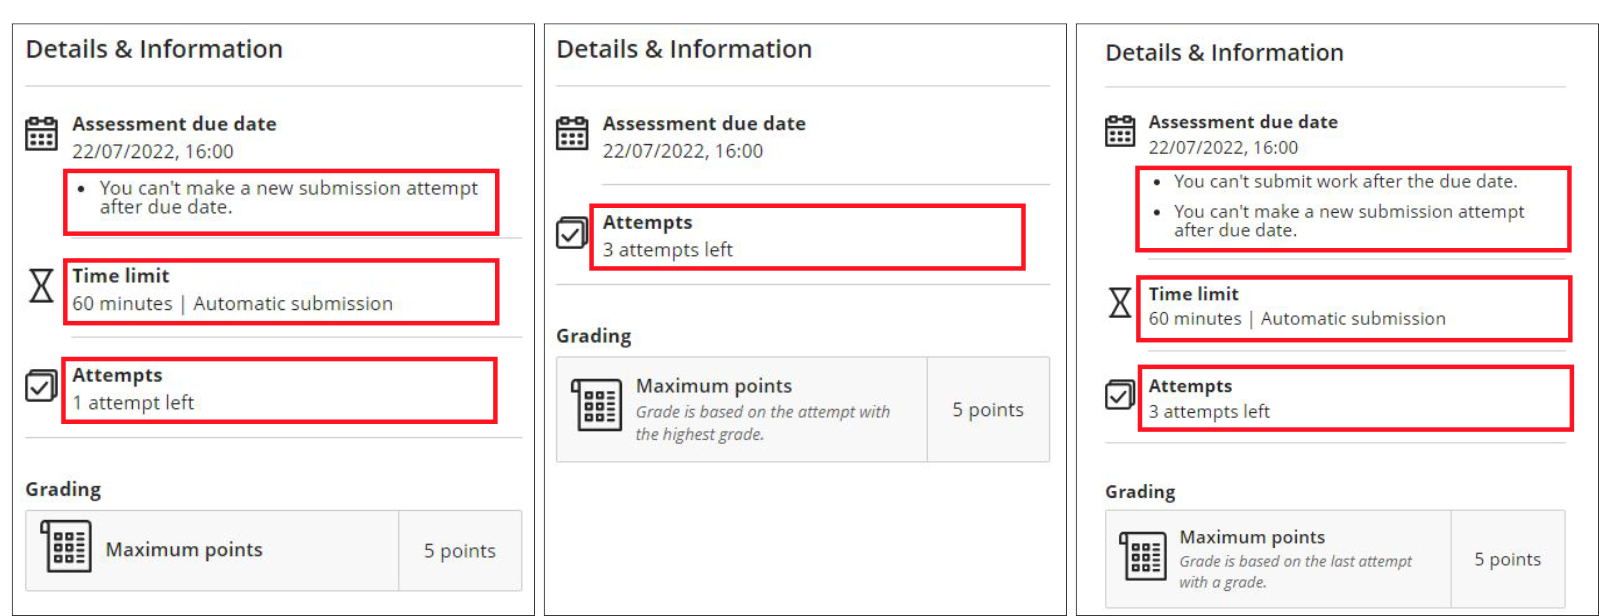
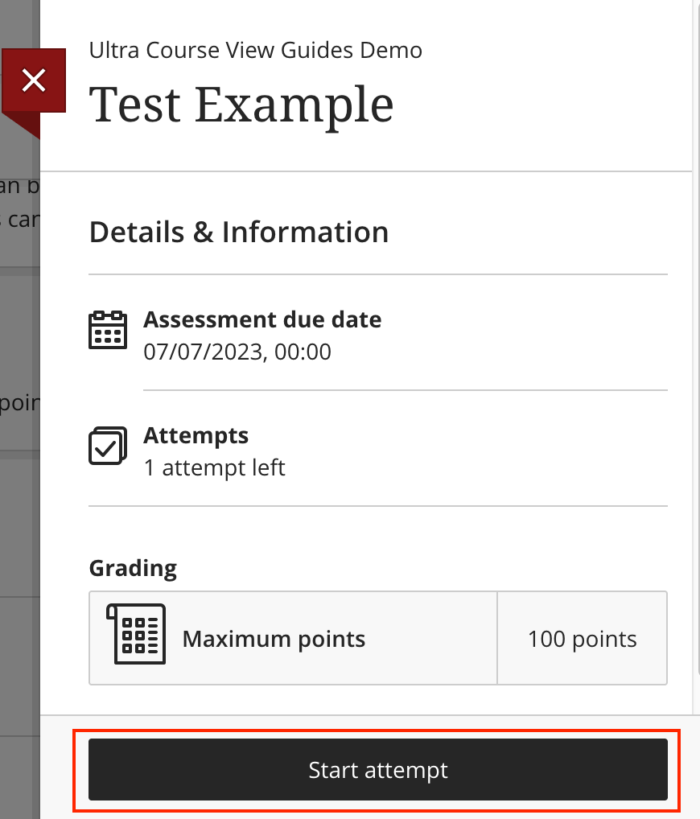
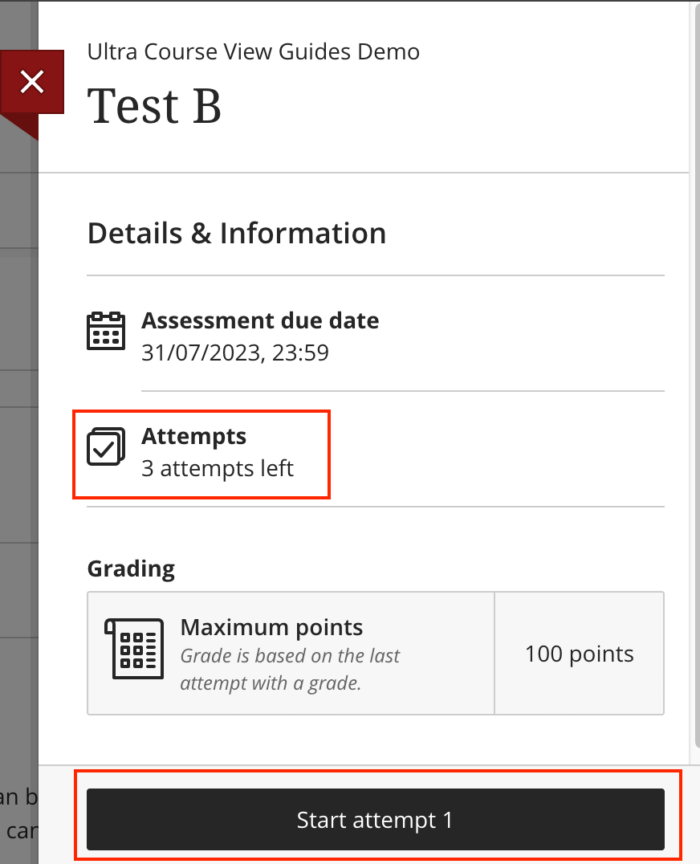
3. Click the name of the Test, this will open the Details & Information panel – the Details & Information panel is important as it provides you with information you should review before starting your submission.

Review the Test details in the Details & Information panel
4. Review the details of your Test carefully. You will see:
- the due date
- if your submission is late
In addition, depending on the settings your tutor has used, you may see:
- the number of submission attempts you will be allowed
- a time limit, if imposed
- if there is a rubric for grading
- any restrictions on submitting late
- any possible goals that your tutor wants to map against
5. Before starting the Test, if a grading rubric is being used, make sure you read the rubric. If there is a link called 'This item is graded with a rubric' under the Grading rubric heading - your work will be graded using a rubric. Click This item is graded with a rubric to open the Rubric Details panel and view the details of the grading rubric.
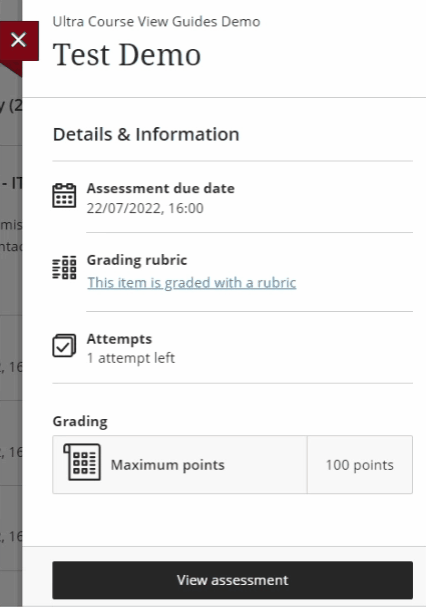
Closing the Rubric Detail panel by clicking the close icon from the top right will take you back to the Details & Information panel.
6. To view the Test - from the Details & Information panel, click the Start attempt button.
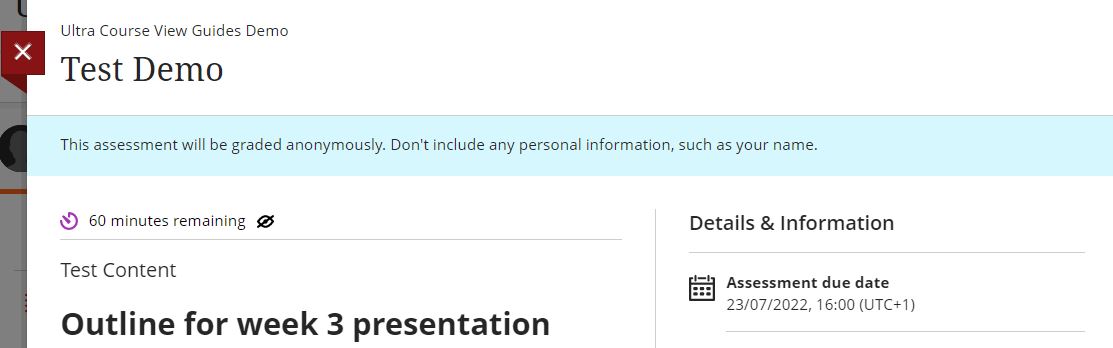
Anonymous Grading
When you view a Test, you are informed if your submission is set to be graded anonymously. A banner at the top of the page will say: 'This assessment will be graded anonymously. Don't include any personal information, such as your name.'
You should not include any easily identifying information with your submission. Don't add your name to files you upload or use your name in any text you add.
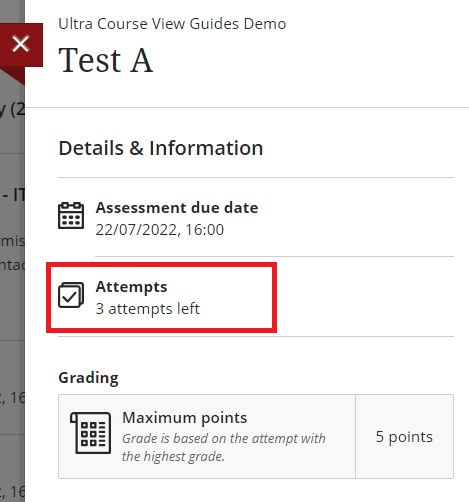
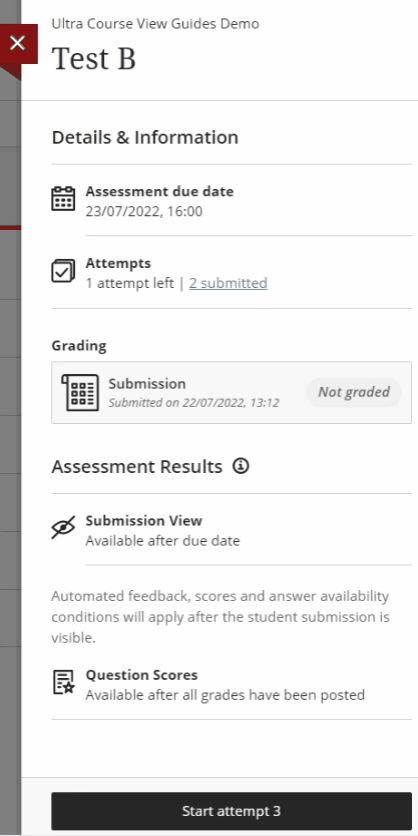
Test with multiple attempts
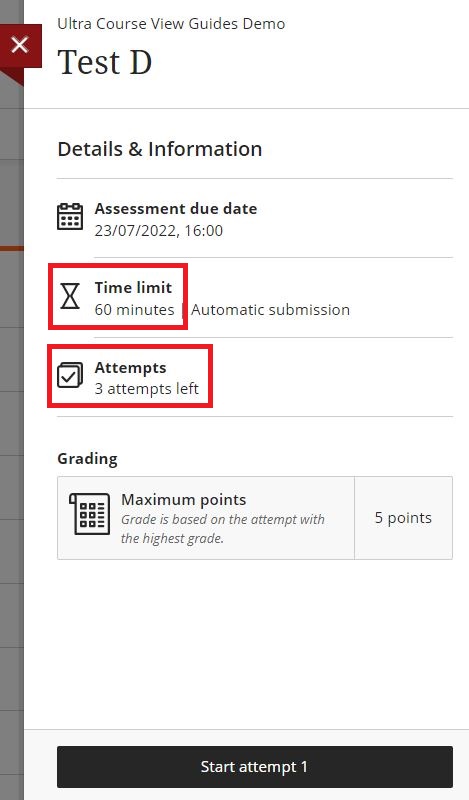
If your tutor has enabled settings to allow you to submit multiple attempts, you'll be able to see this information when you view the Test, under the Attempts heading in the Details & Information panel.
Finding your Test in the Activity Stream / Calendar
You can also find the Test in your Activity Stream or the Calendar tab.
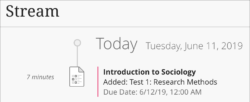
If the due date has passed for a Test, you’re alerted in the Important section of your Activity Stream.
Now let's move on to Step 2.
Step 2. (choose the relevant Test type from below)
Take a Non-Timed Test where you have 1 attempt
Take your Test
1. Click the name of the Test. This will open the Details & Information panel - review the details of the Test.

2. Click Start attempt when you are ready to begin.
3. You'll then be shown the Test.
Important: Late and in-progress submissions
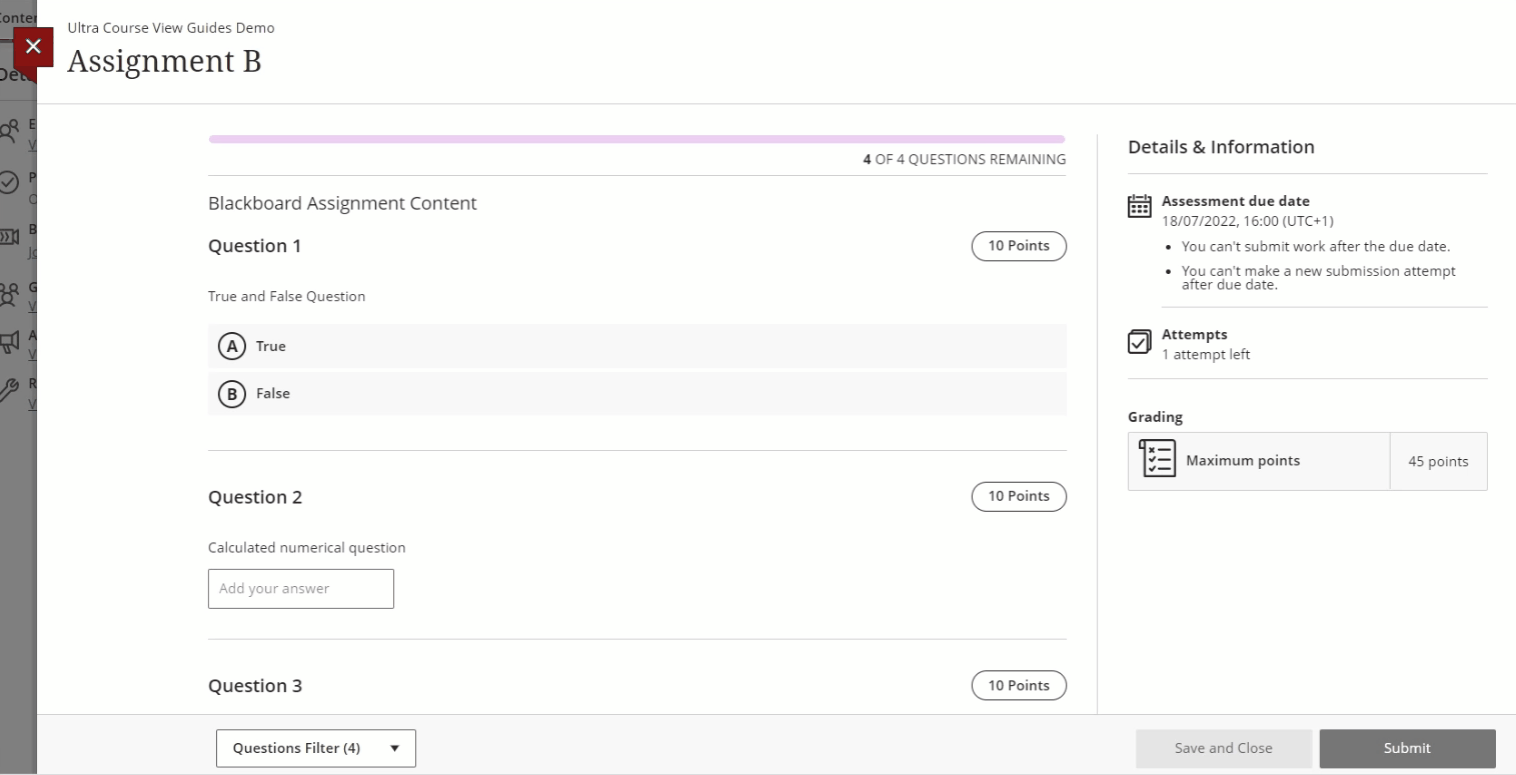
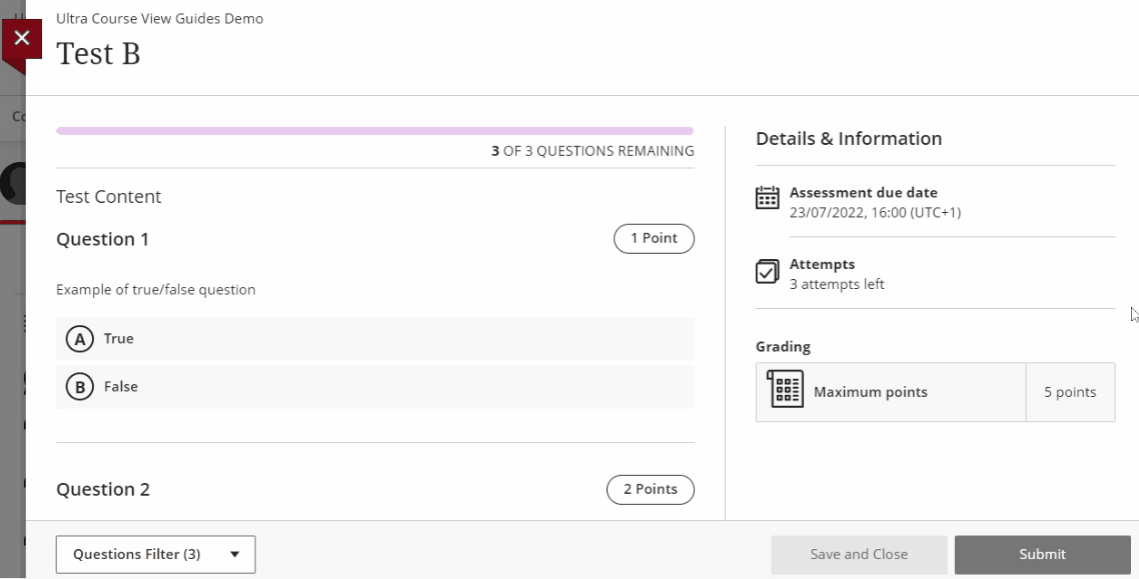
Start answering the questions/upload your documents as prompted on screen. The Submit button will be disabled, until you attempt your first question (or type some text in a text field).
- Depending on the settings your tutor has applied, you may see all the questions on one page, or you may have to view a question before you can see the next one. If this is the case you'll see a continue button under the question, click Continue to move to the next question. If you move to the next question without answering the current question, you'll be reminded to review your answers before you submit.
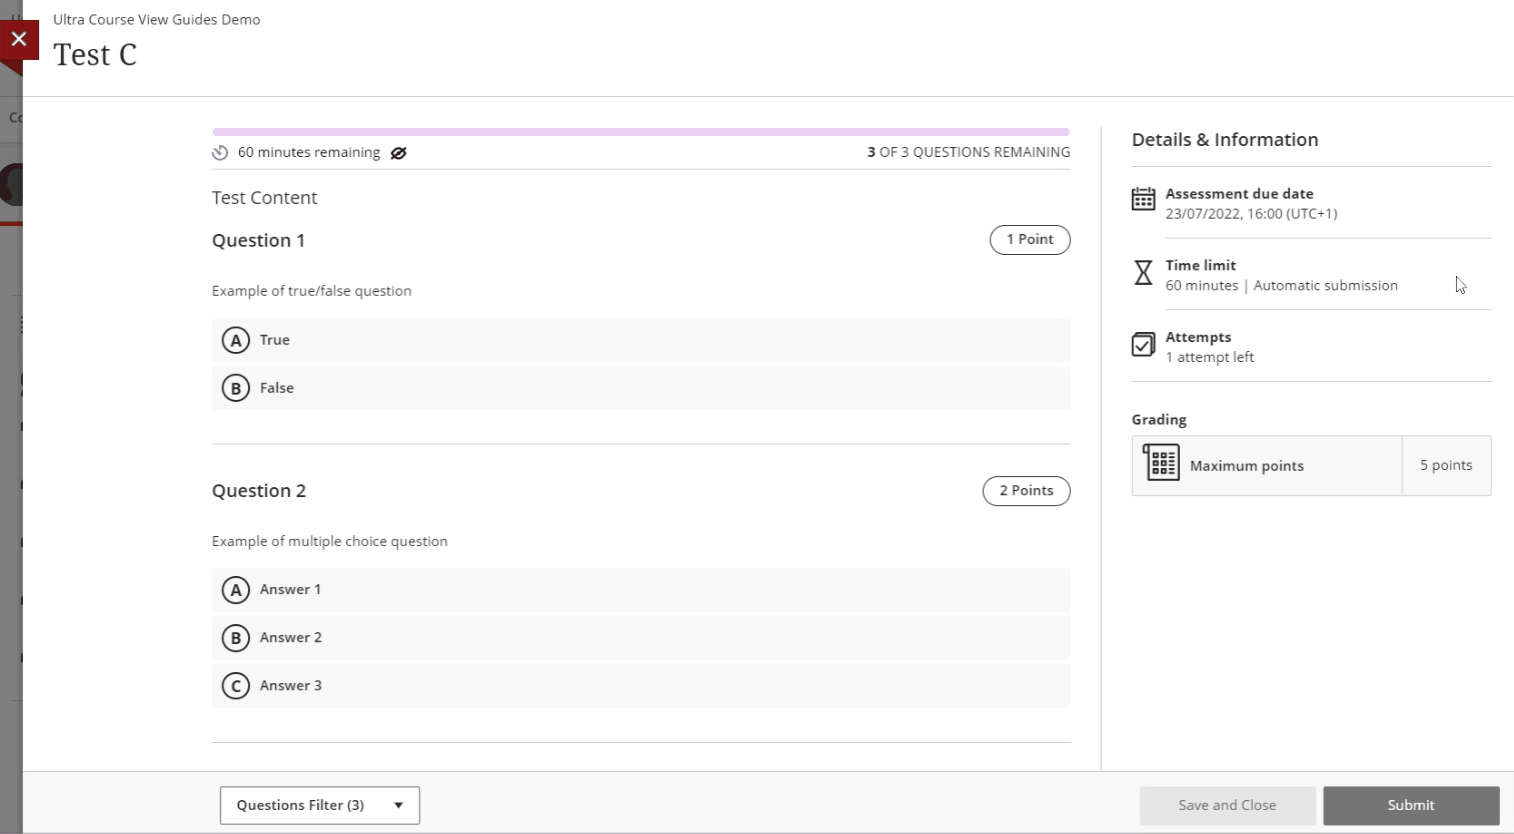
Your progress is shown at the top of the screen, e.g. 2 of 4 questions remaining.
If you are asked to submit a file or type in text, you'll see a text editor field. Click into the field to see formatting and editing options.
If you are asked to upload files
a. Click into the text editor field to reveal the format and editing options.
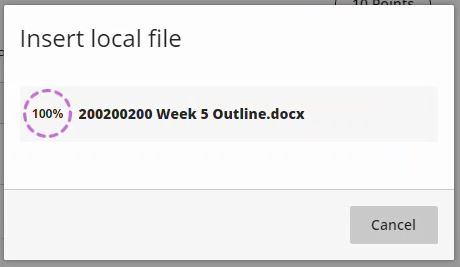
b. Click the paperclip icon, this will open the file explorer for you to insert the file of your choosing.
![]()
c. Locate the document you want to insert and click Open. Your file will then be uploaded (at this point depending on how large your file is you may be given the option to cancel the download).
d. Click Save to confirm the file upload.
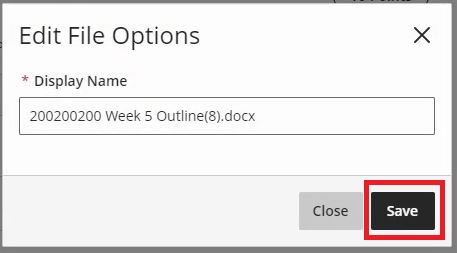
An document icon along with the name of your document should appear in the editor to show it has been attached. You have the option to delete the file by clicking the trash icon to the right of the file name.
![]()
When uploading multiple files, your tutor may ask you to combine them into a zip file first. If you're not sure how to create zip files, see zip your files for submission.
Important: During the Test
If you want to stop working for any reason, you can choose Save and Close.

When you are ready to resume working/submit your Test, you'll be able to open the Test again by clicking View assessment.
4. Once you have answered the questions/uploaded the relevant documents and are ready to submit, select Submit.

5. A pop-up window asking you to confirm if you want to submit the Test will be displayed, select Submit.
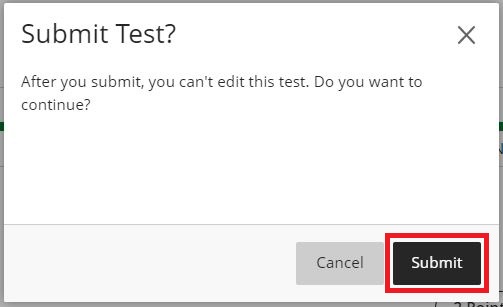
- If you have any unanswered questions when you click Submit, a pop-up window will ask you if you want to Submit as you still have unanswered questions. Click Keep working if you want to go back and answer the question before submitting. Select Submit if you are ready to submit your work as it is.

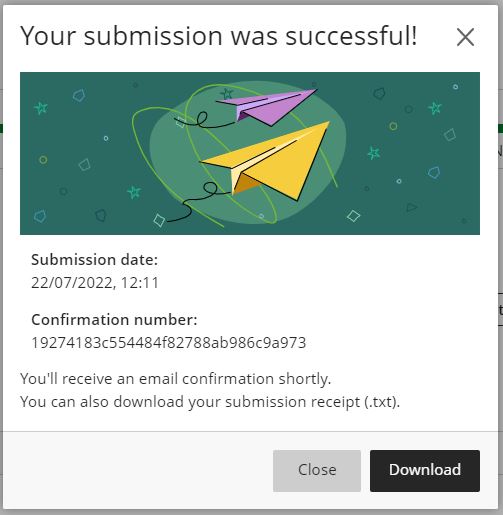
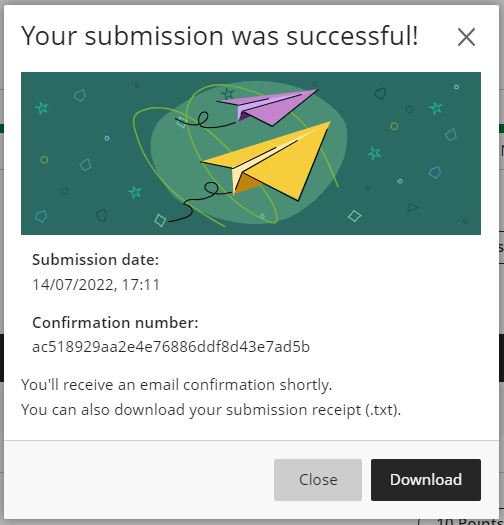
Confirmation/receipt of submission
Once you have clicked Submit, you should see a 'Your submission was successful' pop-up message. This will provide you with a confirmation number and the time and date of your submission. It will advise you that you'll receive an email confirmation shortly. Note: during busy times, it can take a few hours for you to receive an email.
You will also have the option to Download a copy of your submission receipt.
After you submit
You can't edit your work after you submit. After submission, if you look in the Gradebook, you'll notice the status column for the Test will now say 'Submitted'. You may need to refresh your browser.

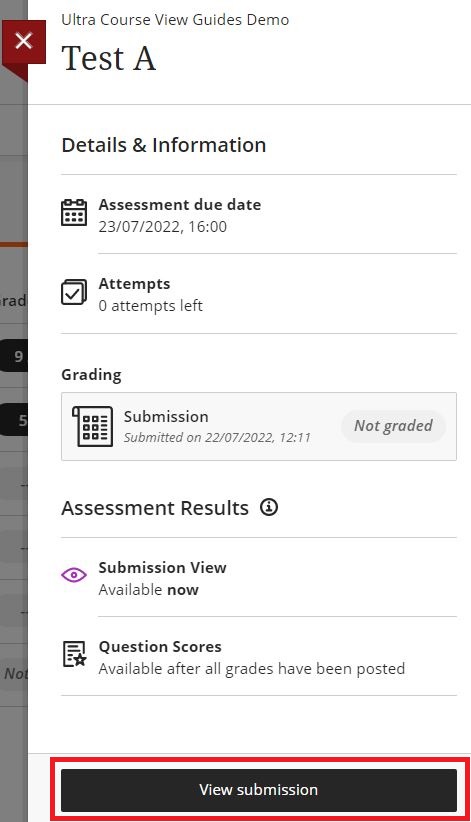
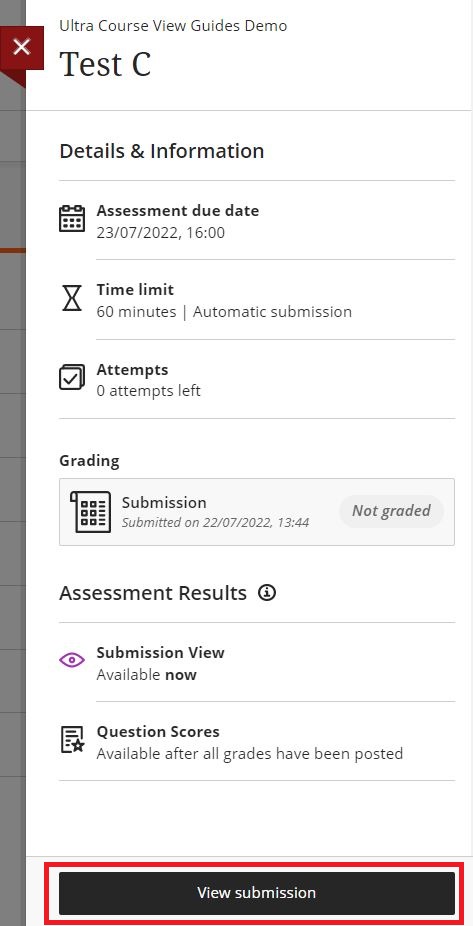
Viewing your submission
You may see the option to ‘View Submission’ in the Details & Information panel (this appears when you have the Test open). Click View Submission to see the answers/work you submitted. Note: depending on the settings your tutor has used for the Test, you may not be able to view your submission until after your work is graded.
Take a Non-Timed Test where you are allowed multiple attempts
If your tutor has enabled multiple attempts for a Test you'll see this information when you look at the Details & Information panel for the Test.
Take your Test
1. Click the name of the Test. This will open the Details & Information panel - review the details of the Test.
You'll be able to see the number of attempts you have (and how many you have left, after you submit).
2. Click Start attempt when you are ready to begin.
3. You'll then be shown the Test.
Important: Late and in-progress submissions
Start answering the questions/upload your documents as prompted on screen. The Submit button will be disabled, until you attempt your first question (or type some text in a text field).
- Depending on the settings your tutor has applied, you may see all the questions on one page, or you may have to view a question before you can see the next one. If this is the case you'll see a continue button under the question, click Continue to move to the next question. If you move to the next question without answering the current question, you'll be reminded to review your answers before you submit.
Your progress is shown at the top of the screen, e.g. 2 of 4 questions remaining.
If you are asked to submit a file or type in text, you'll see a text editor field. Click into the field to see formatting and editing options.
If you are asked to upload files
a. Click into the text editor field to reveal the format and editing options.
b. Click the paperclip icon, this will open the file explorer for you to insert the file of your choosing.
![]()
c. Locate the document you want to insert and click Open. Your file will then be uploaded (at this point depending on how large your file is you may be given the option to cancel the download).
d. Click Save to confirm the file upload.
An document icon along with the name of your document should appear in the editor to show it has been attached. You have the option to delete the file by clicking the trash icon to the right of the file name.
![]()
When uploading multiple files, your tutor may ask you to combine them into a zip file first. If you're not sure how to create zip files, see zip your files for submission.
Important: During the Test
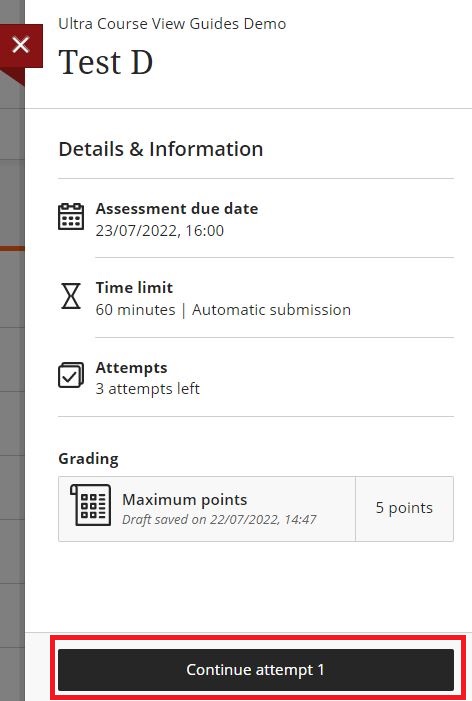
If you want to stop working for any reason, you can choose Save and Close.
When you are ready to resume working/submit your Test, you'll be able to open the Test again by clicking Continue attempt.
4. Once you have answered the questions/uploaded the relevant documents and are ready to submit, select Submit.
5. A pop-up window asking you to confirm if you want to submit the Test will be displayed, select Submit.
- If you have any unanswered questions when you click Submit, a pop-up window will ask you if you want to Submit as you still have unanswered questions. Click Keep working if you want to go back and answer the question before submitting. Select Submit if you are ready to submit your work as it is.
Confirmation/receipt of submission
Once you have clicked Submit, you should see a 'Your submission was successful' pop-up message. This will provide you with a confirmation number and the time and date of your submission. It will advise you that you'll receive an email confirmation shortly. Note: during busy times, it can take a few hours for you to receive an email.
You will also have the option to Download a copy of your submission receipt.
If the due date has passed, and you still have some attempts left, your tutor may enable a setting allowing you to submit these attempts late. You will see a system message advising you that your next attempt will be marked late. Do not attempt another submission after the due date has passed without first understanding the penalty for late submission (speak to your tutor if you are unsure).
After you submit
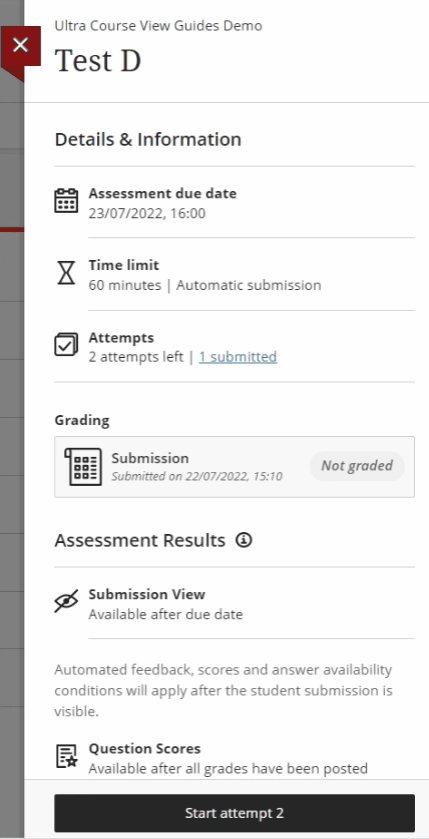
You can't edit your work after you submit. After submission, if you look in the Gradebook, you'll notice the status column for the Test will now say 'Submitted'. Under the name of the Test you'll also see '1 attempt submitted'. You may need to refresh your browser.

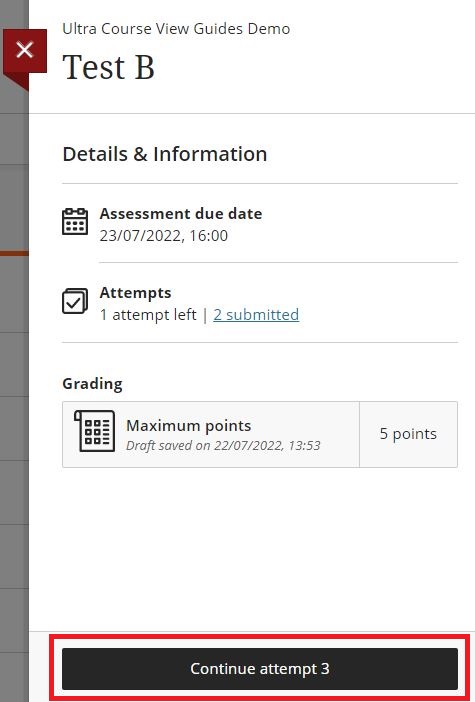
Once you have made your first submission, you will be able to see the grading calculation that will be used to grade your Test - this can help you to decide if you want to make additional attempts:
1. Click the name of the Test to open the Details & Information panel.
2. Under the Attempts heading, click the link which tells you how many submissions you have submitted, e.g. 1 Submitted. This will open the Submission panel. Under the Final Grade heading you'll see the calculation your tutor intends to use, this could be one of the following:
- Average of all attempts
- First attempt with a grade
- Attempt with highest grade
- Last attempt with a grade
- Attempt with lowest grade
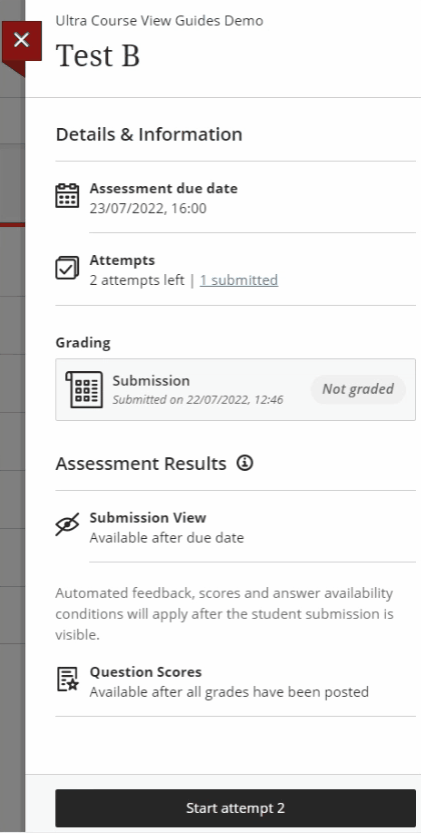
3. If you want to attempt another submission, select Start attempt 2 (and so on). You will then submit your Test in the same way as before.
Viewing your submission
You may see the option to ‘View Submission’ in the Details & Information panel (this appears when you have the Test open). Click View Submission to see the answers/work you submitted for each of your attempts. Note: depending on the settings your tutor has used for the Test, you may not be able to view your submissions until after your work is graded.
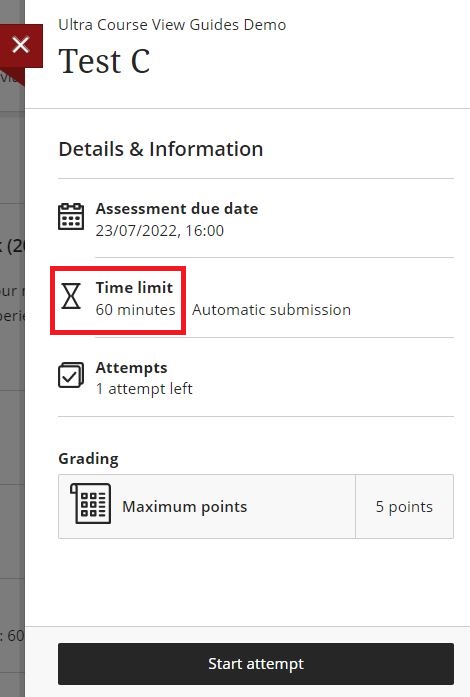
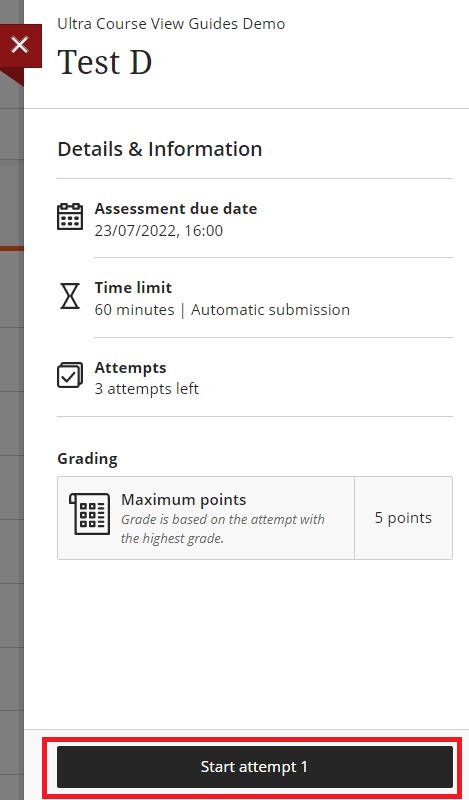
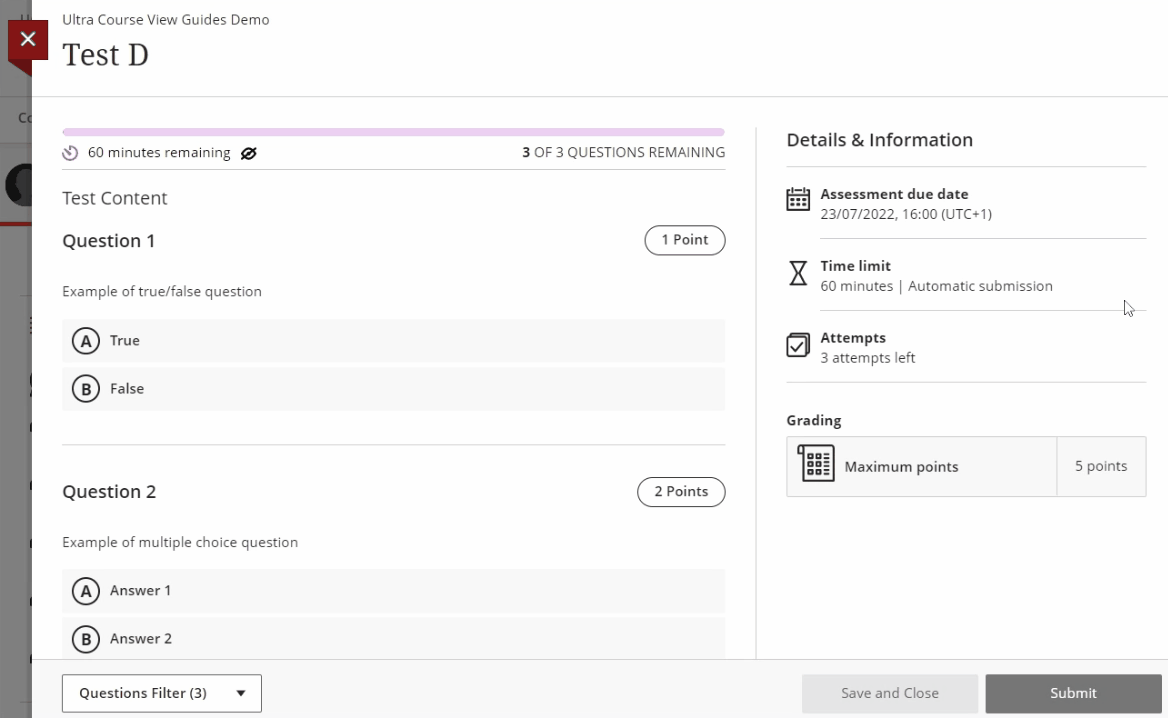
Take a Timed Test where you have 1 attempt
Your tutor may limit the amount of time you have to complete your Test (e.g. 60 minutes, once started). Time limit information appears alongside other Test details in the Module Content area. You'll also see the time limit when you open the Test - in the Details & Information panel, and within the Test, as you work.
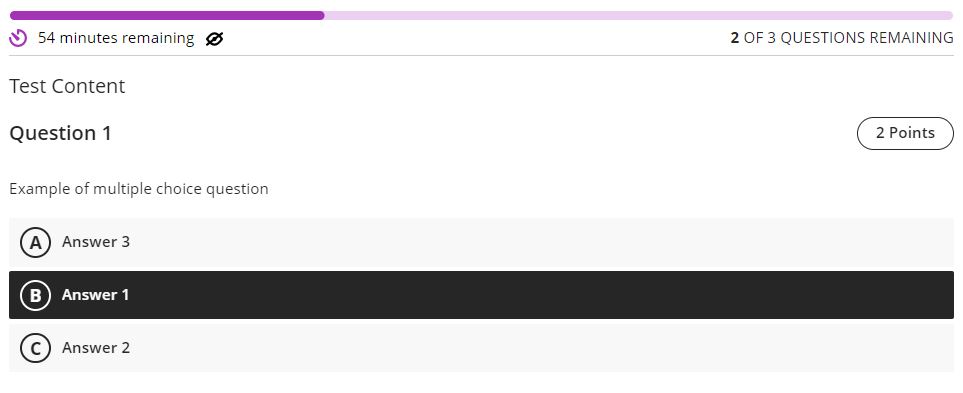
Once you start the Test, you'll find a timer at the top of the screen (above the questions), this will let you know the remaining time in minutes and, during the last minute, the time you have left down to the last second.
Start and submit a timed Test
1. Select the name of the Test to open it. This will open the Details & Information panel - review the details of the Test.
2. When you are ready to start, click the Start attempt button. If you see 'View assessment' instead of 'Start attempt' the Test isn't timed, refer to the non-timed submission guides above.
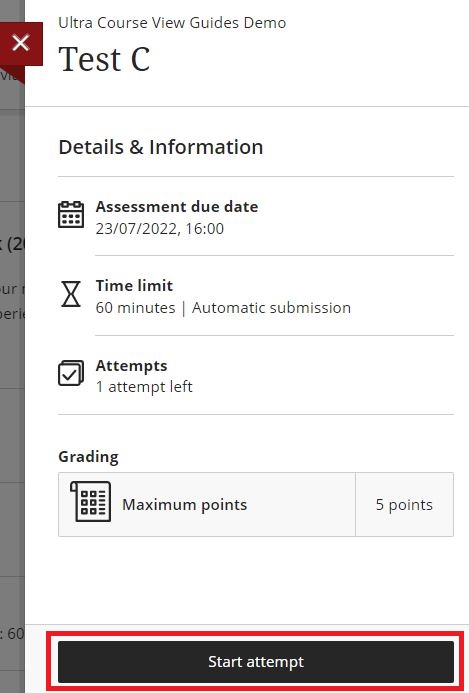
A pop-up window will be displayed to notify you the timer will start. If you're not ready to start, select Cancel. If you are ready to start, select Start Timer.

Important
3. Start answering the questions/upload your documents as prompted on screen. The Submit button will be disabled, until you attempt your first question (or type some text in a text field).
- Depending on the settings your tutor has applied, you may see all the questions on one page, or you may have to view a question before you can see the next one. If this is the case you'll see a continue button under the question, click Continue to move to the next question. If you move to the next question without answering the current question, you'll be reminded to review your answers before you submit.
Your progress is shown at the top of the screen, e.g. 2 of 4 questions remaining.
If you are asked to submit a file or type in text, you'll see a text editor field. Click into the field to see formatting and editing options.
If you are asked to upload files
a. Click into the text editor field to reveal the format and editing options.
b. Click the paperclip icon, this will open the file explorer for you to insert the file of your choosing.
![]()
c. Locate the document you want to insert and click Open. Your file will then be uploaded (at this point depending on how large your file is you may be given the option to cancel the download).
d. Click Save to confirm the file upload.
An document icon along with the name of your document should appear in the editor to show it has been attached. You have the option to delete the file by clicking the trash icon to the right of the file name.
![]()
When uploading multiple files, your tutor may ask you to combine them into a zip file first. If you're not sure how to create zip files, see zip your files for submission.
Important: During the Test
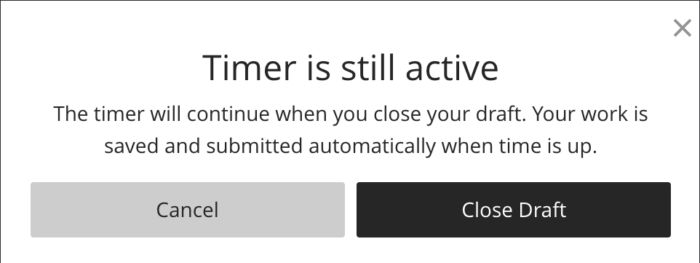
If you want to stop working for any reason, you can choose Save and Close.
You are reminded that the timer will continue and need to confirm if you want to Close Draft, or Cancel and return to the Test.
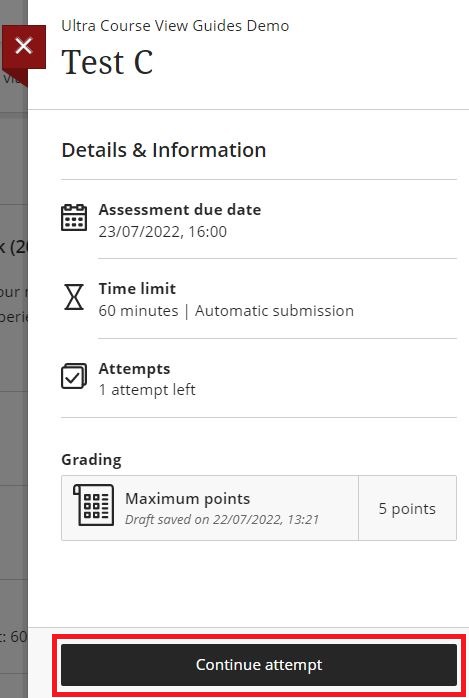
When you are ready to resume working/submit, you'll be able to open the Test again by clicking Continue attempt.
4. Once you have answered the questions/uploaded the relevant documents and are ready to submit, select Submit.
5. A pop-up window asking you to confirm if you want to submit the Test will be displayed, select Submit.
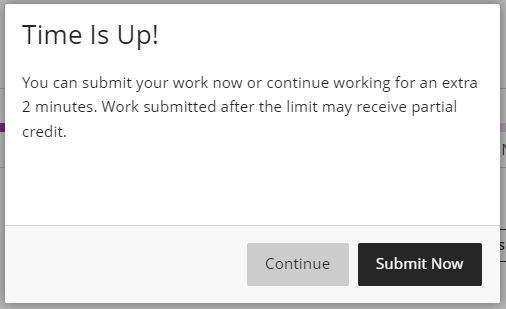
If you do not click Submit before the timer lapses; depending on the settings your tutor has applied, you may see 1 of two messages when the timer gets to zero:
- Your Test will auto-submit and you'll see a message advising you Time is up and that your Test has been submitted.
OR
- You'll see a message advising you Time is up and that you can continue working for an extra amount of time, though work submitted after the limit may receive partial credit. Click Submit Now if you want to avoid the penalties for extra time.
Unanswered Questions
If you have any unanswered questions when you click Submit, a pop-up window will ask you if you want to Submit as you still have unanswered questions. Click Keep working if you want to go back and answer the question before submitting. Select Submit if you are ready to submit your work as it is.
Confirmation/receipt of submission
Once you have clicked Submit, you should see a 'Your submission was successful' pop-up message. This will provide you with a confirmation number and the time and date of your submission. It will advise you that you'll receive an email confirmation shortly. Note: during busy times, it can take a few hours for you to receive an email.
You will also have the option to Download a copy of your submission receipt.
After you submit
You can't edit your work after you submit. In-progress attempts will be submitted automatically once the timer counts down to zero.
After submission, if you look in the Gradebook, you'll notice the status column for the Test will now say 'Submitted'.

Viewing your submission
You may see the option to 'View Submission' in the Details & Information panel (this appears when you have the Test open). Click View Submission to see the answers/work you submitted. Note: depending on the settings your tutor has used for the Test, you may not be able to view your submission until after your work is graded.
Take a Timed Test where you are allowed multiple attempts
Your tutor may limit the amount of time you have to complete your Test (e.g. 60 minutes, once started), along with giving you multiple attempts to submit. Time limit information appears alongside other Test details in the Module Content area. You'll also see the time limit when you open the Test - in the Details & Information panel, and within the Test, as you work.
Your tutor may also allow you to submit multiple times, you'll see the number of attempts you have in the Details & Information panel. The time limit for the Test applies to each attempt.
Once you've started the Test, you'll find a timer at the top of the screen (above the questions), this will let you know the remaining time in minutes and, during the last minute, the time you have left down to the last second.
Start and submit a timed Test
1. Select the name of the Test to open it. This will open the Details & Information panel - review the details of the Test.
2. When you are ready to start, click the Start attempt 1 button. If you see 'View assessment' instead of 'Start attempt' the Test isn't timed, refer to the non-timed submission guides above.
A pop-up window will be displayed to notify you the timer will start. If you're not ready to start, select Cancel. If you are ready to start, select Start Timer.
Important
3. Start answering the questions/upload your documents as prompted on screen. The Submit button will be disabled, until you attempt your first question (or type some text in a text field).
- Depending on the settings your tutor has applied, you may see all the questions on one page, or you may have to view a question before you can see the next one. If this is the case you'll see a continue button under the question, click Continue to move to the next question. If you move to the next question without answering the current question, you'll be reminded to review your answers before you submit.
Your progress is shown at the top of the screen, e.g. 2 of 4 questions remaining.
If you are asked to submit a file or type in text, you'll see a text editor field. Click into the field to see formatting and editing options.
If you are asked to upload files
a. Click into the text editor field to reveal the format and editing options.
b. Click the paperclip icon, this will open the file explorer for you to insert the file of your choosing.
![]()
c. Locate the document you want to insert and click Open. Your file will then be uploaded (at this point depending on how large your file is you may be given the option to cancel the download).
d. Click Save to confirm the file upload.
An document icon along with the name of your document should appear in the editor to show it has been attached. You have the option to delete the file by clicking the trash icon to the right of the file name.
![]()
When uploading multiple files, your tutor may ask you to combine them into a zip file first. If you're not sure how to create zip files, see zip your files for submission.
Important: During the Test
If you want to stop working for any reason, you can choose Save and Close.
You are reminded that the timer will continue and need to confirm if you want to Close Draft, or Cancel and return to the Test.
When you are ready to resume working/submit, you'll be able to open the Test again by clicking Continue attempt.
4. Once you have answered the questions/uploaded the relevant documents and are ready to submit, select Submit.
5. A pop-up window asking you to confirm if you want to submit the Test will be displayed, select Submit.
If you do not click Submit before the timer lapses; depending on the settings your tutor has applied, you may see 1 of two messages when the timer gets to zero:
- Your Test will auto-submit and you'll see a message advising you Time is up and that your Test has been submitted.
OR
- You'll see a message advising you Time is up and that you can continue working for an extra amount of time, though work submitted after the limit may receive partial credit. Click Submit Now if you want to avoid the penalties for extra time.
Unanswered Questions
If you have any unanswered questions when you click Submit, a pop-up window will ask you if you want to Submit as you still have unanswered questions. Click Keep working if you want to go back and answer the question before submitting. Select Submit if you are ready to submit your work as it is.
Confirmation/receipt of submission
Once you have clicked Submit, you should see a 'Your submission was successful' pop-up message. This will provide you with a confirmation number and the time and date of your submission. It will advise you that you'll receive an email confirmation shortly. Note: during busy times, it can take a few hours for you to receive an email.
You will also have the option to Download a copy of your submission receipt.
If the due date has passed, and you still have some attempts left, your tutor may enable a setting allowing you to submit these attempts late. You will see a system message advising you that your next attempt will be marked late. Do not attempt another submission after the due date has passed without first understanding the penalty for late submission
After you submit
You can't edit your work after you submit. In-progress attempts will be submitted automatically once the timer counts down to zero.
After submission, if you look in the Gradebook, you'll notice the status column for the Test will now say 'Submitted'. Under the name of the Test you'll also see '1 attempt submitted'.

Attempting further submissions
Once you have made your first submission, you will be able to see the grading calculation that will be used to grade your Test – this can help you to decide if you want to make additional attempts:
1. Click the name of the Test to open the Details & Information panel.
2. Under the Attempts heading, click the link which tells you how many submissions you have submitted, e.g. 1 Submitted. This will open the Submission panel. Under the Final Grade heading you’ll see the calculation your tutor intends to use, this could be one of the following:
- Average of all attempts
- First attempt with a grade
- Attempt with highest grade
- Last attempt with a grade
- Attempt with lowest grade

3. If you want to attempt another submission, select Start attempt 2 (and so on). You will then submit your Test in the same way as before.
Viewing your submission
You may see the option to 'View Submission' in the Details & Information panel (this appears when you have the Test open). Click View Submission to see the answers/work you submitted for each of your attempts. Note: depending on the settings your tutor has used for the Test, you may not be able to view your submissions until after your work is graded.
Submit Group Tests
Your tutor can create a Group Test where you will collaborate with other students and submit work that you all contribute to.
Your tutor may assign you to a Group or ask you to join a Group so that you can contribute to a Group Test.
Group Tests where the tutor assigns members
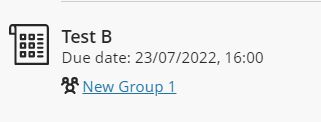
In the Module Content area, if a Blackboard Test is a Group assessment, you'll see your group name listed under the Test name. Group member names appear at the bottom of the Details & Information panel when you open an Test.
Group Tests where you join a Group to participate.
In the Module Content area, if you see a 'Join a group to participate' link under the Test name, select the link to choose a Group.
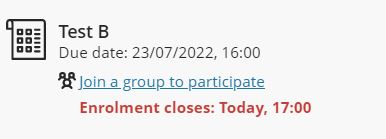
Clicking the link will open the Groups page, where you can join the Group of your choice.
Once you've selected a Group, the name of the Group you have chosen will appear under the Test name in the Module Content area and the Details & Information panel of the Test.
The Test will then also be listed in your Gradebook for the module.
For further guidance on joining a Group, see Groups in Minerva.
Submitting a Group Test
Any of the group members can submit the Test on behalf the group.
- You can view a Group Test without submitting it. When you select View assessment, you can just view the Group Test or add some work.
- If you are not ready to submit, select Save and Close. Your work on behalf of the group is saved and not submitted. Select View assessment to resume working.
- Everyone in the group can keep track of the latest version of the work. Until a member selects Submit, you can open the Group Test as many times as you want.
For guidance on how to submit the Group Test, refer to the relevant guide above, keeping in mind that the Submit button can be clicked by anyone in the Group and that group members should agree on who is going to submit the Test on behalf of the Group.
- Submit a Non-Timed Test where you have 1 attempt
- Submit a Non-Timed Test where you are allowed multiple attempts
Group Tests cannot be timed, but can have a due date and time.
Additional guidance for Tests
Viewing files that have been included in a Test
Your instructor may attach files that you need to read or use to complete a Test. Your tutor decides if you can:
- view the file
- download it
- view and download it
If your tutor allows file downloads, you'll see a small Ally icon and a three dots icon to the right of the file name, this will give you the option to download the file.
If you are only allowed to view the file, you'll only see a downward arrow. Click the arrow or file name to open the file and see it within the Test page.

For video and audio files, select the name of the file to open them. You have controls for play, pause, and volume control. For video files, you can view the video in full screen.
Images are shown directly within the Test page.
Want to decide where your downloads are saved?
For most browsers, you can select where the files that you download are saved.
For example, in Chrome, navigate to Settings > Advanced > Downloads. You can select the location for file downloads and choose if you want the browser to ask each time. In Safari, you have the same capabilities. Navigate to Preferences > General > File download location.
How to check your word count
If you are typing in the text editor (usually for essay questions and for free-form responses), the word count appears below the text editor. After you save, the word count no longer appears.
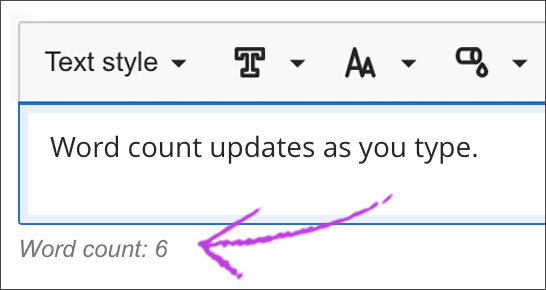
These items are included in the word count:
- Individual words
- Web links
- Text in bulleted or numbered lists, but the bullets or numbers themselves aren't included
- Superscript and subscript text not part of another word
These items and formatting elements don't affect the word count:
- Images, videos, and file attachments
- Math formulas
- Blank spaces and lines
- Alternative text
Confirmation/receipt of submission
Once you have submitted your work, you should see a 'Your submission was successful' pop-up message. This will provide you with a confirmation number and the time and date of your submission. It will advise you that you'll receive an email confirmation shortly. Note: during busy times, it can take a few hours for you to receive an email.
You will also have the option to Download a copy of your submission receipt.
Late submissions
Your tutor may allow you to submit a Test late, (late submissions may be subject to penalties).
After the due date has passed and you open a Test, you’re alerted that your submission will be marked late. You can view the alert in the Details & Information panel, and in the Submit confirmation pop-up window. In the Details & Information panel, you can also see if any submissions are or will be late.
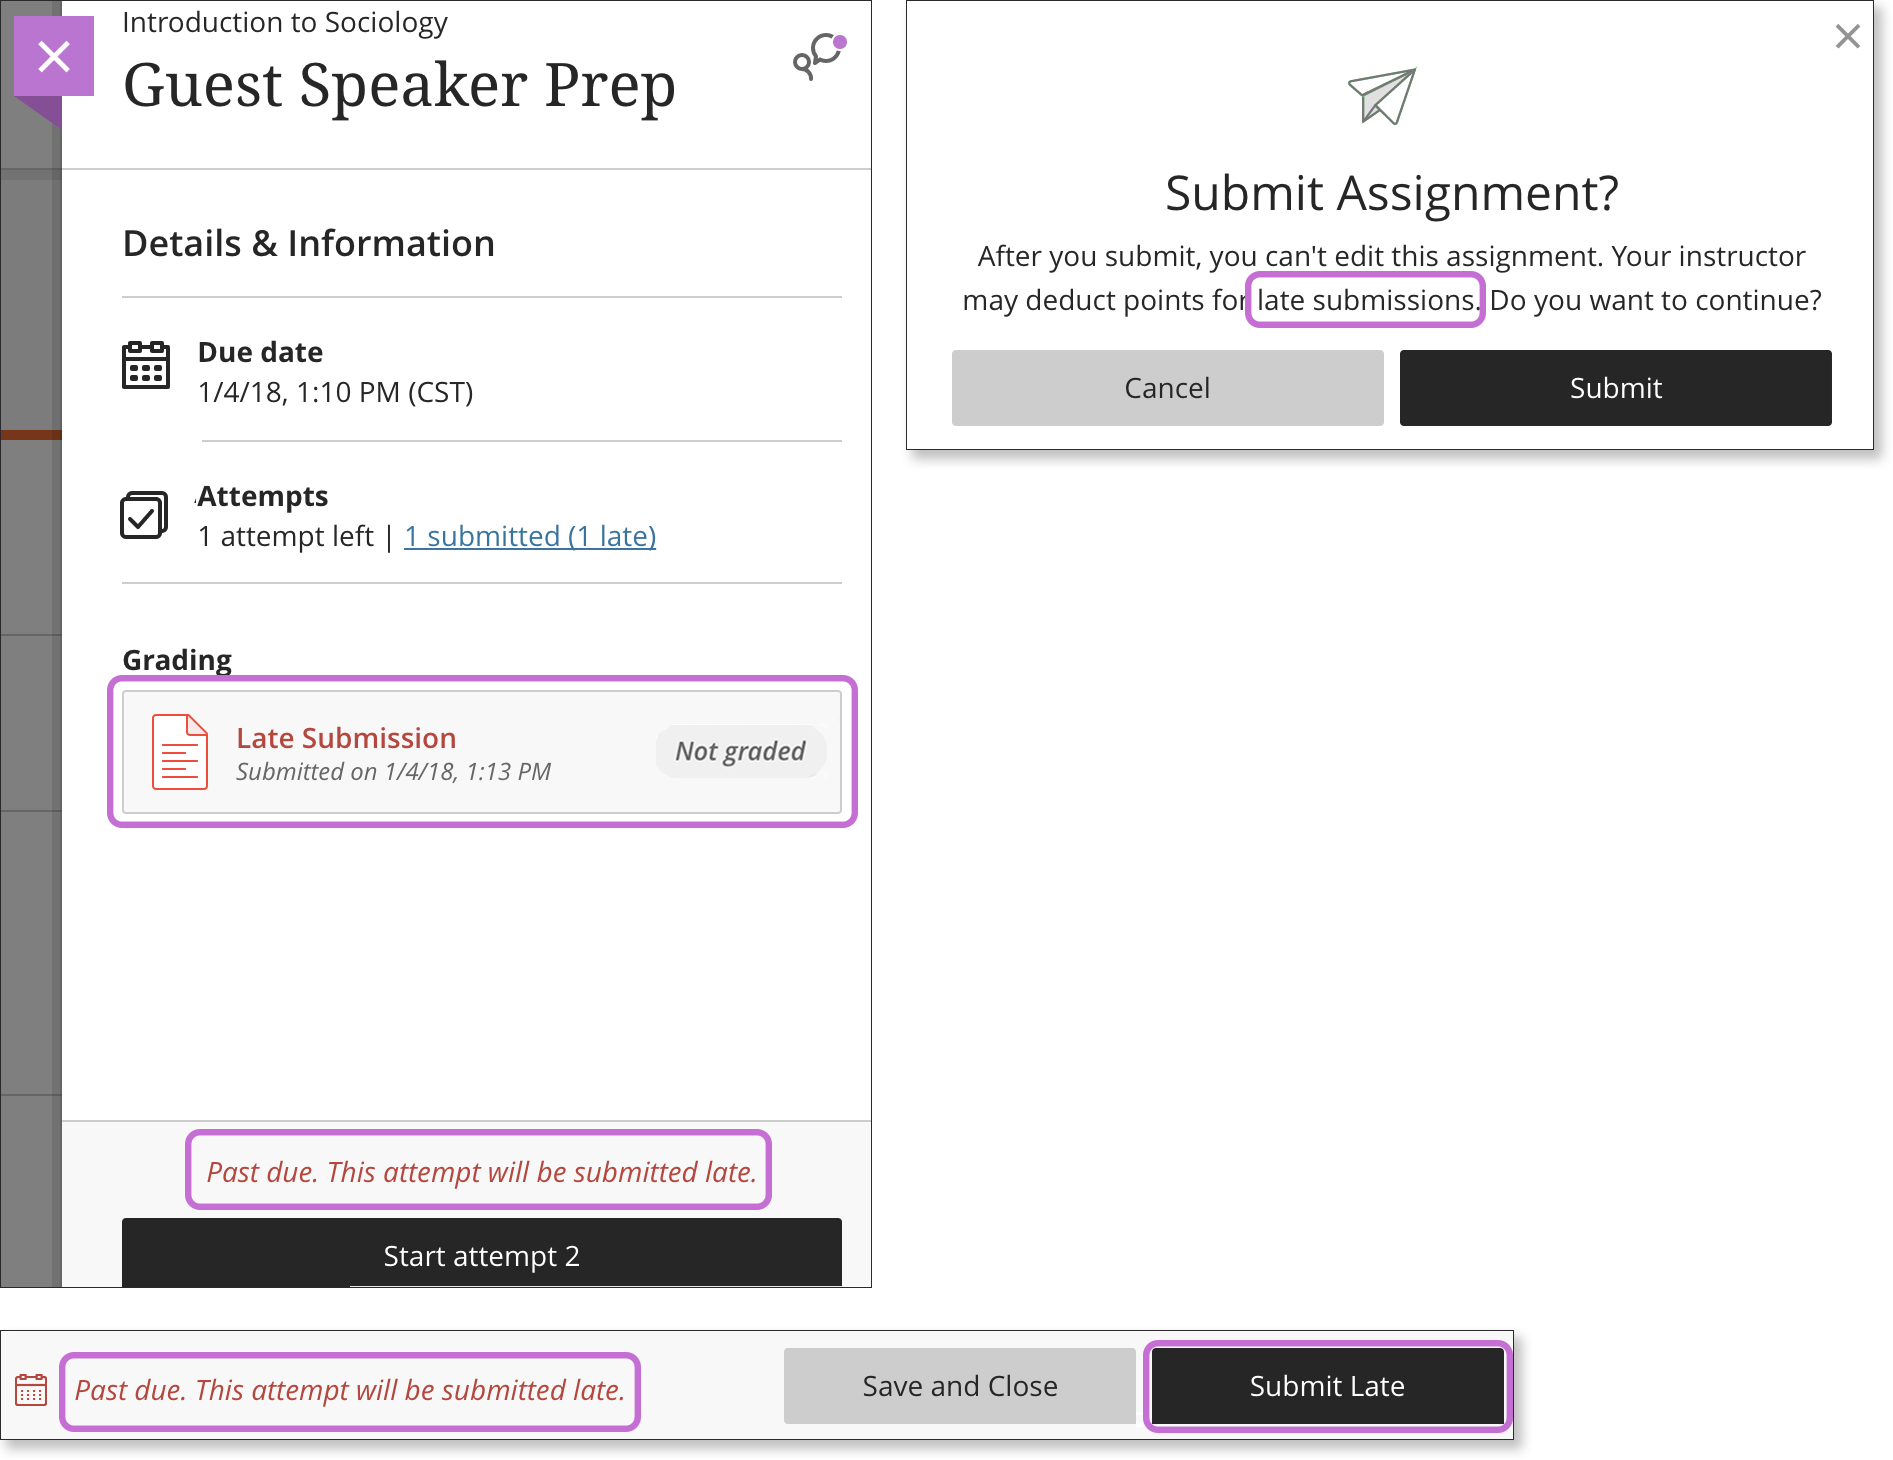
If you are not allowed to submit late, the Details & Information panel will say, 'You can't submit after the due date' This means that you must take and submit the Test before the due date and time, regardless of the number of attempts or time limit you have to submit your work. In-progress and saved attempts will auto-submit at the due date and you will receive a submission receipt via email.
If you need to submit late and are not able to, or are unsure of the penalties for submitting late, you must contact your tutor/school
Can I retake a Test?
Not normally but it depends on the settings your tutor has chosen.
If your tutor has enabled multiple attempts, you should be able to submit again (though the number of times you can do this will vary). See the guidance above on Submitting Test where you are allowed multiple attempts:
- Submit a Non-Timed Test where you are allowed multiple attempts
- Submit a Timed Test where you are allowed multiple attempts
If you need to re-take the Test and are not able to, you must contact your tutor/school.
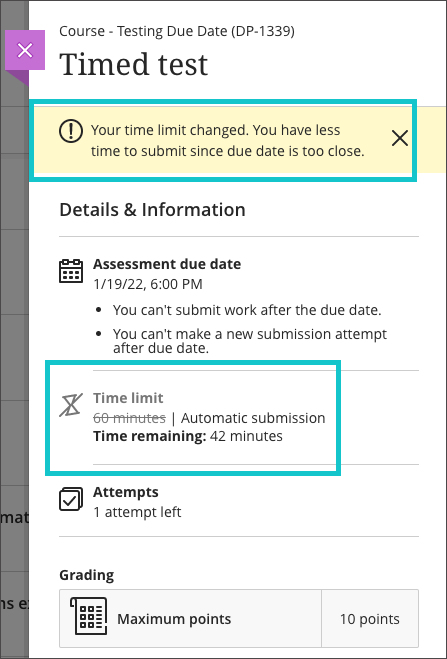
Starting a timed Test that may cause you to finish after the due date
If your tutor has set up the Test so that you cannot submit work after the due date, and you start an attempt too close to the due date, you will see a message in the Details and Information panel that states your time limit has changed.
Once you start the Test, a timer with the new limit appears at the top of your submission attempt (for example, a Test is due at 4pm and is 1 hour long, you start at 3:30pm. This means you will have a 30 minute time limit as that is all the time that remains).
Test is asking for an Access Code
Your tutor may require you to enter a a 6-digit access code before you can view the Test.
If your tutor wants to use the access code feature, they will share the code with you. After you type the code in, you can open the Test. You can use the code to resume a Test you have started and not yet submit.
You won't need the code to view your grades and feedback.
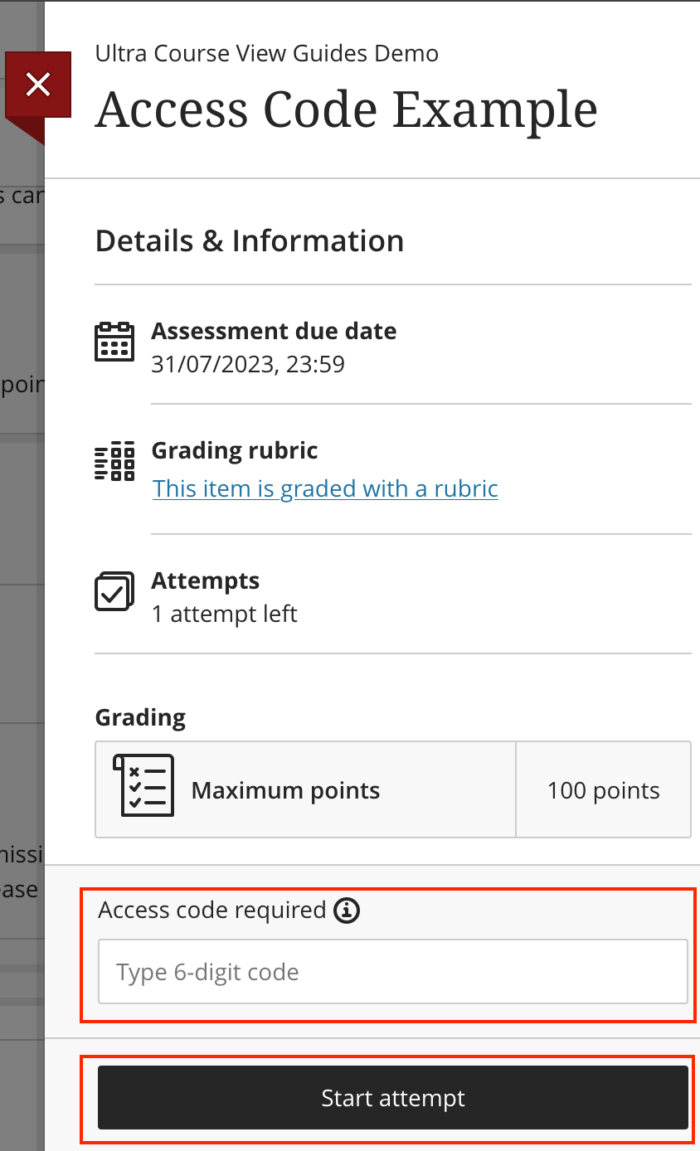
If you are asked to enter an Access code and do not have one, please contact your tutor for help.