Create Minerva Discussions - Staff Guide
Discussions are a good way to encourage students to think critically about their coursework and interact with each others' ideas asynchronously.
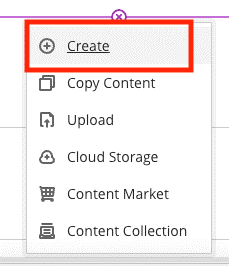
You can create Discussions from the top navigation menu in your module (by clicking Discussions). Alternatively, you can create Discussions directly within module content. To do the latter, select the + icon wherever you want to add content. To add content to folders/learning modules, click on the folders and learning modules to open them. Then look for the + icon to add content within your folder/learning module.
Once you have clicked the + icon, a menu will open. Click Create.
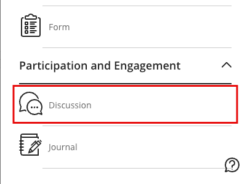
A second menu will open. Select Discussion in the Participation and Engagement section.
The Discussion page will open. A title 'New Discussion' with the current date will be created automatically. Click on this to rename the Discussion. Then use the content editor to make an initial post to start. If you want some ideas for your Discussion, you can use the AI Design Assistant for suggestions. The AI icon is in the top right of the page:

When Discussions are first created, they are hidden from students, you will need to make them available in your module. Click where it says Hidden from students (top right) to change:

Settings for individual Discussions
In the Discussion, you will see a settings cog:
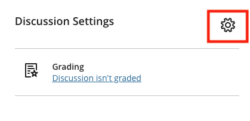
In the settings you can select grading and participation options, allow anonymous responses, assign to groups (if you just want a select number of students to see the Discussion) and make students need to create a post before seeing anyone else's post.
The full options are:
- Display on Module Content Page, this is the default - if this is unselected, students will only be able to see the Discussion through the Discussions Page. You also have the option to create a Discussion in a Folder or Learning Module, so that you can organise them (e.g. by topic or by week).

- Post first - if you select this option, students have to create their own post before they can see anyone else's posts.
- Prevent editing - if selected, students can't edit or delete their posts.
- Allow anonymous responses and replies - if this is selected, students can post anonymously. It is not possible to grade a discussion that has anonymous posts enabled.
- Grade Discussion - if this is selected, the Discussion will be added to the Gradebook. You can set expected participation criteria e.g. number of posts/replies. Set how many posts and replies that students must complete across up to two due dates. Participation criteria do not affect grading workflows but are highlighted to students.
- Additional Tools: Group discussion - use this setting to make a Discussion visible only to certain groups
- Description - you can use the description to make any instructions to students clear.
Follow a discussion
You can select to follow an individual discussion. Do this by clicking on the Follow button:
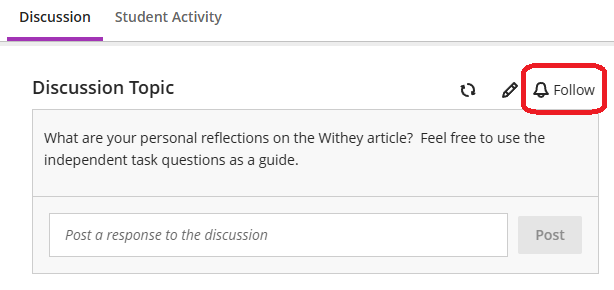
If you follow a discussion, you will receive an email update when there is a new post. If this is not preferred, you can review your notification settings. These are managed in the Activity Stream of Minerva. Read our guide on the Activity Stream to find out more.
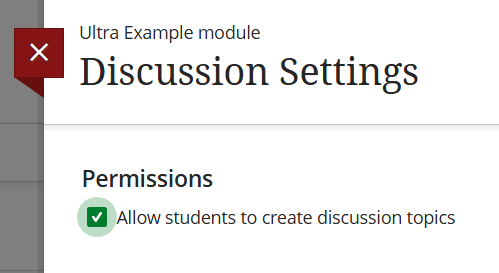
Allow students to create Discussion topics
If you want to allow your students to create topics:
1. Go to the Discussions page.
2. Click on the cog icon in the top right corner. This will open the Module Discussion Settings panel.

3. Check the Allow students to create discussion topics checkbox and click Save.
When your students go to the Discussions page for your module they will see a + icon and can use this to create their own discussion.
Topics created by students will only appear on the Discussions page. They cannot add them to other parts of the module.
Read - Create Discussions
For step-by-step written guidance, see Create Discussions on Blackboard's website.
Watch - Create Discussions
Learn how you can easily create and manage a discussion (2:36 minutes).