
Creating a Blackboard Assignment - Staff Guide
These instructions are for a summative assessment where students upload their work outside of exam (invigilated) conditions. These instructions should also be used for formative assessments. If students will not upload their work, see the Blackboard Offline Assignment guide.
Wherever possible, one submission area should be used. Bear in mind that where anonymous marking is used, all grades/feedback have to be released at the same time. It is not possible to keep anonymous marking on when releasing grades if all submissions have not been marked.
If it is not possible to mark late submissions to meet the timescales required for returning grades/feedback for the on-time submissions, you will need to use two submission areas.
In this guide:
- How to set up one submission area (on time and late submissions marked together)
- How to set up two submission areas (one for on time and one for late)
- Using Conditional Availability to restrict access to submission areas (this can be useful to restrict the times students see the submission area)
Setting up one submission area
In this scenario, all students submit to the same submission area, whether on-time or late. Marking will need to be completed to meet the timescales required for returning grades/feedback for on-time submissions.
Step 1 - Create the Blackboard Assignment
- Go to the Minerva module and select the Submit My Work folder to open it. This is where summative assessments should be added. If you are setting up a formative assessment, you may choose to put it elsewhere.
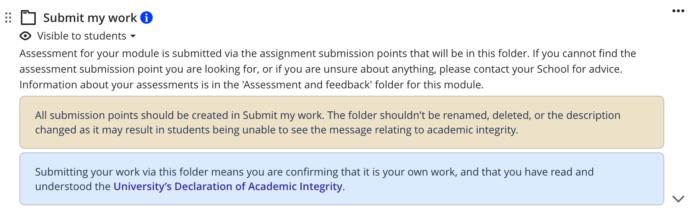
- Once the folder opens, select the + icon under the existing Assessment submission support item (or the bold, purple line which will also appear)
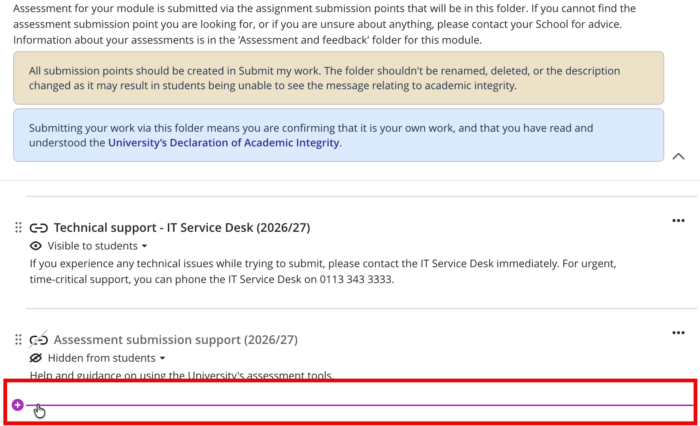
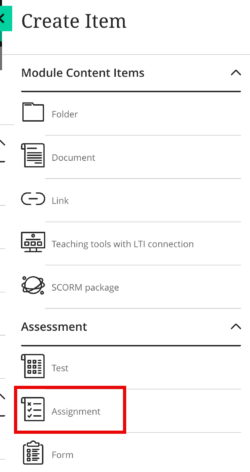
- Select Create to open the Create Item panel, then select Assignment to add a Blackboard Assignment to your module.
- The assignment will be called 'New Assignment' by default. Select the default name text to edit and rename it. Use a consistent format, including key information such as the module code, name of assessment, due dd/mm/yyyy, hh:mm.
Example: SCH0000, Name of Assessment, due 19/03/2026 14:00pm.
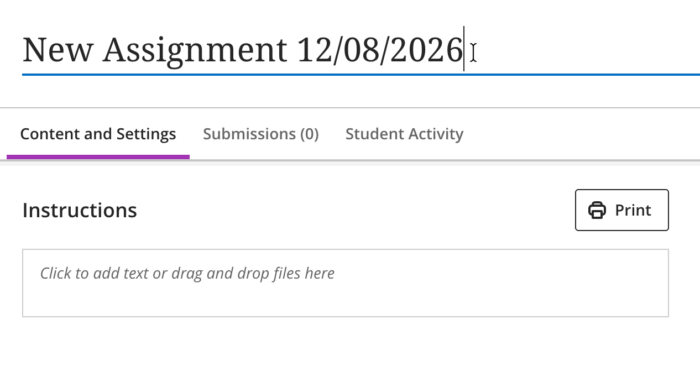
- Enter the instructions for the assessment in the Instructions box and select Save. For video assessment, review the Panopto Video Submission guide for detail on how video assessment is handled and instructions you should provide to students.
Step 2 - Review the Assignment Settings
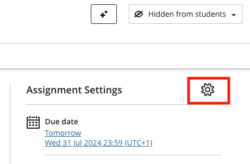
Select the Cog icon to access all settings.
Details & Information
Due date: Add in the due date and time for the assessment. As you are allowing late submissions with one submission area, do not select 'Prohibit late submissions' or 'Prohibit new attempts after due date'.
Class Conversations: Cannot be used if you need to hide student names (mark anonymously). Selecting this option creates a space for students to ask questions about the assessment. This should only be enabled if module teaching staff intend to monitor the conversation and participate.
Submission details
As students are expected to submit work, leave as 'online submissions'.
You can select the format in which the students can submit. If your students need to submit a file, ensure File Upload is selected. If your students need to submit a video assessment via Panopto, ensure Editor (text, video) is selected. One or both options can be selected.
For video assessment, review the Panopto Video Submission guide for detail on how video assessment is handled and instructions you should provide to students.
Formative Tools
For formative assessments, you can select 'Formative assessment' and elect to show this label to students. This should be done consistently across all relevant assessments if used.
Grading & Submissions
Grade category: Categories can be used to filter the Gradebook.
Attempts allowed: If you want students to be able to submit more than once, change this here. You may choose to allow students to submit multiple times so they can submit again in case of errors with their first submission.
Note that in Blackboard Assignment, all attempts are preserved. If you let students submit more than once, you will need to specify which attempt will be graded (typically the last).
Grade using and Maximum points: Enter as required. If you need different settings from the defaults, review the guide on Blackboard Assignment Settings.
Anonymous grading: Select 'Hide student names' if required.
Evaluation options: Select as required.
- 'Two graders per student' facilitates double marking, with a third marker reconciling grades.
- 'Peer review' is used only when students review peers' assignment submissions.
- 'Delegated Grading' can be used to specify that staff only mark certain students.
For a deeper explanation, see our guide on Blackboard Assignment Settings.
Assessment grade: don't select the 'Post grades automatically' option.
Assessment security
An access code is typically only used for supervised exams.
Additional Tools
Time limit: Do not use
Use grading rubric: If marking with rubrics, add the Blackboard rubric here, for more information on creating a rubric within Blackboard, see our guide on Blackboard Rubrics
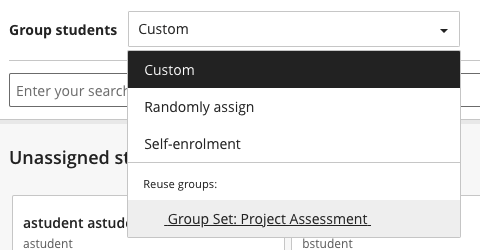
Assign to groups: Use this setting if it is a group assignment, i.e. one submission for a group of students. Groups must be created in Minerva and then Assignments can be assigned to Groups as required. Read our guidance on creating Groups first if you have not already done this.
After selecting Assign to groups, you are prompted to either set up new Groups or reuse existing Groups by selecting from the Group students drop down menu. Existing Group Sets are listed under the Reuse groups section.
Originality Report: Enable Turnitin if you need to generate a Similarity (originality) Report. Note this is not possible for some configurations (Group assignment, peer review, and parallel grading).
To enable Turnitin, you must select Enable Turnitin. A panel will open, then select Enable Turnitin in the panel. Wait for the settings to load, and configure.
Recommended settings are:
- Store student submissions in the default option: Standard paper repository (papers will be stored in Turnitin's database for future similarity searches).
- Leave all options under 'Compare submissions against' selected.
- You may exclude small matches, but do not increase the default setting 'Fewer than 8 words'.
- It is generally not advised to allow students to view the report - leave this setting unchecked.
Then select Save.
Once this is done, you should note that in the settings it now says 'Turnitin enabled'.
Select Save once you have completed your review of the Settings.
Step 3 - Make the Assignment visible to students
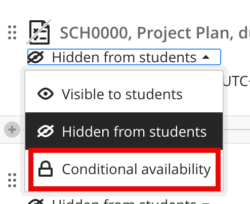
The Assignment will be hidden from students by default. Below the name of the Assignment you will see it is 'Hidden from students'. Select the drop down menu (small arrow) next to 'Hidden from students' to reveal the settings.

Because there are often many submission areas for a module, it is good practice to make the submission area available two weeks before submission.
You can either switch to 'Visible to students' if it needs to be available straight away, or use conditional availability to make it available two weeks before.
Go back to the top of this page
Setting up two submission areas
In this scenario, students submit on-time to the first submission area. Students who are late or have an extension will submit to the second submission area.
First submission area:
- Go through the steps listed above to create the first submission area. The only difference is under Details and Information (Due Date) - select 'Prohibit new attempts after due date' to make sure students don't submit after the due date.
- It is recommended that you do not select 'Prohibit late submissions' as this will automatically submit draft attempts which may not be what the student wishes to do.
Second submission area:
- Use the steps above to create the second submission area - include in the name that this is for late submissions.
- Set the due date as fourteen calendar days after the submission deadline.
- Under Details and Information (Due Date), select 'Prohibit new attempts after due date' to make sure students don't submit after the due date. It is recommended that you do not select 'Prohibit late submissions' as this will submit automatically draft attempts which may not be what the student wishes.
- Use conditional availability to make the second submission area after the deadline.
Go back to the top of this page
Using Conditional Availability to restrict access to submission areas
The Conditional Availability function can be used to restrict access to submission areas. Note that this does not prevent access to posted grades.
For example, you may wish to release a submission area two weeks before the due date to reduce the chances of students submitting to the wrong area.
To do this:
- In the relevant submission point, select the drop down menu (small arrow) next to 'Hidden from students' to reveal the settings, then choose Conditional availability.
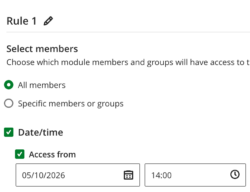
- Tick the Date/time box, and then tick the box for each type of restriction you want to apply, e.g. Access from. Then use the date and time selectors to set the desired dates/times.
- Select Save. Now, when you look at the link to the submission area, you should see the Conditional availability rule below.
Go back to the top of this page
Related Guidance
- Getting Started Blackboard Assignment
- Create an Offline Blackboard Assignment (where students do not submit work)
- Blackboard Assignment Settings Explained
- Exceptions and Accommodations
- Download Blackboard Assignment submissions
- Grading Blackboard Tests or Assignments
- Student Guide: Submit a Blackboard Assignment