Getting Started with Minerva modules - Staff Guide
This guide provides an overview of Minerva modules, highlighting workflows and the look and feel of module areas. Let's take a look at the essentials. For detailed instructions on structuring your module and using the institutional template, please see the Module Template and Top Tips guide.
Layout
There are 4 key areas to your module:
1 - Module Content
This is the area where you add your module information, learning resources and assessments as required for your module.
2 - Navigation bar
Access frequently used tools quickly within your module via the Navigation bar. You can navigate directly to the Minerva calendar for your module, post announcements, take part in discussions, access the Gradebook and send messages to users enrolled on a module.
3 - Details & Actions
This is where you can view module enrolments; create and manage groups; add a module banner image; manage test question banks; enable Microsoft Teams; and add a module schedule.
4 - Module Settings
This is where you can set the module availability.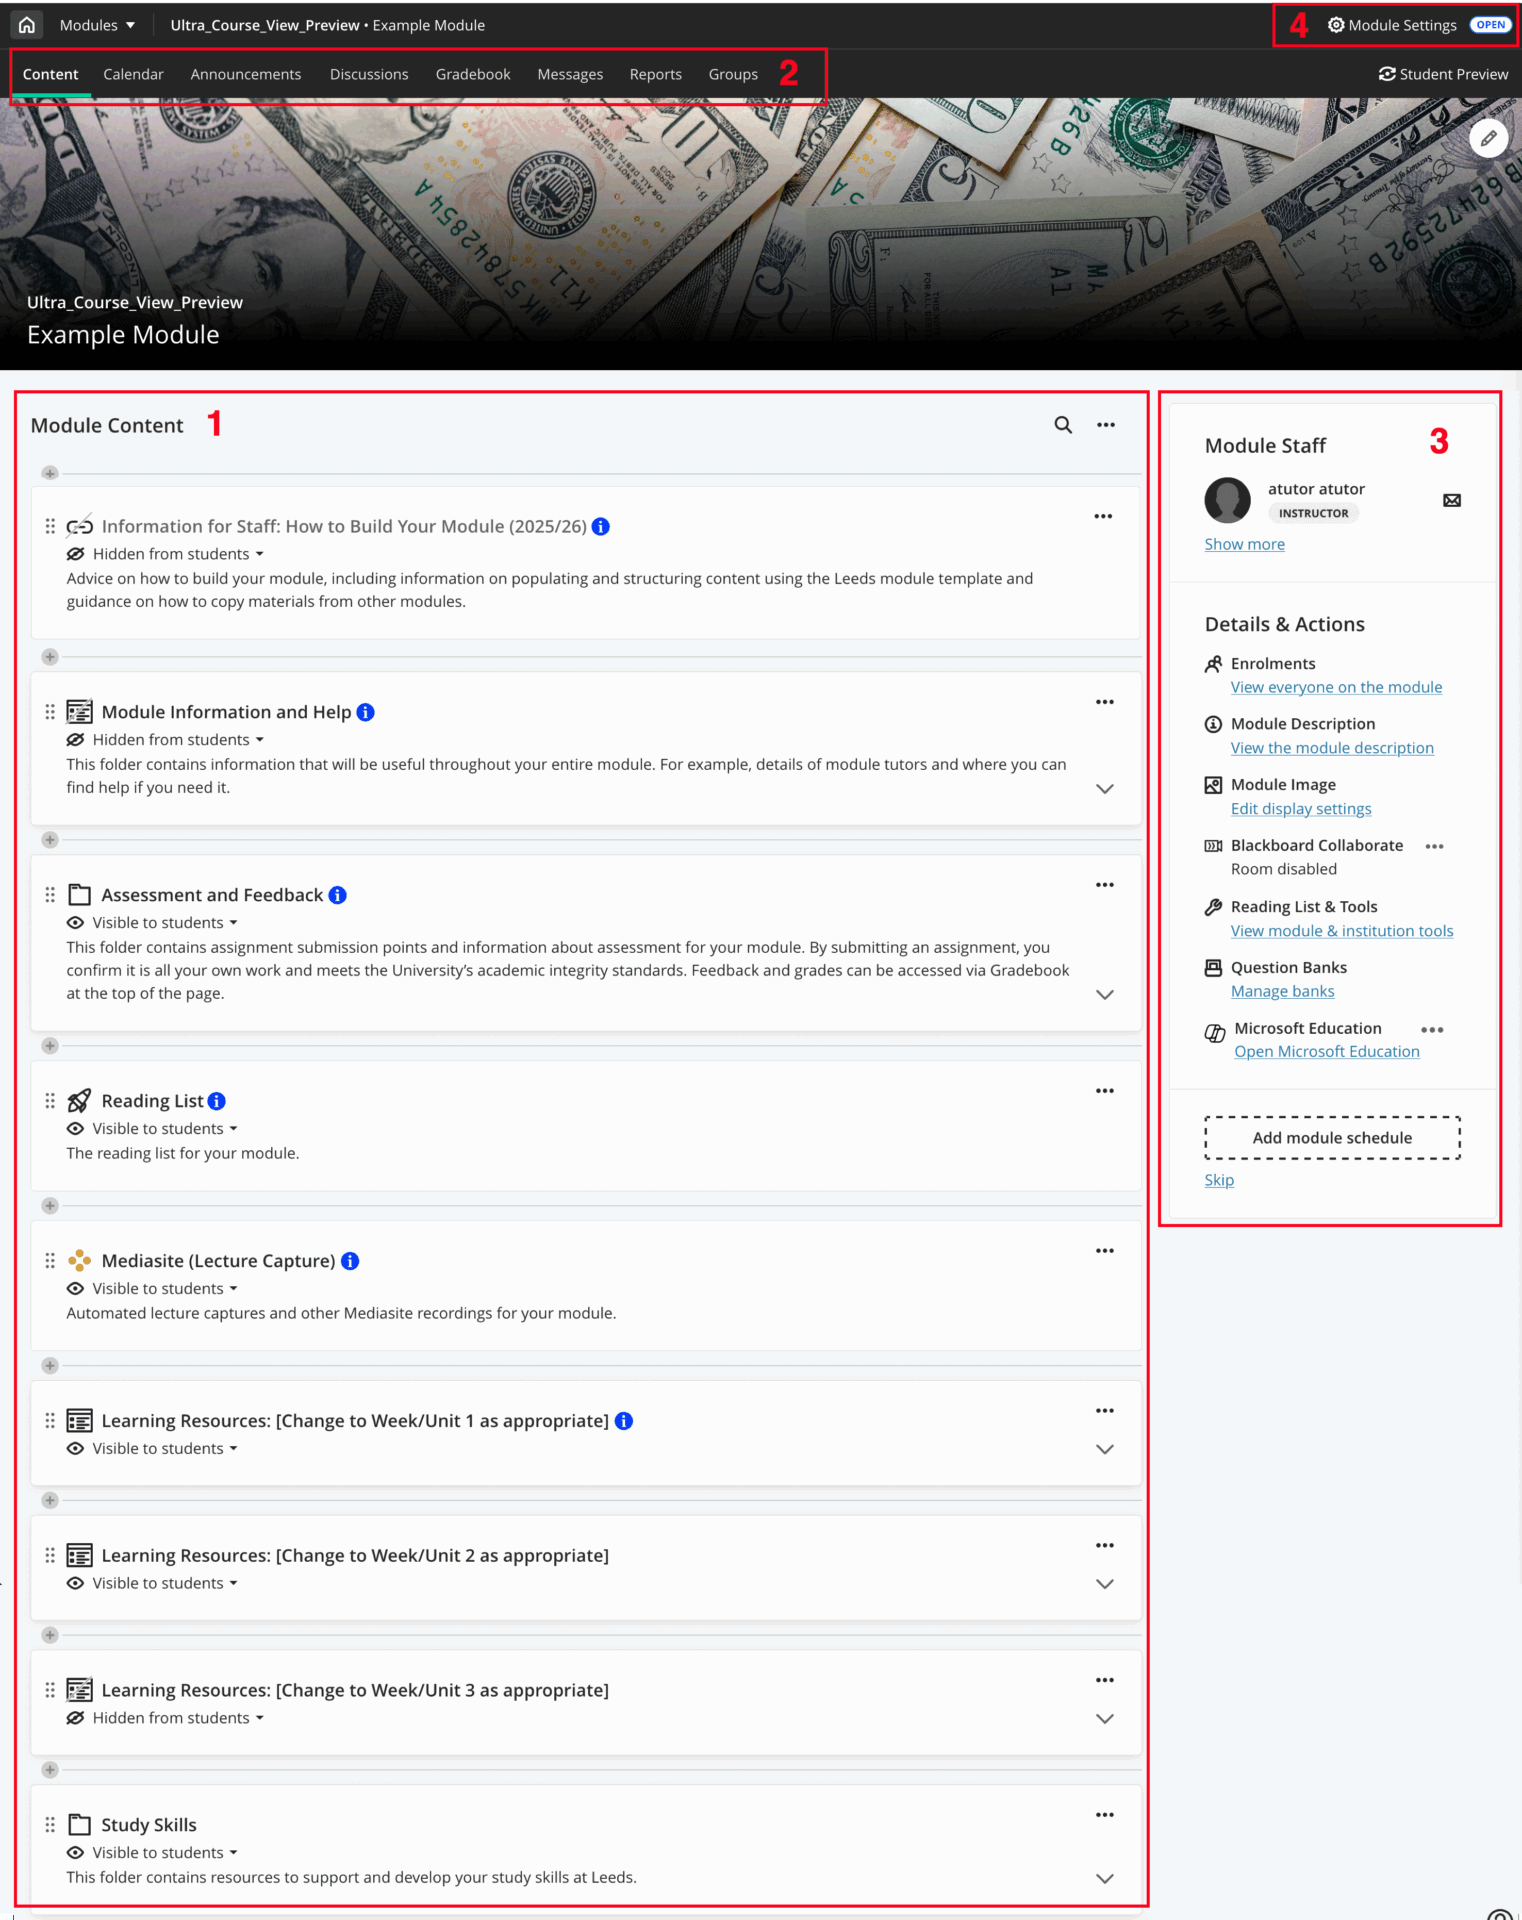
Module structure and creating content
Folders and Learning Modules
Content can be organised within the Module Content area using:
- Folders
- Learning Modules
Both are collapsible containers for content but it is only possible to add learning modules at the top level. Learning Modules allow you to force students to access content in a sequence.
All Minerva module areas are created with the institutional module template. The template is designed to assist staff when structuring module areas and to provide a consistent method of navigation to students across the University.
Two levels
When you build your content, you can create two levels of structure. This means that you can have:
- Module Content >
- Learning Module/Folder [1] >
- Folder [2] then any content added to Folder [2] (but you cannot add another folder within Folder 2).
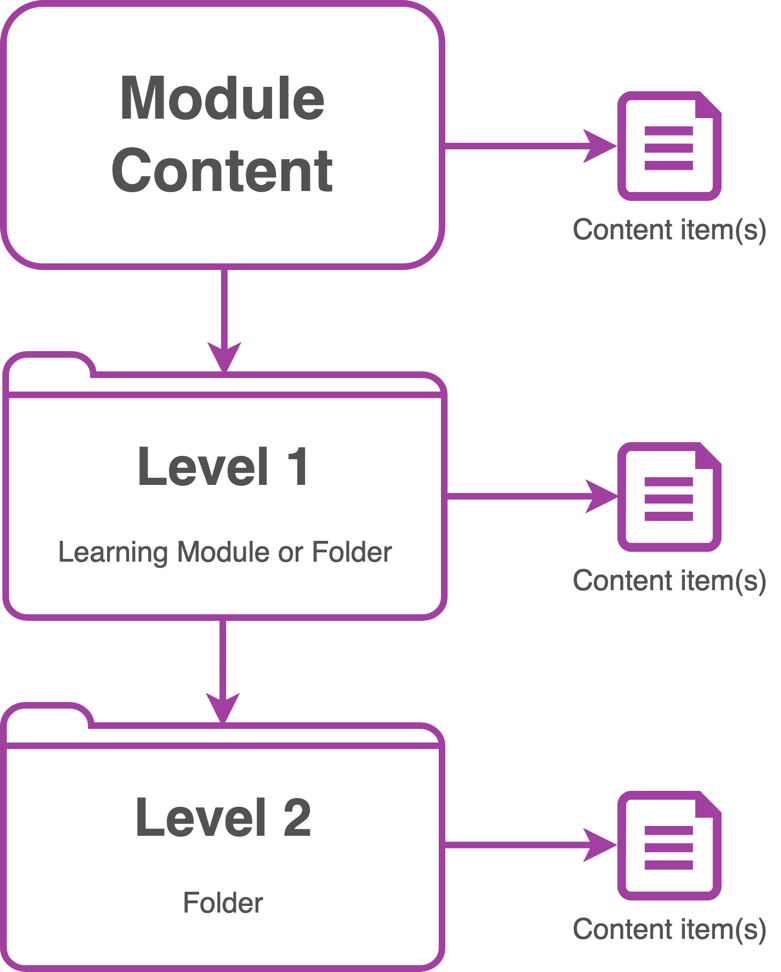
Diagram highlighting 2 levels of structure.
The key icons
![]()
+ icon
Within Module Content, select the + icon wherever you want to add content. You may need to hover beneath content items to make the + icon appear. When you select on the + icon, it will expand to reveal content options so that you can select the type of content you want to add.
To add content to folders/Learning Modules, select on the folders and Learning Modules to open them. Then select the + icon that is displayed on screen to add content to your folder or Learning Module.
![]()
If you need more folders/Learning Modules or another item at the top level, select the + icon where you want to add them.
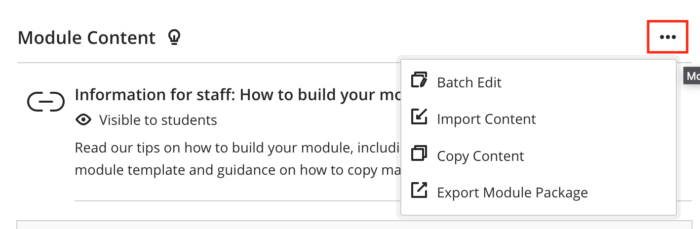
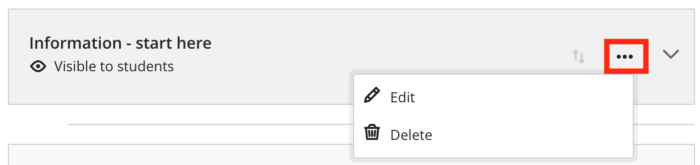
Three dots icon
Selecting the three dots icon will open a pop-up menu with options for editing, deleting, and copying content. The three dots icon is usually found in the top right corner of module content and items.
Cog icon
The cog icon is used to access the settings of a tool or item. Typically, you’ll see this in Blackboard assessment and collaborative items e.g. discussion boards – where, for example, the cog icon will give you grading and display options.
![]()
Copying content
You will add your content to the Module Content area.
For technical reasons, and to ensure that module areas are uncluttered, content will not be automatically copied from the previous instance of a module. Once staff have reviewed their teaching content, they can use straightforward copy functionality to copy individual items or folders from previous modules.
You should only copy individual files, folders, Learning Modules, or other content (such as tests) - do not copy an entire module, as not all content types will copy well. The Copy content in Minerva guide provides a detailed overview of the process and includes key recommendations.
Adding content
When you select the + icon, content options will be displayed underneath for you to select the type of content you want to add:
- Create
- Auto-Generate Modules
- Copy Content
- Upload
- Cloud Storage
- Content Market
- Content Collection

Let's look at each one of the content options in a little more detail:
1. Create - Selecting Create will present you with options to add:
-
- Content items:
- Folder/Learning module (both containers for content).
- Document (this is a blank page you can add different types of content to e.g. text/file uploads/html/embed videos/content knowledge checks). See the Minerva Documents guide for more information on the options available.
- Link (link to an external website, content, Learning Module, or folder in the same module).
- SCORM package. (Please ignore Teaching tools with LTI connection option). See Create Content for more information.
- Content items:
-
- Assessment: Blackboard Test, Assignment, and Form. See Assess and evaluate for more information on these tools.
- Participant and Engagement: Discussion Board and Journal (online diary). See Engage and interact for more information on these tools.
2. Auto-Generate Modules - Use the AI Design Assistant to create Learning Modules.
3. Copy Content - Options to copy content from other modules and within the module. See Copy content in Minerva.
4. Upload - A way to quickly upload files from your computer/mapped drive.
5. Cloud Storage - Map your computer to OneDrive so you can easily upload files from there. See Add files from cloud storage for more information.
6. Content Market - This is the route to our integrated tools e.g. Mediasite, Turnitin, Gradescope, Mobius, Pebblepad etc. Select on the name of the tool you want or the + icon (when it's displayed on screen) to add the tool to your module.
N.B. A link to your Mediasite module catalogue and your module reading list is already added to your module as part of the module template.
7. Content Collection - The Content Collection is the file store of Minerva and automatically stores the files that you add to the module. You can add files to the Content Collection and then link to them here. This is usually done where you have a file in multiple locations, which will require frequent updating – it means you only have to update it in one place.
8. Conversations - A content item not listed in the menu is ‘Conversations’. This is an option you can enable for the following Blackboard content types: Documents, Blackboard Assignments, Tests. Conversations give students the option to discuss the content with staff and students on the module. See Enable Minerva Conversations for more information.
Make content available to Students
As you create content, you’ll notice that it is always unavailable to students by default as you create it. You can change the availability of content either:
- individually as you work, or
- by using the Batch Edit function after you've finished adding multiple items of content.
Changing the availability of individual items/content
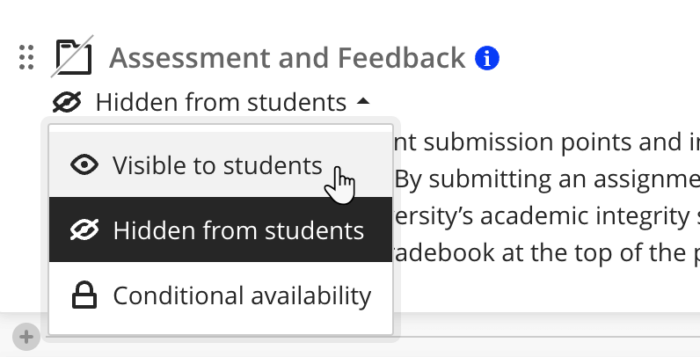
You can change the availability of items/content by selecting Hidden from students, which is usually displayed directly under the item/content name, and selecting either:
- Visible to students or
- Conditional availability - where you will be asked to provide the conditions you want to apply.
Batch Edit to change the availability of multiple items
You can use the Batch Edit function to change the availability of multiple pieces of content/items more quickly (particularly useful if you copy content from last year’s module).
To use Batch Edit, select on the three dots icon … from the top right of the Module Content area and select Batch Edit. For step-by-step guidance, see the Batch Edit to change availability of multiple items guide.
Preview content as a student
Student Preview
Once you’ve built your content, use the Student Preview function to review it. This is useful to:
- Check the content you want students to see is available to them;
- Check any content you don’t want students to see yet is hidden;
- Try out Blackboard Tests and Assignments to understand the student experience and how these attempts and any feedback appear to students.
Enter Student Preview by seelcting the Student Preview icon in the top right. See the Review your content with Student Preview guide for more detailed guidance.

Details & Actions
The right-hand Details & Actions menu is not customisable. It is a route through to useful tools and functions. Let's take a look at each of the links on the menu.
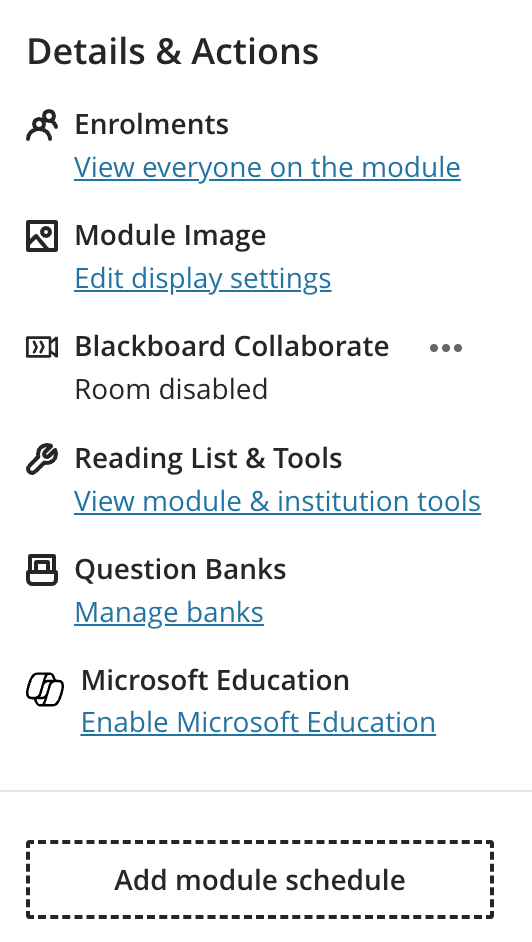
Enrolments
You can view everyone enrolled in a module here. Banner automatically manages student and staff enrolments, so manual enrolment is usually unnecessary. However, if students are auditing or sitting in on the module, they may be added here as needed.
The lead instructor in Banner will be displayed above the Details & Actions Menu with a link to view other instructors on the module. See how students see Module Staff lists in a module, for more information. Staff who are not teaching on the module may wish to change your role in Minerva to Assistant (via Banner).
Module Description
Selecting the module description link will take you, (and your students) to the the module catalogue. See where can I find my module catalogue link for further guidance.
Module image
Add an banner image for a module from here. Make sure you have permission to use the image. We recommend you stick to an image without text as it will be resized on devices and may not work well e.g. can be cropped/too small.
Reading List & Tools
Access the Ally Accessibility report and Reading List tool here. There are also links through to some integrated tools, but it is better to access these via the Module Content area.
Question Banks
Instructors can use question banks to create a database of questions they can reuse in multiple assessments. You can create new question banks or import existing ones to use in your modules. See Blackboard Test for more information.
Microsoft Education
Enable Minerva Class Teams, or create Microsoft Teams Meetings in your module.
Add a module schedule
If you wish you can add a module schedule here, it is not integrated to the University online teaching timetable, though it is possible to do this manually. If you do nothing, students will not see a link - it is your choice.
Navigation bar
You have access to frequently used tools for your module from the Navigation bar at the top of the screen. This can be found just below the module code and name. Let's look at each one in turn:

Content
This is the landing page, and where staff build content and students access content.
Calendar
This is a calendar for your module activities. You and your students will see Blackboard assessment and Turnitin deadlines for the module here. You can also add other items like regular office hours, and if you add a module schedule, this will also be displayed here. It isn’t connected to the University online module timetable - this is flagged to students when they access the calendar. The Global Navigation menu on the left contains the global calendar which displays deadlines and events for all your modules in one place.
Announcements & Discussions
Announcements
Create announcements from here. You can choose to send an email copy of the Announcement to everyone enrolled on the module. Students see announcements in the activity stream and also when they enter the module – new announcements appear as a pop-up when they enter the module. Read our guide on Module Announcements for further information.
Watch - How to create an announcement
Discussions
This gives quick access to the Discussion Tool. See Create Minerva Discussions for more information.
Gradebook
This is where you can manage and grade Blackboard assessments, post grades and student feedback for your module.
Read our guide on accessing the Gradebook for information on how to get started.
Messages
You can send messages to those enrolled on your module (and select the email option as relevant). There is a message notification which appears in the left-hand side black Global Navigation menu on the home page. Staff and students can access messages from there as well. At this time, students cannot reply to messages. Messages are similar to announcements; the key differences are listed in the table below:
| Messages | Announcements |
|---|---|
| Can be sent to one or more students. | Automatically sent to everyone on the module. |
| No expiration date. | Can be scheduled to limit visibility between dates. |
| Can be accessed through Global messages page, and the messages section within a module. | Accessed through Activity Stream and under the Details & Actions menu within a module. |
Reports & Groups
Reports
In this section you can find test question/SCORM analytics.
Groups
Create groupings of students here. See Create and manage groups for more information.
Module Settings
Change the module availability and track student progress.
Module available/unavailable
Switch the availability of your module. All modules are created as unavailable to students by default.
Progress Tracking
This is enabled by default. Progress tracking helps students as they progress through the module, this will flag to them what content they have completed (e.g. a test) and what content they have opened. For most content types, staff also have the option to see what content has been reviewed (see the Progress Tracking guide for further details).
Students viewing your module will also have the option to mark content as complete.
![]()
Student view of Progress Tracking in Minerva Ultra Course View