Using the Minerva module template and top tips for building modules - Staff Guide
The template is designed to improve consistency within module areas across the institution. The use of some template items is compulsory for all modules in order to directly address student concerns about lack of consistency, and to provide clarity to staff about the information required at a minimum within Minerva modules.
Guidance on how to use the template when building and structuring your modules is provided below, including information about which elements are required to be used and/or made available to students, and tips to help you get the most out of Minerva. Local Digital Education Enhancement Teams are also available to provide help and advice to individuals and work with programme teams/schools. Contact them directly for support, and watch out for local and centralised training opportunities and information.
If you are new to Minerva, we strongly recommend you review the Getting Started with Minerva Modules guide before building your module.
In this guide:
- Required actions
- Personalise your module
- How to add content to the template
- Copying materials
- Copying materials from another module
- Copying structure within a module
- Top Tips
- Belonging and its importance at Leeds
Required actions
As part of the Curriculum Redefined Build Phase, the following aspects of the template are required to be used and/or completed for all modules (including those which have been developed through Curriculum Redefined and those which have not). Template items should not be deleted/moved and the item name/description should not be changed:
- Module teaching staff contact details
- School support information, including contact details
- Module accessibility information
- Information about how to provide module feedback
- Module reading list created using the Leeds Reading List tool (where appropriate)
- Link to lecture capture recordings (where appropriate)
- Submission areas added to 'Submit my work'
- All summative assessment information added to the default ‘Assessment and feedback’ folder
- Module assessment overview
In addition, staff are required to:
- Make teaching content available at least 48 hours before lectures/tutorials
- Follow Curriculum Redefined guidance when designing and delivering assessment, including use of a standard assessment brief
Staff are also strongly encouraged to:
- Upload a profile picture
Personalise your module
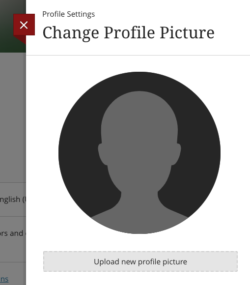
Add a profile picture - Strongly recommended
If at all possible, you should add a profile picture which will display to your students in Minerva Discussions, Journals, Messages, the module staff list, and the list of module enrolments page. This adds a personal touch and makes it easier for students to identify you, helping to reduce anxiety. Profile pictures can also make the module more visually engaging, and in areas like Discussions help to build a sense of community. You only need to do this once and your picture will appear in all of your Minerva modules.
Read our guide on how to add a profile picture for more information.
Add a module image
Module images display at the top of the Module Content page. The image will also display as a module card thumbnail on the Modules page.
- Images must be at least 1200 x 240 pixels.
- Don’t put text in the image as it needs to be suitable for different types of devices e.g. mobile phone. Text may not resize well.
See our guide on how to create a module card thumbnail and banner image for step-by-step guidance.
Add a welcome video using Announcements
Consider adding a welcome video using Announcements. A welcome message can humanise the online experience and can help you build a rapport with students. With Announcements, you can post a text message and/or include a short audio/video recording.
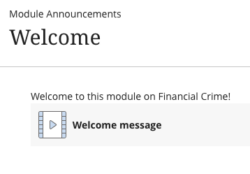
Read our guide on Announcements and our guide on adding recordings to Minerva to find out how to add a message/recording. Contact your Digital Education Enhancement Team for support/local guidance.
How to add content to the template
Read about the items added to your module automatically and how to use them to add content.
Submit my work - required
The 'Submit my work' folder is now at the top of the module in response to student feedback. You will see some notices display under the description. Students see the information about the ‘University’s Declaration of Academic Integrity’.
Create all summative submission areas (e.g. Turnitin/Blackboard assignments) in the 'Submit my work' folder. Do not remove contact information for the IT Service Desk and make the 'Assessment submission support' item available to students if you do not have local guidance.
Folders can be used to create structure if needed. Conditional availability can also be used to restrict the visibility of assessments to specific groups of students, making it easier for students to locate the submission areas that are relevant to them.
To add submission points to 'Submit my work', click on it to open it. Below the default content on support, add submission points using the +icon. Read assessment guides for more information.
| Item | To do | Why? |
|---|---|---|
| Technical support - IT Service Desk (2026/27) | No work is required - leave the link unchanged. | Provides students with contact details for support with any technical issues submitting work. |
| Assessment submission support (2026/27) | This links to student support on how to use supported assessment tools e.g. Turnitin. It can be made available to students alongside school-specific information or instead of school-specific information. | Provides students with support and help relating to assessment submission. |
Module information and help - required
'Module information and help' contains links and content items for key information, to help students start your module confidently and successfully. In order to maintain a consistent experience for students, ensuring that they can find content easily, don't change the name 'Module Information and help' or the names of the template content within it. If you wish, you can change the thumbnail image.
Click on 'Module information and help' to open it and view/edit each template item. Most items will need editing and making available to students. To do this:
- Click on an item to open it. Click Edit Content (top right) to add content to the existing item. A new block of content can be added by clicking the + icon on the left. See our guide on how to edit a Minerva document for full step-by-step guidance if you need more assistance.
- Change ‘Hidden from students’ to ‘Visible to students’ when you have finished
| Item | To do | Why? |
|---|---|---|
| Module teaching staff | List key teaching staff here. Include name, email address (or other preferred contact method) and office hours. | Provides students with contact details for teaching staff, helping with orientation. |
| Module structure | Describe the structure of the module here and how it will be delivered. List any computer/software requirements as relevant. | Gives students the knowledge required to prepare successfully for the module. |
| Support for students | For most Schools, this will have been pre-populated with specific contacts. If not, a link to the Student Information Service is provided. Add additional details as required e.g. School support information. | Provides students with contact details so that they can get help. |
| Module accessibility information (new name) | Let students know of any materials in your module which may not be accessible. You'll find guidance on creating a module accessibility statement on the Digital Accessibility website. | All reasonable efforts should be made to ensure that module content is fully accessible. Being digitally accessible means removing barriers that can hinder and exclude people with disabilities. Just like other public sector bodies, the University has needed to meet specific accessibility regulations since 2018. If students are aware that module materials are not fully accessible in advance, they can seek help and the University can support them better. |
| How to give module feedback | Add details of course reps if possible. | Informs students about the mechanisms available to provide feedback. |
| Minerva support website | No work is required - leave the link unchanged. | This link is for students, to help them with using Minerva. |
Reading list - required
This is a link to the Leeds Reading List tool. The link should not be deleted or renamed and should only be hidden from students for modules that do not require reading lists, e.g. dissertation modules.
To do: Use the Reading List tool for your module's reading list
Why?: It is important that staff use the institutional reading list tool so that the Library can ensure that books and journal articles are available, and in appropriate numbers, for use by students, and so that digitised versions of reading list items can be provided by the Online Course Readings Service.
How: Click on the link to open the Leeds Reading List tool. Read the Library reading list guidance if you need assistance.
Panopto (lecture capture) - required
Automated lecture captures and other Panopto recordings made available to your module will be available here automatically. Panopto replaces Mediasite for the 26/27 academic year and going forward. The link should not be deleted or renamed and should only be hidden from students for modules that do not provide lecture capture recordings, e.g. fully online modules.
Assessment and feedback - required
'Assessment and feedback' contains links and some content items. Don’t change the name/description of 'Assessment and Feedback' or the names of the template content to maintain the consistent experience of Minerva for students. When designing assessment, staff should follow the guidance set out by the Assessment Design Framework, including use of assessment briefs and templates. Find out more on the Assessment Matters SharePoint site.
Click on 'Assessment and feedback' to open it. To add content, click on a placeholder to open it, e.g. 'Module assessment overview'. Click Edit Content (top right) to add content to the existing item. A new block of content can be added by clicking the + icon on the left. See our guide on how to edit a Minerva document for full step-by-step guidance if you need more assistance.
| Item | To Do | Why? |
|---|---|---|
| Module assessment overview | Include information on how your module is assessed. For example, include: -Coursework timetable -Feedback mechanisms -Grading criteria/rubrics -Advice on which assessment tools will be used, e.g. Turnitin | Prepare students for assessment at the beginning of the module so that they have a broad understanding of what is expected. |
| Module assessment briefs | Add assessment briefs for the module to this folder. Make the folder visible to students when finished. | Add assessment briefs to this folder so they are easy for students to find. |
| Academic Integrity and generative AI | No work is required - leave the link and content unchanged. | This item must remain in the module to ensure that students are aware of the University's approach to academic integrity and use of generative AI. |
| Faculty/School assessment Information | This item can be used to include Faculty/School assessment information. For most Schools, this will have already been populated. Examples to include: -Link to school SharePoint site or equivalent -Appropriate student facing assessment information -School assessment criteria | Help students understand Faculty/School assessment procedures. |
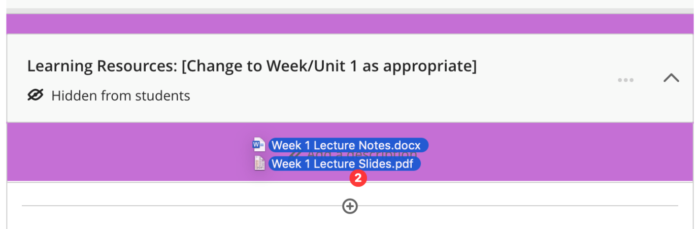
Learning resources
Structure your learning resources under 'Assessment and feedback.'It is strongly recommended that module content be divided into weekly or unit-based chunks. Many schools have added guidance on how to structure learning resources to the template. Teaching content should be made available to students at least 48 hours before lectures/tutorials.
Add as many weekly/unit learning modules as you require, keeping to a consistent naming convention. The naming convention can be changed to fit with the structure of your module(s).
- To edit the name, click the three dots icon (…) to the right of it.
- Select the pencil icon next to the name, edit the text and press enter on your keyboard to confirm the name change.
- You can also add a description to help your students find resources more quickly. This is limited to 250 characters.
- Choose whether to enable Forced sequence so that students must access the content in order.
- Once you’ve finished, select Save.
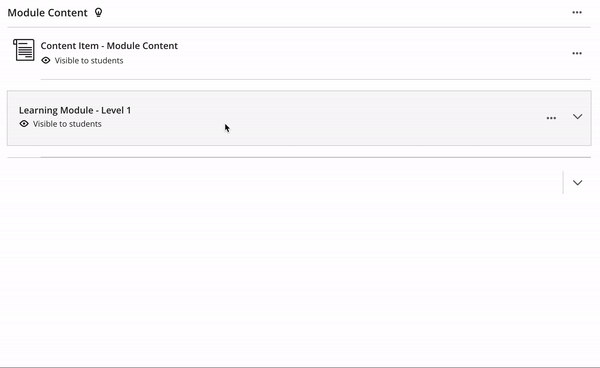
To add content to a learning module, click on it to open it, then use the + icon to add content. It is important to think about how you want to structure your module before adding content. When you build content, you can only create 2 levels of structure.
There are two types of containers for content, folders and learning modules. Learning modules enable students to easily navigate from one item to another, with a reduction in the number of clicks required. Learning modules also have the option to force students to access content in a sequential manner. However, if you prefer, use folders.
Your guide to independent learning
This folder provides access to the University guide to becoming an effective independent learner and a University glossary that brings together common university terms, processes, and phrases that students often say feel unfamiliar or unclear when they first arrive at university.
Use the 'School resources' folder to share school- or module-specific resources and activities with your students that will help them to develop their skills for independent learning in their subject area.
The Learning Development Team works with academic colleagues to design and deliver academic and digital literacies development within your module or degree programme, and can support you with creating bespoke skills development resources that you can embed in your Minerva module area or use in your teaching. Please contact your Learning Advisor if you would like to find out more about the support that is available.
A wide range of resources to support students' development as independent learners is also available on the team's Skills@Library webpages. You are welcome to adapt these materials to suit the needs of your module / programme. All of the Library's online resources are available under the terms of the Creative Commons licence CC-BY-NC-SA.
Copying materials
Copying materials from another module
For technical reasons, and to ensure that module areas are uncluttered, content will not be automatically copied from the previous instance of a module. You can use the copy functionality to copy individual items or folders/learning modules from previous modules.
Do not copy the 'Assessment and feedback' folder or 'Module information and help' learning module from previous modules. This is because they have changed in the 26/27 template. Items from your Learning resources held in folders/learning modules can be copied from previous years.
To understand what does and doesn't copy successfully, read our Copy content in Minerva guide.
Copying structure within modules
If you have a set structure that you wish to use for all your Learning Resources, you can build out the structure and then copy that. To do this, use the same copy functionality as you would to copy materials from another module (detailed in our Copy content in Minerva guide. You will need to search for the module you are in to copy the structure within it.
Structure - 2 levels limit
It is important to think about how you want to structure your module before adding content.
When you build content, you can only create 2 levels of structure e.g.
- Module Content >
- Learning Module/Folder [1] >
- Folder [2] then any content added to Folder [2].
- No further Folders can be added.
Top tips
Here are our top tips on building your module.
1. Drag and drop to upload files
You can quickly add files, or folders of files, to module content/folders/learning modules via drag and drop.
To do this you will need to locate the file(s)/folder (s)* you want to upload, use your mouse to select the file(s) you want to upload, then drag them into the relevant area within the module. Use the Ctrl key (CMD key if using a Mac) to select more than one file.
*When using drag and drop to upload folders of files, this will create a folder in the module containing your files. It is important to note that this can't exceed 2 levels of structure. If you attempt to add a deeper structure, any folders that exceed the limit of 2 levels will be discarded. For example, if you tried to add a folder with a subfolder to an existing learning module the subfolder would not be added and you would see a notice informing you that 'Some folders were discarded due to the maximum number of subfolders being reached' at the top of the page.
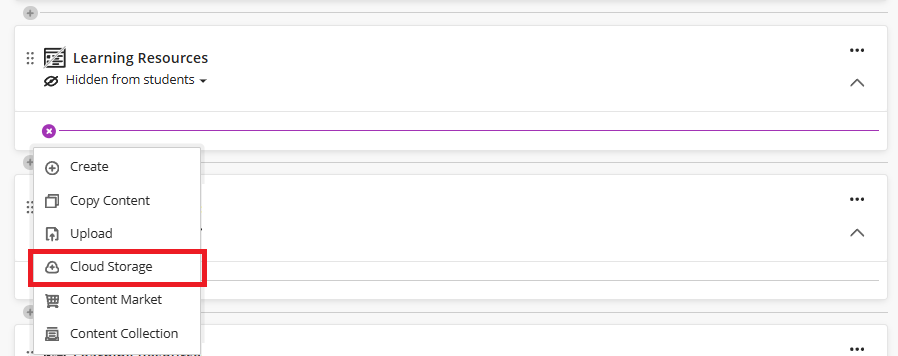
Files can also be added directly from your University of Leeds OneDrive account by selecting the + icon in the relevant area, then clicking Cloud Storage > OneDrive then Connect. You can then add one or more files from your Cloud Storage. You may need to hover beneath content items to make the + icon appear.
2. Create accessible content/files
There are thousands of people in the University of Leeds community with a disability.
When adding content to Minerva modules, make sure the name of the content will make sense to your students. Minerva modules have a content search - if content is named well, it will help students find it. For most content types you can also add a description to help students.
As you add content to your module, review the Ally indicators for tips on how to improve your files to ensure staff and students have the best experience possible. Microsoft's accessibility checker can also be used to review files as you create them.
3. Communicating with students via Minerva modules
There are two key tools which can used to communication with students on your module:
- Announcements
- Messages
Announcements are seen by everyone on the module (staff and students). Staff can post announcements to the Minerva module which appear as a pop-up when students enter the module. Announcements can be scheduled for a future date. Announcements which are posted immediately, can also be emailed to module members.
Messages is a Minerva tool for sending communications to module members; only staff can send Messages and students cannot reply. Messages can be sent to all module members, all instructors, all students, groups or individuals as required. Messages can be accessed in Minerva, staff also have the option to email a copy of a message to module members.
Find out more by reading our webpages on Minerva module communication tools.
4. Track progress reports
Progress Tracking is enabled in all modules by default. This provides students with an at-a-glance guide of both the content they have reviewed and that which they have yet to engage with. In addition, it provides staff with reports on engagement with their content.
Find out more by reviewing our guide on Progress Tracking.
5. Make use of the Conditional availability function
The 'Conditional availability' function allows you to stipulate rules that must be satisfied before students can access content. These rules can include:
- dates (Access from ... and/or Access until ...)
- group membership
- individuals (ie, specifically selected students)
- grades
This means you can plan ahead i.e. upload materials at the start of the module and, if they shouldn't be available straight away, stipulate the date they should be.
If you have content/assessment which should only be available to a subset of students, this can also be done by using group membership/individual rules.
You can use more than one rule on a piece of content i.e. make content only available to certain students after a certain date.
For more information, read our guide on Conditional availability.
6. Preview content as a student
Before making your module available to students, you can use the Student Preview function to see how it would look to a student.
Click the Student Preview link from the top right of the Navigation bar.

7. Make your module open (available) to students
All modules are created as closed (unavailable) to students by default. Once you’re happy the module is ready for students to access, you can open it. Go to your Minerva module and follow the steps below:
1. The status of the module is displayed by the OPEN/CLOSED button in the top, right-hand corner of the module. Click on this to change the status:
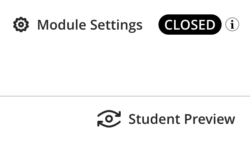
2. The Module Settings page will open. Scroll down to the Module status option.
- Open - To open the module and make it available to students, select the Open radio button.
- Close - To close the module and make it unavailable to students, select the Close radio button.
When you make the change, it will be reflected under the Module Access heading, displaying either OPEN or CLOSED to enrolled students.

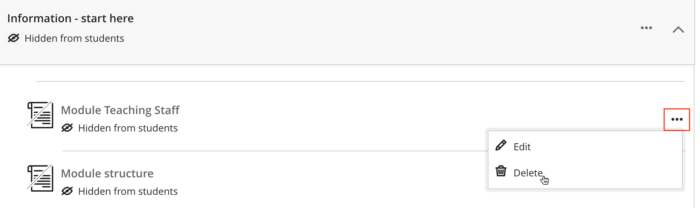
8. Tidy up by deleting or hiding content
You should only delete content if it is something you no longer want to retain. An alternative is to hide the content from students.
Deleting content
In the row for the content you want to delete, select the three dots icon ... located to the right and select Delete.
Hiding content
An alternative is to hide the content from students.
- Select Visible to students or Conditional availability which will be shown below the name of your content/item/Learning Module or folder.
- This will open a drop down menu where you can then select Hidden from students from the dropdown menu.
Belonging and its importance at Leeds
We are on a journey to understanding Belonging and its importance at Leeds; there's a lot we know already. Here are a few things to consider when preparing a module in Minerva:
- Do students co-create reading lists and suggest items they’ve read, perhaps on social media?
- Does your programme or module include some student-led assessment design or choice?
- Where modules involve discussion groups, are students assigned to multiple groups to encourage peer-to-peer connections?
- Does module content represent a range of diverse cultures, heritages, and approaches to knowledge?
Learn more about Belonging at Leeds on OD&PL's website.
You can contact the Learning Design Team for bespoke support when designing future iterations of modules using co-creation principles: [email protected]